Marbles are more than mere toys – they are tiny orbs of endless possibilities capable of bringing joy, creativity, and charm to any project. From DIY home decor to traditional games, using marbles in a myriad of ways is a fun and crafty activity that sparks imagination and skill. In this article, we explore eleven innovative and unexpected ways to incorporate marbles into your daily life, proving that with a little creativity, even the humblest of objects can be transformed into something truly beautiful and unique. So, grab your marbles and get ready to be inspired!
| Activity | Description |
|---|---|
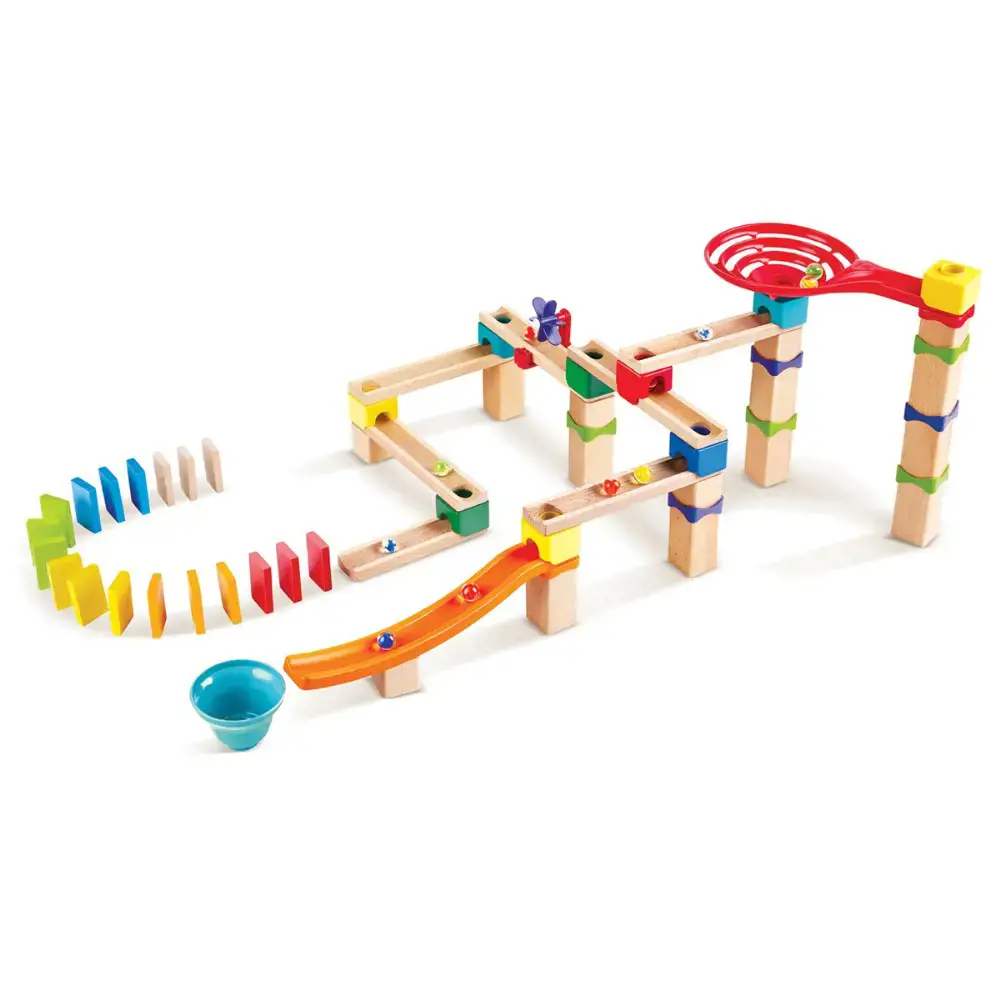
| Marble Run | Build a fun and creative obstacle course for marbles to roll through. Use a variety of materials, such as cardboard, PVC piping, and magnets. |
| Marble Race | Create a track or ramp and challenge friends to race their marbles to the finish line. Add obstacles and twists to make it even more exciting. |
| Marble Painting | Dip marbles in paint and roll them across paper to create unique and colorful designs. |
| Marble Jewelry | Drill holes in marbles and string them to make necklaces, bracelets, and earrings. |
| Marble Maze | Design and build a maze out of cardboard or wood and challenge yourself to navigate a marble through it. |
| Marble Tic Tac Toe | Draw a tic tac toe board and use marbles as game pieces. |
| Marble Magnets | Glue magnets onto the back of marbles to create fun and colorful fridge magnets. |
| Aggravation Board Game | Play the classic game of Aggravation using marbles as game pieces. |
| Marble Bowling | Set up a bowling alley using marbles and a ball, and challenge friends to a game. |
| Marble Sculptures | Use marbles to create sculptures, mosaics, or other artistic designs. |
What You'll Learn
![]()
DIY Marble Coasters
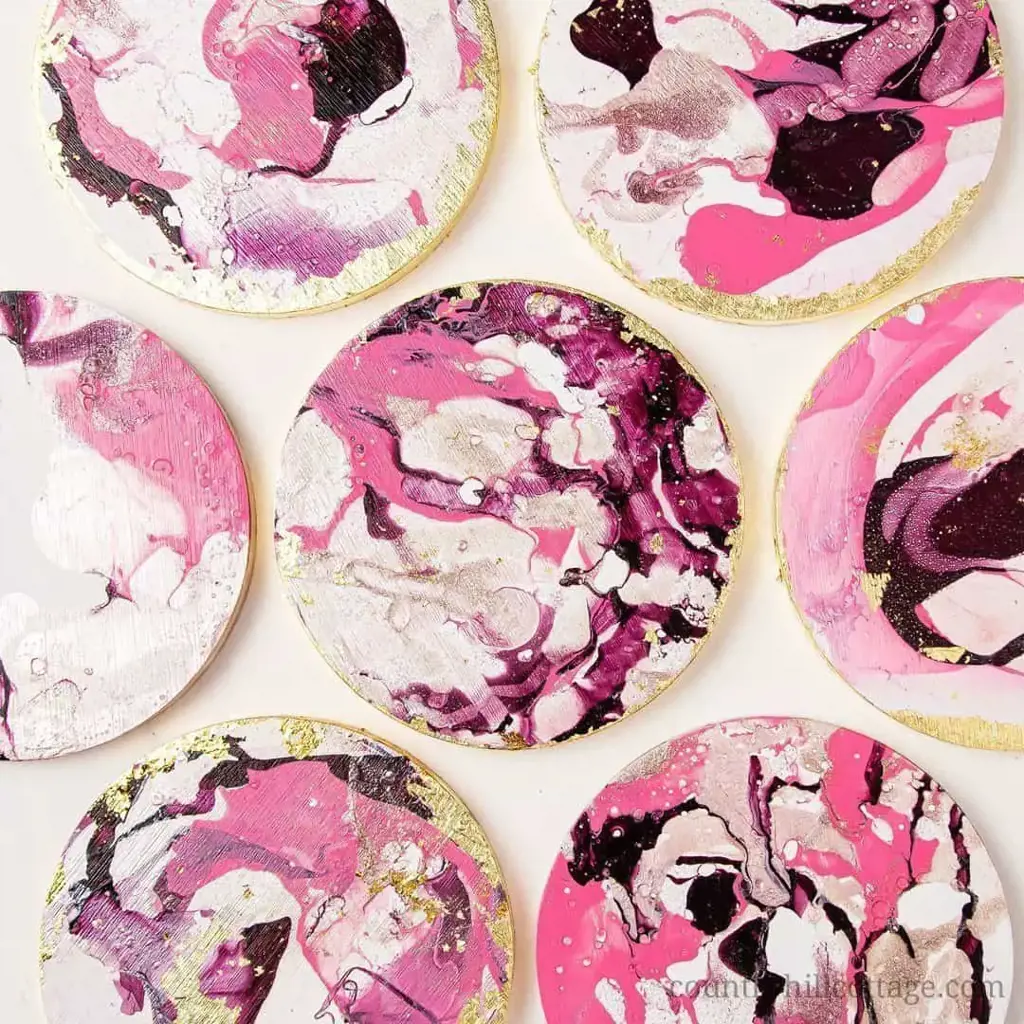
If you love marbles and enjoy DIY projects, then you’ll love making your own marble coasters! Not only are they functional, but they make great conversation pieces when you have company over. Here is a step-by-step guide on how to create your own DIY marble coasters.
Step 1: Gather Your Supplies
To make your own marble coasters, you will need:
- Ceramic or cork coasters
- Marble tiles (you can find these at a hardware store or online)
- Epoxy
- Paintbrush
- Scissors
- Marker
Step 2: Trace and Cut the Marble Tile
Place the ceramic or cork coaster on top of the marble tile and trace around it with a marker. Use your scissors to cut out the square that you’ve traced onto the tile.
Step 3: Apply Epoxy
Following the manufacturer’s instructions, apply epoxy to the back of the marble tile. Be sure to cover it entirely with a thin layer.
Step 4: Adhere the Tile to the Coaster
After the epoxy has been applied, press the tile onto the coaster. Be sure to apply enough pressure so that it adheres securely.
Step 5: Let the Coasters Dry
Allow the coasters to dry for at least 24 hours before using them. Once the epoxy has fully cured, they'll be ready to use!
Tips for Creating Marble Coasters
- Mix and match different colors of marbles to make interesting coasters.
- Use different sizes of marbles to create a unique look.
- If you're using cork coasters instead of ceramic, apply a coat of Mod Podge beforehand to prevent any liquid from soaking through.
- Only use enough epoxy to secure the tiles - too much could cause the tile to slide around on the coaster.
Creating your own marble coasters can be a fun and rewarding DIY project. With just a few supplies, you can make a unique set of coasters that are sure to impress your guests. Not only do they look great, they're functional too - protecting your furniture from the rings left behind by drinks. Give it a try and see what amazing designs you can come up with!
12 Best Things to Do in Saipan for an Unforgettable Vacation
You may want to see also
![]()
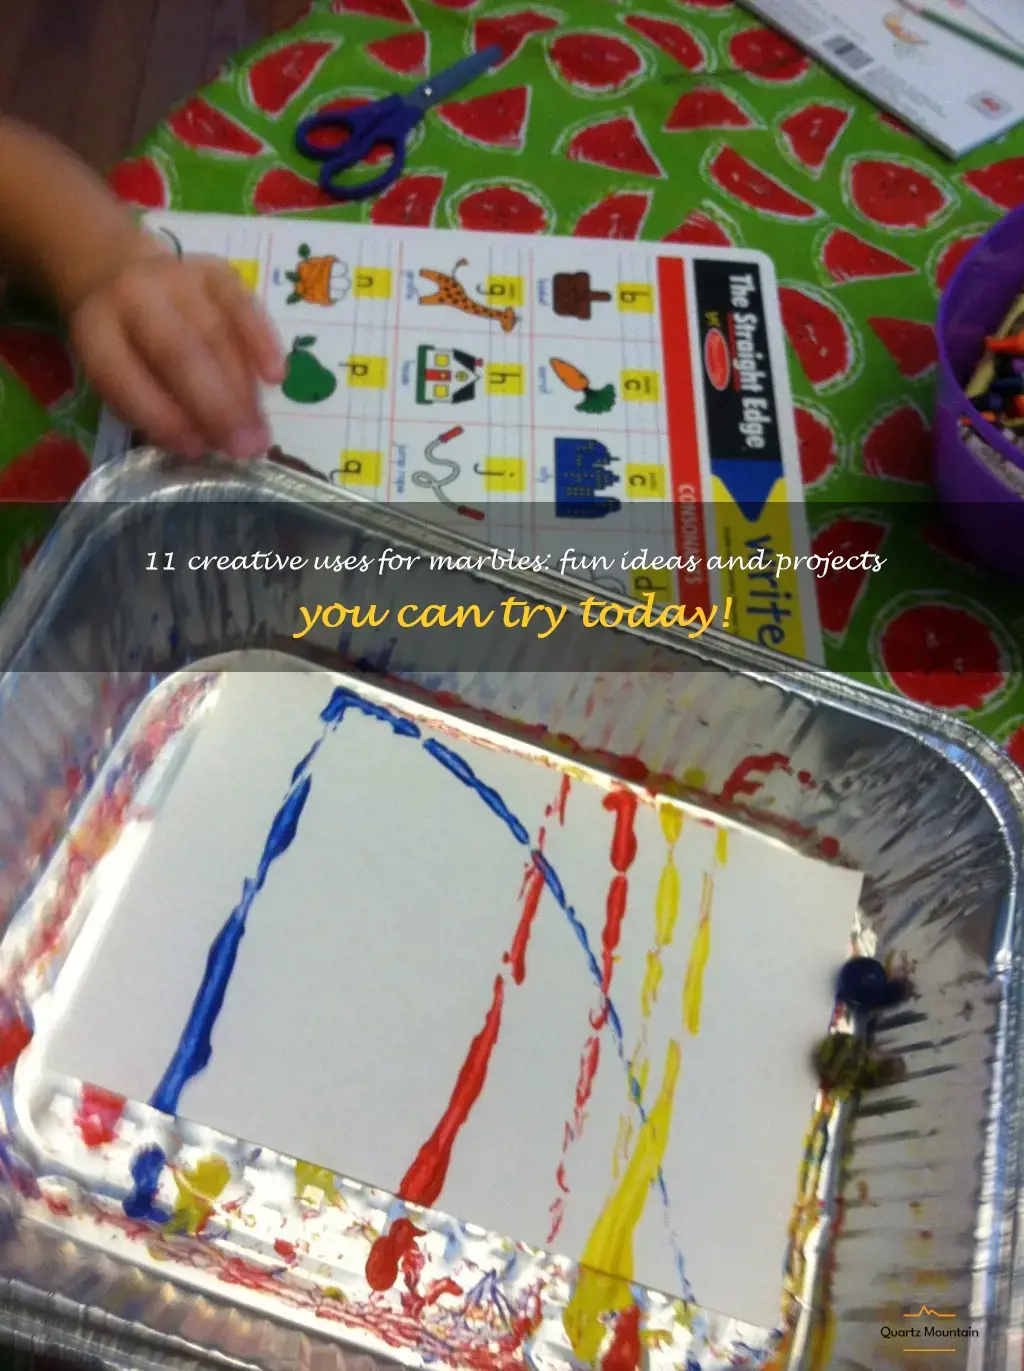
Marble Painting Art Projects
Marbles are a fun and versatile tool for art projects. One creative way to use marbles is to create marble painting art projects. Here are some ideas and techniques to try:
- Marble rolling - This is the simplest way to use marbles for painting. Place a sheet of paper in a shallow box or tray. Dip marbles into paint, and then place them on the paper. Tilt and roll the tray to move the marbles around, creating a unique and colorful design.
- Controlled rolling - This technique requires a bit more precision. Dip marbles into paint, and place them on the paper in a specific pattern or arrangement. Then, tilt and roll the tray to cause the marbles to roll in a controlled way, creating a precise design.
- Stamped patterns - Take a large marble and tie a rubber band around it. Dip it in paint, and then stamp it on paper to create circular patterns. You can also experiment with using different sizes and colors of marbles.
- Shape tracing - This technique involves using marbles to trace specific shapes. Place a piece of paper over a shape stencil, and then roll marbles dipped in paint around the edge of the stencil. The marbles will trace the shape and create a colorful border.
- Spin art - Use a spinning apparatus, such as a record player, to create spin art using marbles. Place a piece of paper on the spinning surface and place marbles dipped in paint on top. Turn on the spinning device and watch the marbles create a unique swirling design on the paper.
Overall, marble painting art projects are a simple and fun way to get creative. Don't be afraid to experiment with different techniques and colors to create your own unique designs.
12 Must-Try Fall Activities in Jacksonville, FL
You may want to see also
![]()
Marble Maze Race Course
If you are a fan of marbles, you probably have more than a handful lying somewhere in your home. From marble runs to games, people are always looking for fun things to do with these colorful little balls. One such idea is creating a maze race course for marbles. It's a simple and enjoyable activity for both children and adults alike.
Materials:
To create this maze race course, you will need some materials. You may be able to find some of these items lying around your home, while others you may need to purchase. The necessary supplies include:
- Cardboard box
- Ruler or measuring tape
- Scissors or craft knife
- Glue or tape
- Marbles
Instructions:
Once you have all of the necessary materials, it's time to start creating the marble maze race course. Follow these easy steps to create your own marble maze:
Step 1: Take a cardboard box and cut out one of the sides with scissors or a craft knife. This will create an open top to the box, which you will use as your maze's playing area.
Step 2: Measure the width of the box and divide it into equal sections. You can use a ruler or measuring tape to ensure accuracy.
Step 3: Using a pen or pencil, draw lines across the cardboard box's width to create your maze's walls. Be creative with your design and feel free to make it as elaborate or straightforward as you like.
Step 4: Cut out the walls of the maze with scissors or a craft knife. For best results, take your time and cut carefully.
Step 5: Once you've finished cutting out the maze's walls, glue or tape them to the box's sides. Make sure they are securely attached and that there is no space between the walls and the box's edges.
Step 6: Place your marbles on the starting point of the maze and let them run through the maze until they reach the finish line.
Tips for Creating an Exciting Maze:
- Add Puzzles: Include some tricky parts of the maze where the marbles must be moved in particular ways to lead them on the right path.
- Use Different Colors: Use different colored marbles to race through the maze. For instance, use yellow marbles for level one, blue marbles for level two, and so on.
- Timing: Determine the time each marble takes to finish the race, and keep track of the record for each level.
- Levels: Create multiple levels of the maze with increasing difficulty to add challenge, excitement, and intrigue for puzzle enthusiasts.
In conclusion, Marble Maze Race Courses are a great project to captivate everyone's attention and to create bonding time among friends and family. It's a creative way to use simple materials and have a whole lot of fun. You can encourage your kids to help with the setup and spend hours of fun doing it together. So go ahead, give it a try, and enjoy the endless possibilities of creating marble mazes.
12 Fun Things to Do in Wellington, New Zealand
You may want to see also
![]()
Marble Run Science Experiments
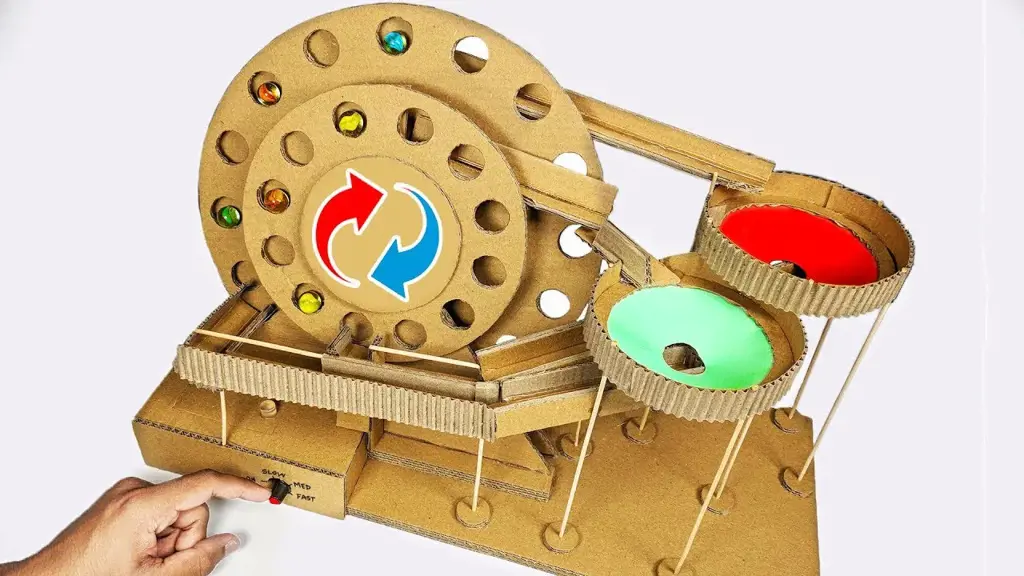
Marbles are a fascinating toy enjoyed by people of all ages. It's incredible how something so small can provide endless entertainment. If you're looking for some cool things to do with marbles, then you should try your hand at some marble run science experiments. Not only will you be able to have fun with marbles, but you'll also learn about science and engineering.
Here are three marble run science experiments that you can try at home.
Marble Run Ramp Experiment:
For this experiment, you'll need a cardboard box, masking tape, scissors, and some marbles. Cut a ramp out of the cardboard box and connect it to the bottom of the box using masking tape. Make sure the ramp is at least 45 degrees. Drop the marbles from the top of the ramp and observe how they travel down the ramp. Record the time it takes for the marbles to travel down the ramp.
Now, try changing the angle of the ramp and see how it affects the time it takes for the marble to travel down. Try different angles and record the time it takes for the marble to slide down the ramp. You can also change the surface of the ramp by using different materials like sandpaper or wax paper.
Marble Run Spiral Experiment:
For this experiment, you'll need a PVC pipe, masking tape, a drill, and some marbles. Drill a hole at the top of the PVC pipe and insert a marble. Use masking tape to cover the hole, so the marbles don't fall out. Then, drill a spiraled hole around the PVC pipe. Make sure the spirals are evenly spaced, and the angle of the spirals is consistent.
Drop the marble at the top of the PVC pipe and observe how it travels through the spiral. Record the time it takes for the marble to travel down the spiral. Now, try changing the spacing between the spirals and see how it affects the time it takes for the marble to travel down.
Marble Run Water Experiment:
For this experiment, you'll need a clear plastic tube, water, and some marbles. Fill a clear plastic tube with water, leaving about an inch of space at the top. Drop the marbles into the tube and observe how they travel through the water. The marbles will look like they're moving in slow motion because of the water's refractive index.
Now, try adding different substances to the water, like salt or sugar, and observe how it affects the marbles' speed. You can also try changing the temperature of the water and see how it affects the marble's movement.
These marble run science experiments are a fun and interactive way to learn about science and engineering. You can also try creating your own marble run using everyday materials like cardboard or PVC pipes. Have fun experimenting and learning about how marbles can be both entertaining and educational.
12 Best Activities in the Peninsula to Add to Your Itinerary
You may want to see also
![]()
Marbleized Nail Art
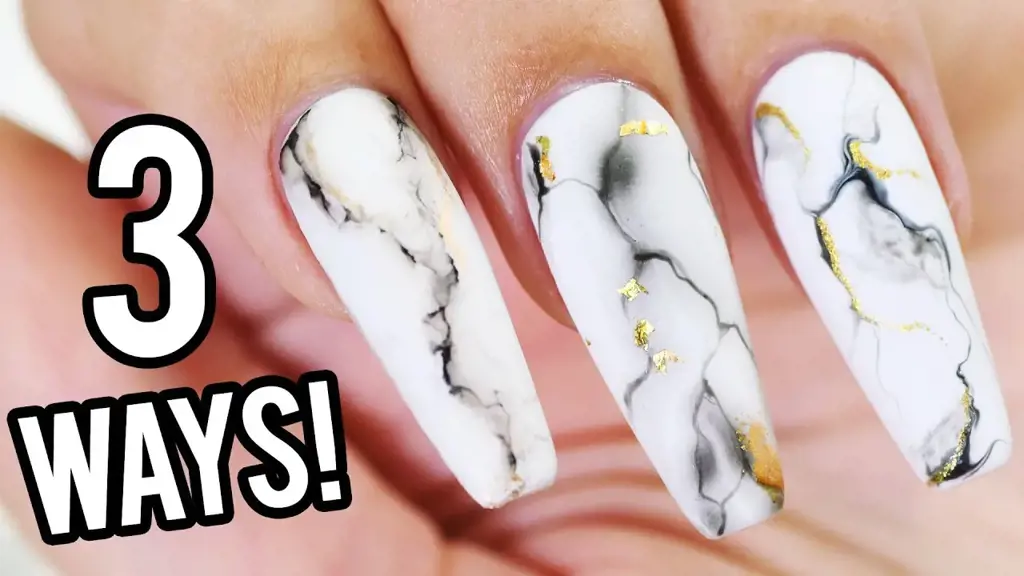
Marbles are small, round glass balls that have always been associated with fun and games. But did you know that these colorful little balls can also be used for other exciting things like nail art? Yes! Marbleized Nail Art is the newest and coolest trend in the world of nail design and it's taking social media by storm. Here's why.
Firstly, what is Marbleized Nail Art? Well, as the name suggests, it involves using marbles to create unique and stunning designs on your nails. This technique is achieved by dipping marbles in different shades of nail polish and then rolling them onto your nails. The result is a beautiful, one-of-a-kind nail pattern that looks like a miniature marble.
Here are some tips and tricks to keep in mind while trying out Marbleized Nail Art:
- Start with a clean and dry surface: Make sure your nails do not have any residue or dirt before starting the design process. This will ensure that your nails look neat and that the design stays put for longer.
- Select the right colors: Depending on the look you want to achieve, select a combination of colors that complement each other. You can go for bold and vibrant shades or soft and subtle tones. The options are endless!
- Use a plastic container: Take a small plastic container and fill it with cold water. Then add a few drops of each nail polish color into the water. Swirl the colors with a toothpick or a straw to create a marble effect.
- Dip and Roll: Take a clean and dry marble and dip it into the polish mixture. Then roll it carefully onto your nails. Repeat the process with different colors and marbles until you achieve the desired pattern.
- Clean up: Once the design is complete, use a small brush or cotton swab to clean up any excess polish around your nails.
Now that you know how to create Marbleized Nail Art, it's time to get creative! You can experiment with different colors, shapes, and patterns to create a unique design on each nail. You can also add glitter, rhinestones or other embellishments to enhance the design further.
In conclusion, Marbleized Nail Art is a cool and easy way to add some style and glam to your nails. With just a few marbles, nail polish, and a little bit of patience, you can achieve a gorgeous and intricate design. So, grab a few marbles and start experimenting today!
12 Fun Things To Do In Texarkana
You may want to see also
![]()
Garden Marble Decorations
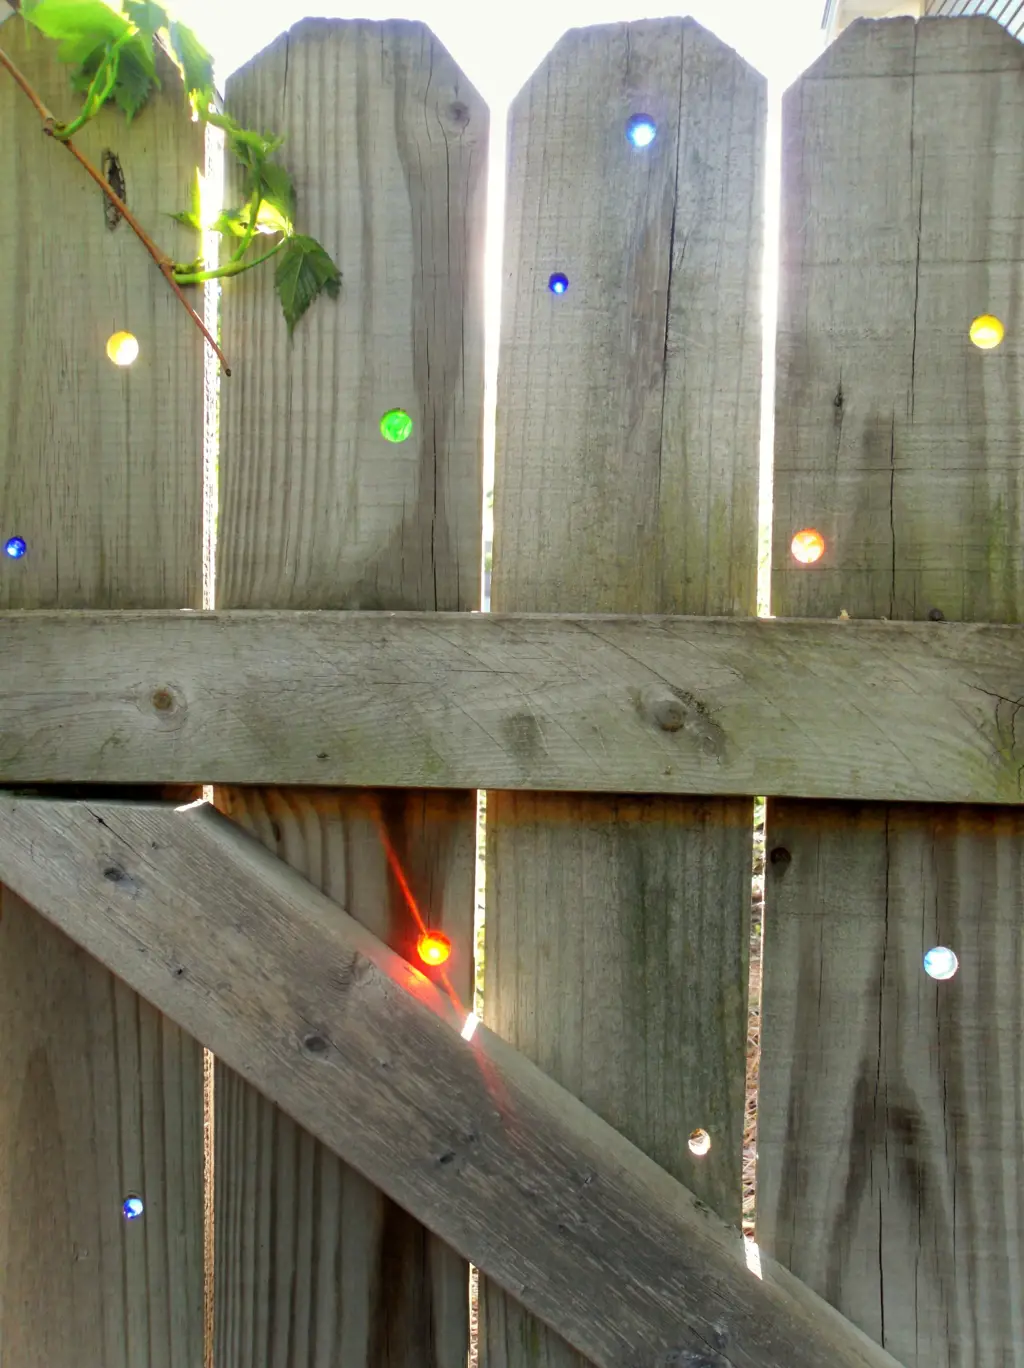
Marbles are not only used for playing games or collecting, but they can also be used as decorative objects in your garden. You can use marbles to create unique and eye-catching garden decorations that will add a touch of whimsy to your outdoor space. Here are some cool things that you can do with marbles to enhance your garden’s decor:
- Marble Garden Edging: Use marbles to create a stunning garden edging. You can place colorful marbles into a trench and fill it with soil to create a border. Simply dig a shallow trench around the perimeter of your garden bed and place the marbles in the trench. The marbles will create a beautiful and colorful border that will make your garden stand out.
- Marble Mosaic Stepping Stones: Create stunning stepping stones for your garden by incorporating marbles into your design. You can use a mold to make concrete stepping stones, then insert marbles into the wet concrete. Once the concrete has set, you will have a unique and colorful stepping stone that will add interest to your garden.
- Marble Fountain: Create a simple marble fountain by stacking marbles in a container or bowl. You can use a large bowl or pot as the base and fill it with water, then place smaller containers or bowls on top of the base. Fill the smaller containers with marbles and allow the water to flow over them. This will create a relaxing and soothing sound and add a cool and refreshing element to your garden.
- Marble Wind Chimes: Create a colorful and unique wind chime using marbles. You can make a simple wind chime by stringing marbles onto fishing line or twine, then hanging them from a stick or branch. As the wind blows, the marbles will clink together creating a musical sound that will add a lovely dimension to your garden.
- Marble Sun Catchers: Create beautiful and colorful sun catchers using marbles. You can string marbles together and hang them in your garden, or create a wire frame and insert marbles into it. Hang these sun catchers in a sunny spot in your garden and let the colors sparkle and shine.
In conclusion, marbles are versatile decorative elements that you can use to create unique and stunning garden decor. From garden edging to wind chimes, there are plenty of ways to use marbles in your outdoor space. So, get creative and add some sparkle and color to your garden with marbles!
12 Fun Things to Do in Portland, Texas
You may want to see also
![]()
Marble Jewelry Making

Marbles are not just fun toys for kids; they can also be used as stunning decor accents and versatile crafting materials. Among the many creative things you can do with marbles, making jewelry is one of the coolest and most rewarding ventures to try. With a few simple tools and materials, you can turn your collection of marbles into unique and stylish pieces of jewelry that you can wear, gift, or sell. In this article, we will guide you on how to make marble jewelry, including some tips and ideas to get you started.
Tools and Materials You Need
First things first, you need to gather the tools and materials you'll be working with. Here's a list of what you'll need:
- Marbles (in various colors and sizes)
- Jewelry wire (in different gauges and colors)
- Jump rings (metal rings used to connect jewelry components)
- Chain (in your desired length and style, such as silver, gold, or leather)
- Lobster clasp (metal fastener used to close the chain)
- Jewelry pliers (round-nose, flat-nose, and wire cutters)
- Super glue or E6000 glue (optional)
Step-by-Step Instructions
Once you have all the supplies, it's time to get creative and turn your marbles into beautiful jewelry pieces. Here are the steps to follow:
- Choose your marbles - Pick out the marbles you'd like to use for your jewelry pieces. They can be different colors, patterns, and sizes, depending on your design.
- Drill a hole in the marbles - Using a small drill bit (preferably 1/16" or smaller), make a hole in the center of each marble. This may require some practice and patience, as marbles are hard and can be tricky to drill without breaking. Use a clamp or vise to hold the marble steady, and go slowly with the drill, applying light pressure. You can also use a rotary tool like a Dremel if you have one.
- Cut the wire - Cut a length of jewelry wire (about 1.5-2 times the length of the marble's diameter) using wire cutters.
- Thread the wire through the hole - Insert one end of the wire through the hole in the marble, leaving about an inch on one side. Bend the wire at a right angle, and twist it around itself to secure it in place.
- Wrap the wire around the marble - Starting at the top of the marble, wrap the wire tightly around it, making sure it covers the entire surface. You can create different shapes and patterns by twisting the wire in different ways. Leave about an inch of wire at the bottom.
- Make a loop - Using round-nose pliers, bend the wire at the bottom into a loop. Make sure the loop is big enough to fit a jump ring through.
- Add the jump ring - Open a jump ring using two pairs of pliers (one pair to hold the ring and the other pair to twist the gap) and slide it through the loop in the wire. Close the jump ring using the same method.
- Attach the chain - Open another jump ring and connect it to the previous one. Then, slide one end of the chain through the jump ring and close it. Repeat the process on the other side of the chain.
- Add the clasp - Finally, attach the lobster clasp to one end of the chain, and a jump ring to the other end. Your marble jewelry piece is now complete!
Tips and Ideas
Here are some tips and ideas to help you make your marble jewelry more unique and interesting:
- Mix and match marbles of different colors and sizes to create a bold and colorful necklace or bracelet.
- Use thicker gauges of wire to create more durable and sturdy jewelry pieces.
- Add beads or charms to the wire along with the marbles to create more intricate designs.
- Dip the marbles in acrylic paints or nail polish to create unique color patterns.
- Glue small rhinestones or crystals onto the wire wrapping for extra sparkle and shine.
- Experiment with different types of chain, such as leather, suede, or ribbon, to give your jewelry a different look and texture.
Making jewelry from marbles is a fun and creative project that can result in stunning and personalized accessories. With the right tools and materials, anyone can create their own marble jewelry pieces that reflect their personality and style. So, start exploring your marbles and see what beautiful jewelry you can create!
10 Fantastic Attractions to Visit in Taylor, MI
You may want to see also
![]()
Marbleized Paper Stationery

Marbles aren't just for playing games. With a little creativity and some simple materials, you can use marbles to make personalized stationery that's both beautiful and unique. Follow these simple steps for marbleizing paper to create one-of-a-kind stationery that's sure to impress.
Materials needed:
- Marbles of different sizes
- Paper (thick enough to resist wrinkling when wet)
- Shallow tray or container large enough to hold your paper
- Paints (acrylic or tempera work best)
- Water
- Toothpicks or skewers
- Newspapers or paper towels
- Gloves (optional)
Step-by-step guide:
- Select your paint colors and squeeze a small amount of each color into the shallow tray. Add some water to each color and mix it with a toothpick or skewer. The amount of water will depend on the intensity of the color you want to achieve. Keep in mind that the more water you use, the more difficult it will be to control the paint when you start to marbleize.
- Start to drop marbles into the tray with the paint. Choose marbles of different sizes to create a variety of patterns. Move the tray around to help the marbles move in the paint and create different patterns.
- When you're happy with the pattern that the marbles have created, carefully place your paper on top of the paint, gently pressing it down. If the paper is too thick, it may not absorb the paint as easily, so you might need to use thinner paper.
- Once your paper is in place, gently lift it off the tray and place it on some newspapers or paper towels to dry. Do not touch the paper while it dries, otherwise, the paint will smudge.
- Once the paper is dry, you can use it to create your own stationery. Cut the paper to the size you want and fold it in half to create a card. You can also use it to create envelopes or line your journals.
Marbleizing paper is a fun and easy activity, and it can be done with kids too. You can experiment with colors and patterns to create your own unique stationery. With a bit of practice, you'll be able to make your own custom stationery that's both beautiful and personalized.
13 Fun Things to Do in Kansas City During November
You may want to see also
![]()
Marble Magnets for Home Decor
Marbles are not just for kids anymore! There are many cool things you can do with these little glass balls, and one of them is to transform them into beautiful marble magnets for home decor. This fun and easy DIY project allows you to create unique and colorful magnets that add a touch of elegance and whimsy to any space.
To get started, you will need some basic materials. Here is a list of what you will need:
- Marbles (you can find them at your local craft store or online)
- Small, flat magnets (also available at craft stores or online)
- Clear glue (such as E6000 or Aleene's Tacky Glue)
- Small paintbrush or toothpick
- Scrapbook paper, fabric or decorative tape (optional)
Now that you have your supplies, it's time to get creative! Here are the steps to make your own marble magnets:
- Clean your marbles thoroughly. Use a cloth or tissue to wipe off any dirt or fingerprints.
- Cut out small circles of scrapbook paper, fabric or decorative tape. These will be the backgrounds for your magnets, so choose patterns and colors that you like.
- Apply a small dab of glue to the flat side of a marble. Use your paintbrush or toothpick to spread the glue evenly.
- Press the marble firmly onto the center of your scrapbook paper circle. Make sure the glue is evenly distributed and there are no air bubbles.
- Repeat steps 3 and 4 for each marble and scrapbook paper circle.
- Let the glue dry completely. This may take a few hours or overnight.
- Once the glue is dry, use your small magnets and glue to attach them to the back of each marble. You can also add a small piece of felt or foam to the back to protect your fridge or other surfaces.
- Allow the glue to dry completely again.
And voila! Your marble magnets are now ready to use. You can stick them on your fridge, file cabinet or other magnetic surface to hold up notes, photos or other small items. The best part of this project is that you can customize your magnets to fit your decor style or color scheme. You can use different types of scrapbook paper, fabric or tape to create a variety of cool designs.
Marble magnets also make great gifts for friends and family. You could make a set of magnets with their favorite colors or patterns. They will love the personal touch and thought that went into the gift.
In conclusion, making marble magnets for home decor is a simple and enjoyable DIY project that anyone can do. It's a great way to add some creativity and fun to your space without breaking the bank. So grab your supplies and start creating your own beautiful and unique magnets today!
14 Fun Things to Do in Hillcrest San Diego
You may want to see also
![]()
Marbleized Easter Eggs
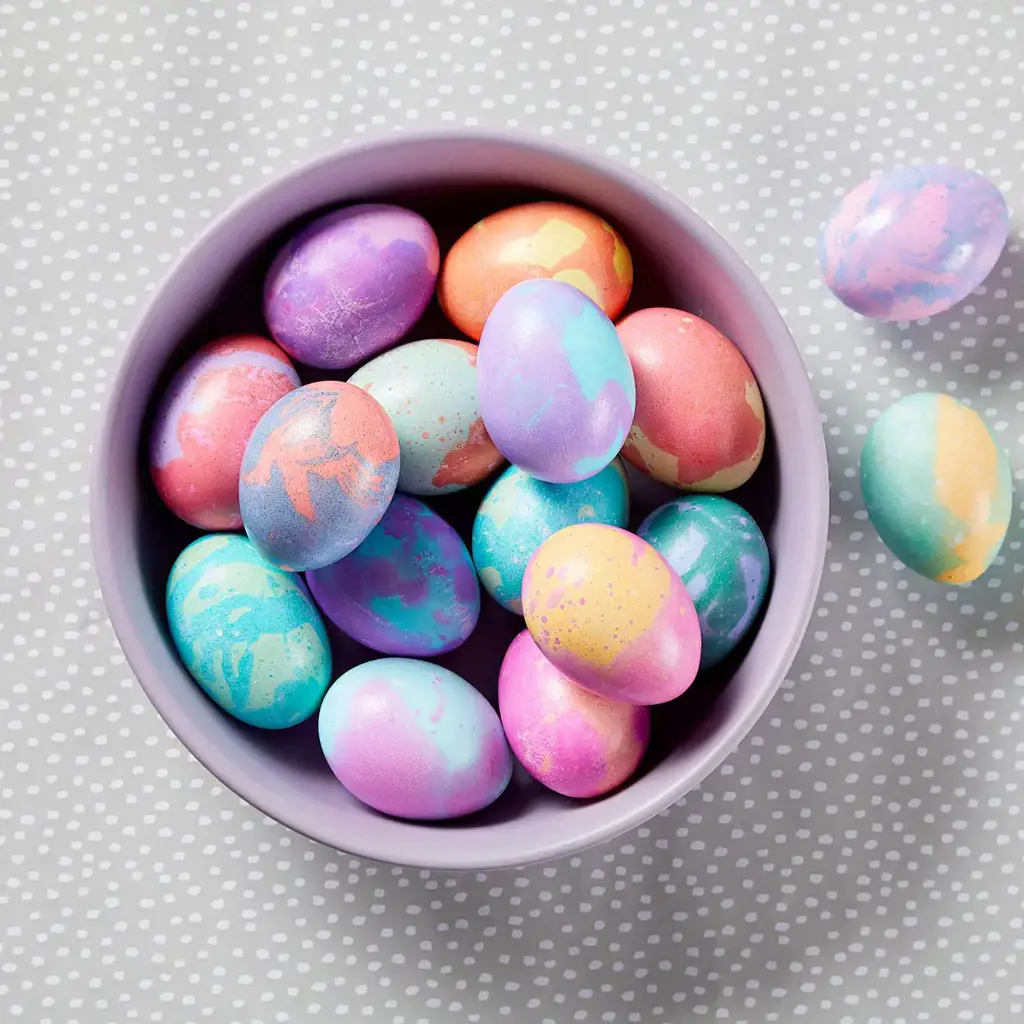
If you're looking for a fun and unique way to decorate Easter eggs this year, try using marbles to create a marbleized effect! This technique is simple, yet produces beautiful and intricate designs that will impress everyone at your Easter gathering. Here's how to do it:
Materials:
- Hard-boiled eggs
- Acrylic paint in various colors
- Paper towels
- A shallow box or container (with lid) slightly larger than your eggs
- An old spoon or tongs
- Marbles in various sizes
Instructions:
- Set up your workspace by laying down paper towels or newspaper to protect your surface.
- Place your desired colors of acrylic paint in the shallow box or container. If the paint is too thick, thin it out with a small amount of water.
- Drop in a few marbles, ensuring they are fully coated in paint.
- Using the spoon or tongs, gently place an egg in the box on top of the marbles.
- Replace the lid on the container and gently shake the box back and forth, rolling the marbles around to create a marbled effect on your egg.
- Carefully remove the egg from the box using the spoon or tongs, and place it on a paper towel to dry.
- Repeat steps 3-6 with different colors of paint and marbles until you have decorated all of your eggs.
- Once the eggs are dry, you can display them in an Easter basket, use them for an Easter egg hunt, or even use them as decorations around the house.
Tips:
- Use a variety of paint colors to create a more dynamic look.
- Experiment with different sizes of marbles to create different patterns.
- Be careful not to let the marbles fall out of the container and make a mess.
- Use a glove or hand-held tongs for easier handling and to prevent getting paint on your hands.
Using marbles to create marbleized Easter eggs is a fun, simple, and unique way to decorate for the holiday. This technique is also a great way to get kids involved in Easter egg decorating, as it is easy and safe for them to do. So this year, try something new and give your Easter eggs a little bit of extra flair with some marbles!
13 Fun Things to Do in Portsmouth, RI
You may want to see also
![]()
Marble Party Favors
Marbles have been a popular toy for centuries, and kids and adults alike have always found them fascinating. But did you know that marbles can be used for more than just playing games? You can also use them to create unique party favors that your guests will love.
Here are a few ideas for creating marble party favors:
Marble magnets
Use small, round magnets and glue them to the back of marbles to create unique magnets. You can use different colored marbles to match your party decor, or try using patterned marbles for a more whimsical look. These magnets are perfect for holding notes, photos, or artwork on your fridge.
Marble necklaces
String a few marbles together to create a colorful and eye-catching necklace. You can use different colors and sizes of marbles to create a fun, layered effect. Finish it off with a simple chain or cord, and your guests will have a one-of-a-kind piece that they can wear again and again.
Marble keychains
Attach a small metal ring to the top of a marble and you've got a unique keychain. You can use paint pens to write guests' names or initials on the marbles, or you can use stickers to create a fun design.
Marble games
Instead of giving your guests individual favors, how about creating a marble game that they can play together at the party? You can create a DIY marble run using cardboard tubes and other materials, or try setting up a game of marbles where guests can compete against each other.
No matter what type of favor you choose, marbles are sure to add a fun and unique twist to your party. With a little creativity, you can turn these small balls into something truly special.
13 Great Things to Do in Canton, TX
You may want to see also
Frequently asked questions
Some popular games are Marble Drop, Ringer, and Follow the Leader. There are also more challenging games like Chinese Checkers and Solitaire.
Marbles can be used to create beautiful mosaic designs for tabletops, backsplashes, and walls. You can also fill glass vases or bowls with marbles to create interesting centerpieces.
Yes, there are many crafts that can be made using marbles. For example, you can make a unique photo frame by gluing marbles around the edge, or create Christmas ornaments by filling clear plastic balls with marbles and adding a ribbon. You can also make jewelry by drilling holes in marbles and stringing them together.


3 Comments
Nevaeh Everett
Connor Rivers
Keaton Matthams