
Looking for a fun way to pass the time or get creative? Look no further than a simple piece of string! String can be a versatile and affordable medium for all sorts of crafts and projects. From stunning wall art to funky jewelry, the possibilities are endless. So grab your spool of string and prepare to be inspired with these 14 cool and creative things to do with string. Get ready to unleash your inner artist and create something truly unique and beautiful!
| # | Activity |
|---|---|
| 1 | Create intricate macrame wall hangings |
| 2 | Make handmade friendship bracelets |
| 3 | Use string to create unique gift wrapping |
| 4 | Create string art by wrapping string around nails on a board |
| 5 | Learn to tie different decorative knots |
| 6 | Play cat's cradle, a hand string game |
| 7 | String together beads to make jewelry |
| 8 | Use string as a tool for sewing and embroidery |
| 9 | Make string dolls by wrapping and tying string around a wooden stick |
| 10 | Practice string figure tricks, like the Jacob's ladder or the Cup and Saucer |
What You'll Learn
- String art: Create intricate designs by wrapping and weaving string around nails on a wooden board
- Friendship bracelets: Make colorful bracelets using various string patterns and techniques
- Cat's cradle: Play the classic hand string game with friends
- DIY dreamcatcher: Use string, beads, and feathers to create a beautiful dreamcatcher to hang by your bed
- String puppets: Make fun puppets by attaching string to different objects and putting on a show
- Macramé plant hangers: Create stylish and bohemian plant hangers using macramé knotting techniques
- String lanterns: Wrap string around balloons and coat them with glue to make unique lanterns
- String garlands: Use colored string to make festive garlands for parties or special occasions
- String painting: Dip string in paint and create unexpected and abstract artwork by dragging it across a canvas
- String bowl: Use string and fabric stiffener to make funky and functional bowls for holding small items
- String sculptures: Mold and shape string into different forms to create abstract sculptures
- String jewelry: Create one-of-a-kind necklaces and bracelets by stringing together beads and charms
- String bookmarks: Make personalized bookmarks by attaching decorative string to a paperclip or cardboard
- String hairstyles: Incorporate colorful string into your hair for a fun and temporary style
![]()
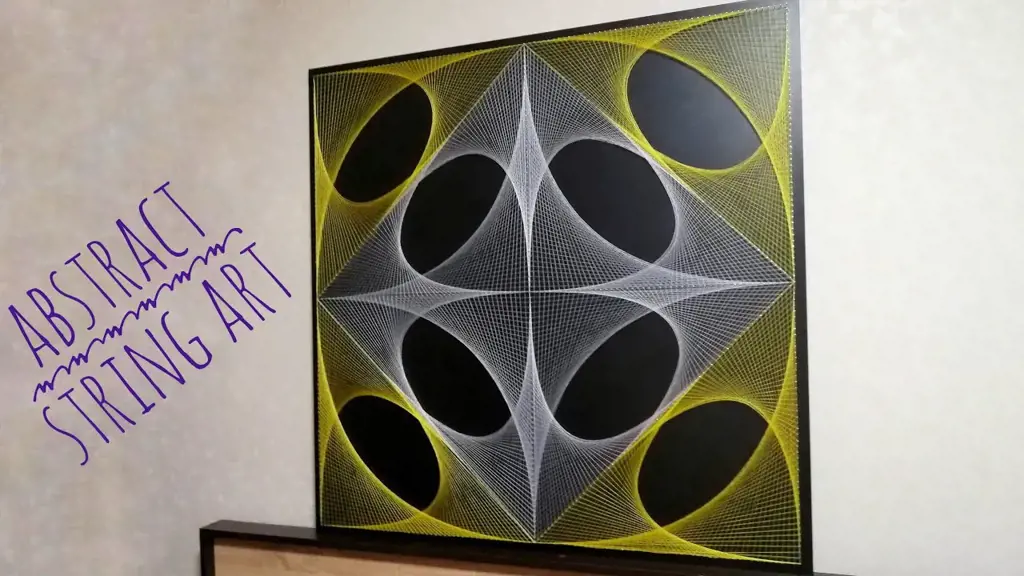
String art: Create intricate designs by wrapping and weaving string around nails on a wooden board
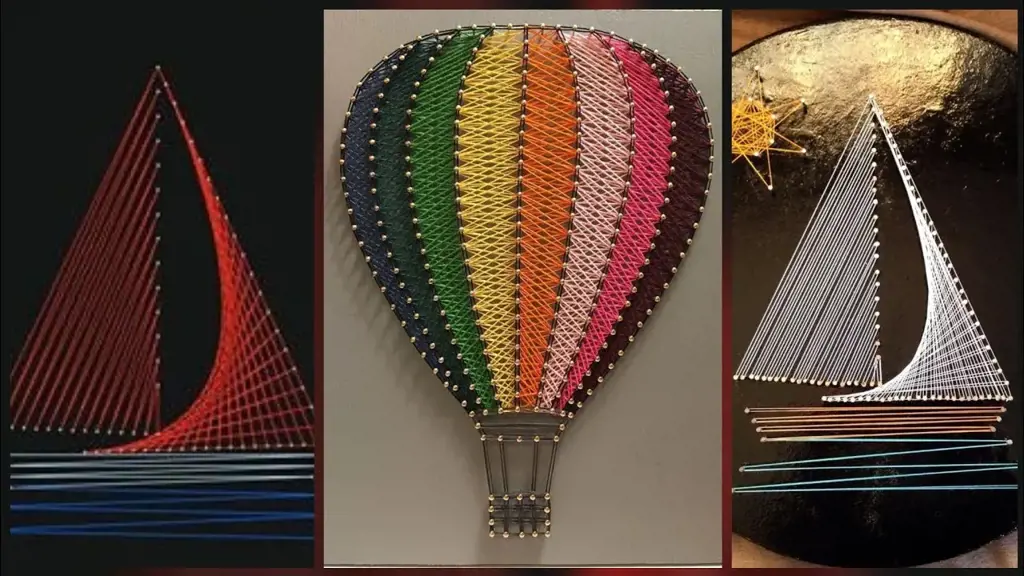
String art is a fun and creative activity that allows you to create intricate designs by wrapping and weaving string around nails on a wooden board. It is a versatile craft that can be done by people of all ages and skill levels. In this article, we will explore the art of string art and provide you with some ideas and inspiration for cool things to do with string.
To get started with string art, you will need a few basic materials. First, you will need a wooden board or canvas as a base. You can choose any size or shape depending on your preference. Next, gather some nails or pins, hammer, and a variety of colorful strings or yarn. You may also want to have a pencil and ruler handy for creating your design.
One of the most popular string art techniques is to create geometric patterns or shapes. Start by drawing your desired design on the wooden board using a pencil. You can create simple shapes like hearts, stars, or arrows, or more complex designs like animals or landscapes. Once you are happy with your design, begin hammering in the nails or pins along the outlines of your drawing. The spacing between nails will depend on the size of your design and the thickness of the string you plan to use.
Once all the nails are in place, it's time to start stringing! Tie one end of the string to a nail and then start wrapping it around the other nails, following the outline of your design. You can use one color of string for a clean and minimalist look or create patterns and gradients by using multiple colors. Experiment with different wrapping techniques such as crisscrossing or weaving to add depth and texture to your string art.
String art can also be used to create personalized decorations or gifts. For example, you can create custom name or initial designs by spelling out the letters using nails and then wrapping string around them. This makes for a unique and thoughtful gift for birthdays, weddings, or other special occasions. You can also create seasonal or holiday-themed string art, such as Christmas trees, pumpkins, or Valentine's Day hearts.
Another cool thing you can do with string art is to incorporate other materials or elements into your design. For example, you can add small wooden beads or buttons to the string as you wrap it around the nails. This adds a tactile and three-dimensional element to your string art. You can also mix string art with other techniques, such as painting or drawing, to create mixed media artworks.
In conclusion, string art is a creative and enjoyable activity that offers endless possibilities for cool things to do with string. Whether you want to create geometric patterns, personalized designs, or experiment with different materials, string art allows you to express your creativity and create unique works of art. So grab some string, nails, and a wooden board, and start creating your own string art masterpiece today!
13 Must-Do Activities in Austin in August
You may want to see also
![]()
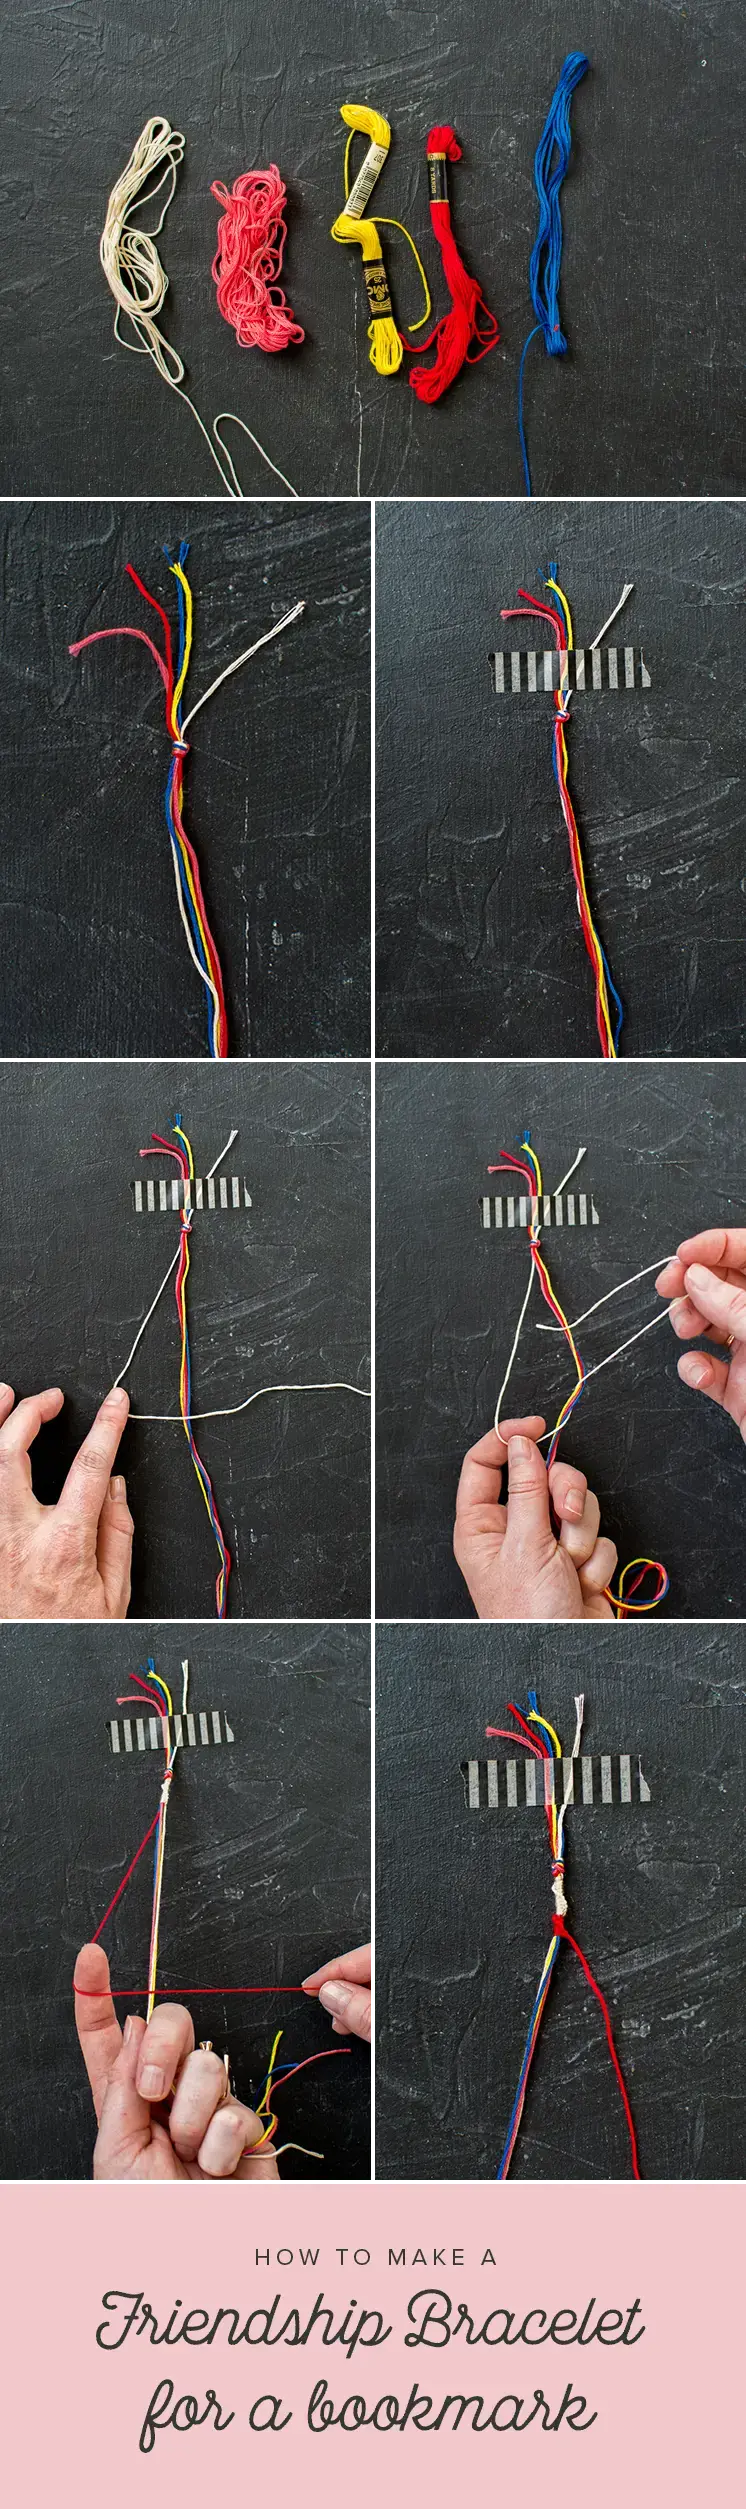
Friendship bracelets: Make colorful bracelets using various string patterns and techniques
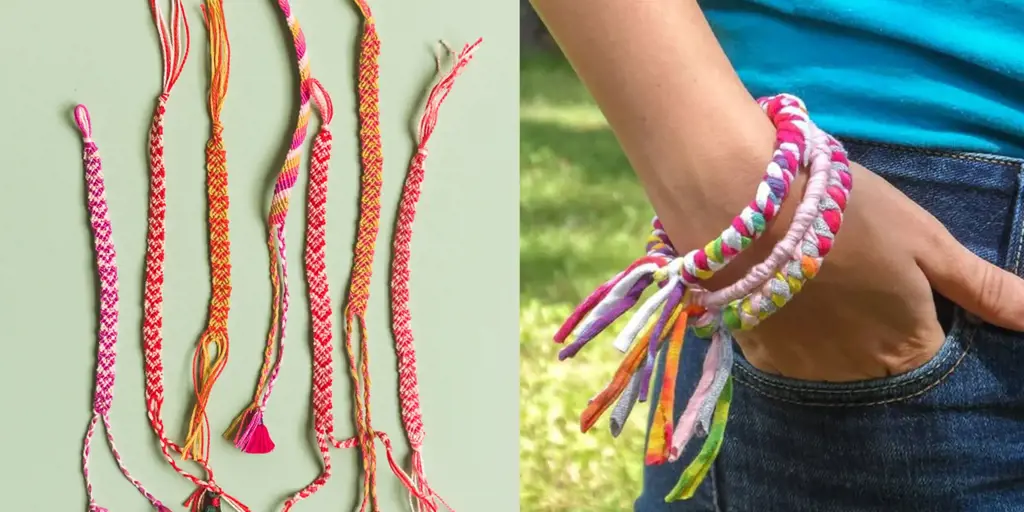
Friendship bracelets have been around for centuries and are a fun way to show your friends that you care. They are also a great way to unleash your creative side. With just a few materials and some string, you can create beautiful bracelets that are not only stylish but also meaningful. Here are some cool things you can do with string to make friendship bracelets:
- Basic Bracelet: The most common friendship bracelet pattern is the basic bracelet. All you need is some colorful embroidery floss or hemp string, and you can create a simple, yet elegant bracelet. To make a basic bracelet, start by cutting your string into four strands of equal length. Tie them together in a knot at one end, and then separate the strands into two groups of two. Take the outside strand from the right group and cross it over to join the left group. Repeat this process, alternating sides until you reach the desired length. Tie a knot at the other end to secure the bracelet, and voila! You have a beautiful basic bracelet.
- Chevron Bracelet: If you want to take your friendship bracelet game to the next level, try making a chevron bracelet. This pattern creates a zigzag design that looks intricate but is actually quite simple to make. To make a chevron bracelet, you will need at least three different colors of string. Cut your string into six strands of equal length, two of each color. Arrange the strands so that the colors alternate, and tie them together in a knot at one end. Separate the strands into three groups, each consisting of two strands. Take the outside strand from the right group and cross it over to join the middle group. Repeat this process, alternating sides until you reach the desired length. Tie a knot at the other end to secure the bracelet, and you have a stunning chevron bracelet.
- Beaded Bracelet: If you want to add some bling to your friendship bracelet, try making a beaded bracelet. These bracelets incorporate colorful beads into the string pattern, creating a unique and eye-catching design. To make a beaded bracelet, you will need some beads and elastic cord. Cut a piece of elastic cord to the desired length and tie a knot at one end to hold the beads in place. Thread the beads onto the cord, alternating between the beads and knots. Once you have added all the beads, tie a knot at the other end to secure the bracelet. You now have a trendy beaded friendship bracelet.
- Letter Bracelet: If you want to personalize your friendship bracelet, try making a letter bracelet. These bracelets spell out words, names, or initials using beads in different colors. To make a letter bracelet, you will need letter beads, colorful beads, and elastic cord. Cut a piece of elastic cord to the desired length and tie a knot at one end to hold the beads in place. Thread the letter beads onto the cord to spell out your chosen word, name, or initials. Add colorful beads between each letter bead to accentuate the design. Once you have added all the beads, tie a knot at the other end to secure the bracelet. You now have a unique and personalized letter friendship bracelet.
Friendship bracelets are a fun and creative way to show your friends how much they mean to you. Whether you keep it simple with a basic bracelet or get fancy with a chevron, beaded, or letter bracelet, the possibilities are endless. So grab some string and get knotting!
14 Fun Things to Do in San Dimas
You may want to see also
![]()
Cat's cradle: Play the classic hand string game with friends

Cats cradle: Play the classic hand string game with friends
String games have been enjoyed by people of all ages for centuries. From simple finger tricks to intricate designs, playing with string can be a fun and creative way to pass the time. One classic string game that has been enjoyed by generations is Cats cradle.
Cats cradle is a game that can be played with two or more players. All you need is a piece of string, about 6 feet long, and a willingness to have fun. Here's how to play:
- Start by making a string loop. Hold the string between your hands, and then cross your arms, bringing the string over your thumbs and behind your hands. Uncross your arms, keeping the string in a loop shape.
- Two players should each put their pinky fingers into the string loops. The loops should be stretched tight, with a straight line of string connecting the two players.
- The game begins with a series of moves, with the goal of creating different string shapes. Each move is made by one player at a time, passing the string from one hand to the other using their fingers.
- Once a shape has been created, the other player will try to recreate it using their hands and the string. If successful, they take a turn creating a new shape. If unsuccessful, the original player gets to create another shape.
- The game continues with players taking turns creating shapes and trying to replicate them. As the game progresses, new and more intricate shapes can be created, challenging the players' dexterity and creativity.
Cats cradle is not only a fun game to play with friends, but it also helps improve hand-eye coordination and finger dexterity. It's a great activity to do during a break at school or work, or even during a long car ride.
If you're feeling adventurous, Cats cradle can also be turned into a performance art form. Skilled players have been known to create elaborate string designs and even perform tricks with them. With practice, you can become a Cats cradle master, impressing your friends and family with your string skills.
So the next time you find yourself with a piece of string and a desire for some entertainment, give Cats cradle a try. Whether you're playing casually with friends or honing your string skills, this classic hand string game is sure to provide hours of fun.
14 Stunning Things to Do in Milos, Greece
You may want to see also
![]()
DIY dreamcatcher: Use string, beads, and feathers to create a beautiful dreamcatcher to hang by your bed
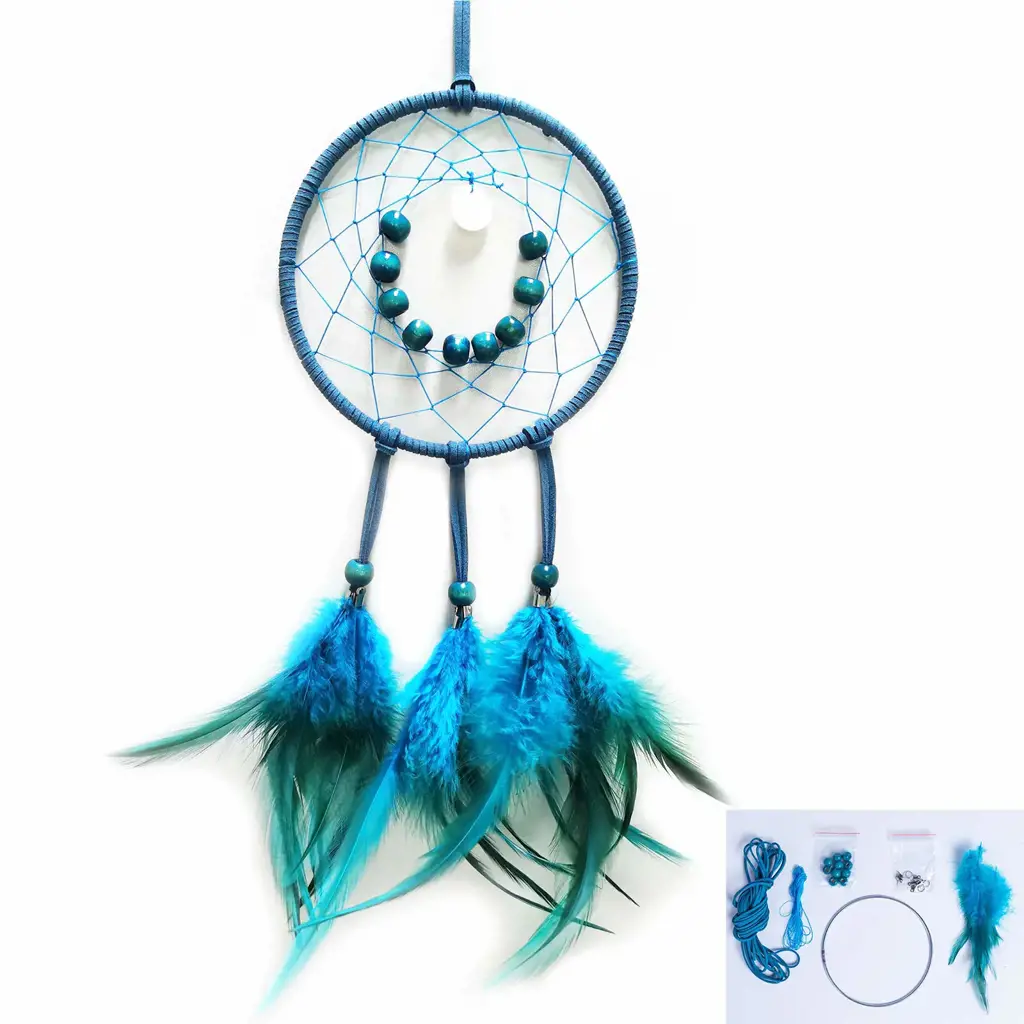
Dreamcatchers are not only beautiful decorative items but also have a rich history and significance. These intricate web-shaped designs are believed to have originated from Native American cultures and were traditionally used to protect people from bad dreams and negative energy. Making your own dreamcatcher can be a fun and creative way to personalize your space while also learning about different cultures. Here's a step-by-step guide on how to make a dreamcatcher using string, beads, and feathers.
Materials you will need:
- A round metal hoop or any sturdy circular object
- String or yarn in various colors
- Beads of your choice
- Feathers or other decorative elements
- Scissors
Step 1: Prepare your hoop
Begin by wrapping the hoop with string/yarn of your desired color. Start by securing one end with a knot and then wrap the string around the hoop tightly, making sure to cover the entire surface. You can use the same color for the entire hoop or switch it up by using different colors or patterns.
Step 2: Create the dreamcatcher web
Cut a long piece of string/yarn (approximately 3-4 ft) and tie one end to the hoop. Leave a tail of a few inches to hang freely. Make a loop knot around the hoop, leaving enough space between the knots to create the desired size of the web holes. Continue making loop knots around the hoop until you reach the center. Pull the string tight after each knot to keep the web shape intact.
Step 3: Add beads and feathers
To add beads to your dreamcatcher, simply string them onto the tail of the loop knots as you go along. You can use different colors and sizes to create a unique pattern. Similarly, attach feathers to the bottom of the dreamcatcher by tying them securely with string. You can also add other decorative elements like small charms or shells.
Step 4: Finishing touches
Once you are satisfied with the web and decorative elements, tie off the string securely and trim any excess. You can also create a hanging loop at the top of the dreamcatcher by attaching a longer piece of string/yarn to the hoop. This will allow you to hang it on your wall or above your bed.
Making a DIY dreamcatcher is a great way to engage in a relaxing and creative project. You can experiment with different colors, bead patterns, and feather combinations to create a dreamcatcher that matches your personal style and preferences. Hang it by your bed to enjoy its decorative beauty and the positive energy it is believed to bring. So grab some string, beads, and feathers, and get started on creating your very own dreamcatcher!
10 Exciting Activities to Experience in West Chicago
You may want to see also
![]()
String puppets: Make fun puppets by attaching string to different objects and putting on a show

String puppets are a wonderful and creative way to entertain both children and adults. With just a few simple materials and a little bit of creativity, you can create your own unique string puppets and put on an amazing show.
To create string puppets, you will need the following materials:
- String or yarn
- Scissors
- Various objects such as socks, paper, or small toys
- Glue or tape (optional)
- Markers or paint (optional)
Here is a step-by-step guide on how to make your own string puppets:
- Choose your objects: Look for objects that can be easily attached to a string. This could be anything from an old sock to a small toy or even a piece of paper. Get creative and think about what kind of characters you want to create.
- Attach the string: Cut a piece of string that is long enough to comfortably hold and manipulate the puppet. Attach one end of the string to the object you have chosen using glue or tape. Make sure it is securely attached so that it doesn't come off while you are performing.
- Decorate the puppet: This step is optional but can add a lot of character to your puppets. Use markers or paint to give your puppet a face, clothes, or any other details you want. Get as detailed or as simple as you like.
- Practice your puppetry skills: Once your puppets are ready, it's time to put on a show! Practice moving the puppets around using the string to give them life and personality. Experiment with different movements and voices to bring your characters to life.
There are endless possibilities for what you can do with your string puppets. Here are a few ideas to get you started:
- Put on a puppet show: Create a storyline and perform a puppet show for your friends or family. You can even make a simple puppet theater using a cardboard box or a sheet hung between two chairs.
- Teach a lesson: Use your puppets to teach about a specific topic or to demonstrate a concept. For example, you could create puppets to explain how plants grow or to act out a scene from a history lesson.
- Create a puppet dance: Set your puppets to some music and create a dancing routine. This can be a fun and entertaining way to showcase your puppetry skills.
- Use puppets for storytelling: Bring your favorite storybook characters to life by creating puppets based on the characters. Use the puppets to act out scenes from the story or to create your own new adventures.
String puppets are a fantastic way to encourage creativity and imagination. They are easy to make, affordable, and provide hours of entertainment. So gather your materials, let your imagination run wild, and start creating your own unique string puppets today.
14 Awesome Things to Do in Sedona at Night
You may want to see also
![]()
Macramé plant hangers: Create stylish and bohemian plant hangers using macramé knotting techniques
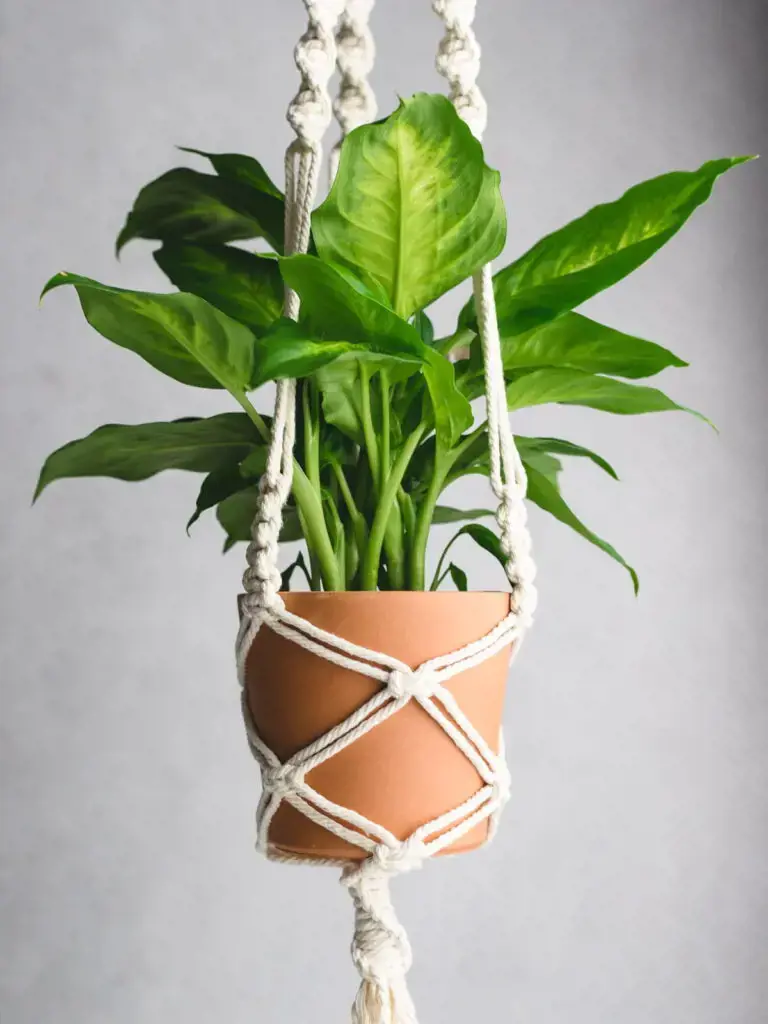
If you're someone who enjoys arts and crafts, working with string can open up a whole new world of possibilities. One cool thing you can do with string is to create macramé plant hangers. Macramé is a knotting technique that has gained popularity in recent years due to its ability to create stylish and bohemian designs.
To start making macramé plant hangers, you'll need a few basic materials. You'll need a sturdy string or cord, preferably one that won't easily fray or break. Cotton or nylon cords are commonly used for this purpose. You'll also need a plant pot or vase that you want to hang, as well as a pair of scissors.
To begin, cut four equal lengths of string. The lengths will vary depending on how long you want your plant hanger to be. For a longer hanger, cut longer strings. Fold each string in half and create a loop at the folded end. This will serve as the top of your plant hanger.
Next, gather all the loops together and tie a knot about an inch below the loops. This will create a secure foundation for your plant hanger. Now you can start working on the macramé knots that will form the body of the hanger.
Take two adjacent strings and make a square knot by crossing the left string over the right string. Thread the left string under the right string, and then bring it up and through the loop created. Gently tighten the knot, making sure it sits snugly against the top knot. Repeat this process with the two adjacent strings on the right side.
Continue making square knots down the length of the strings until you reach your desired length. You can experiment with different knotting patterns or even incorporate beads or other decorative elements into your design.
Once you've reached the bottom of your plant hanger, tie all the loose ends together in a knot to secure the macramé knots. Trim any excess strings and make sure all the knots are tightened properly.
Now you're ready to hang your plant hanger! Simply place your plant pot or vase into the macramé holder and adjust the knots as needed to ensure the hanger is balanced.
Macramé plant hangers are not only functional but also serve as stylish décor pieces. They can add a touch of bohemian charm to any room or outdoor space. You can experiment with different colors and patterns to match your personal style or the aesthetics of your home.
So, if you're looking for a fun and creative way to use string, give macramé plant hangers a try. They are relatively easy to make, and the end result is both practical and visually appealing. Plus, your plants will thank you for giving them a trendy new home!
12 Must-Visit Attractions: Things to Do in Pretoria
You may want to see also
![]()
String lanterns: Wrap string around balloons and coat them with glue to make unique lanterns
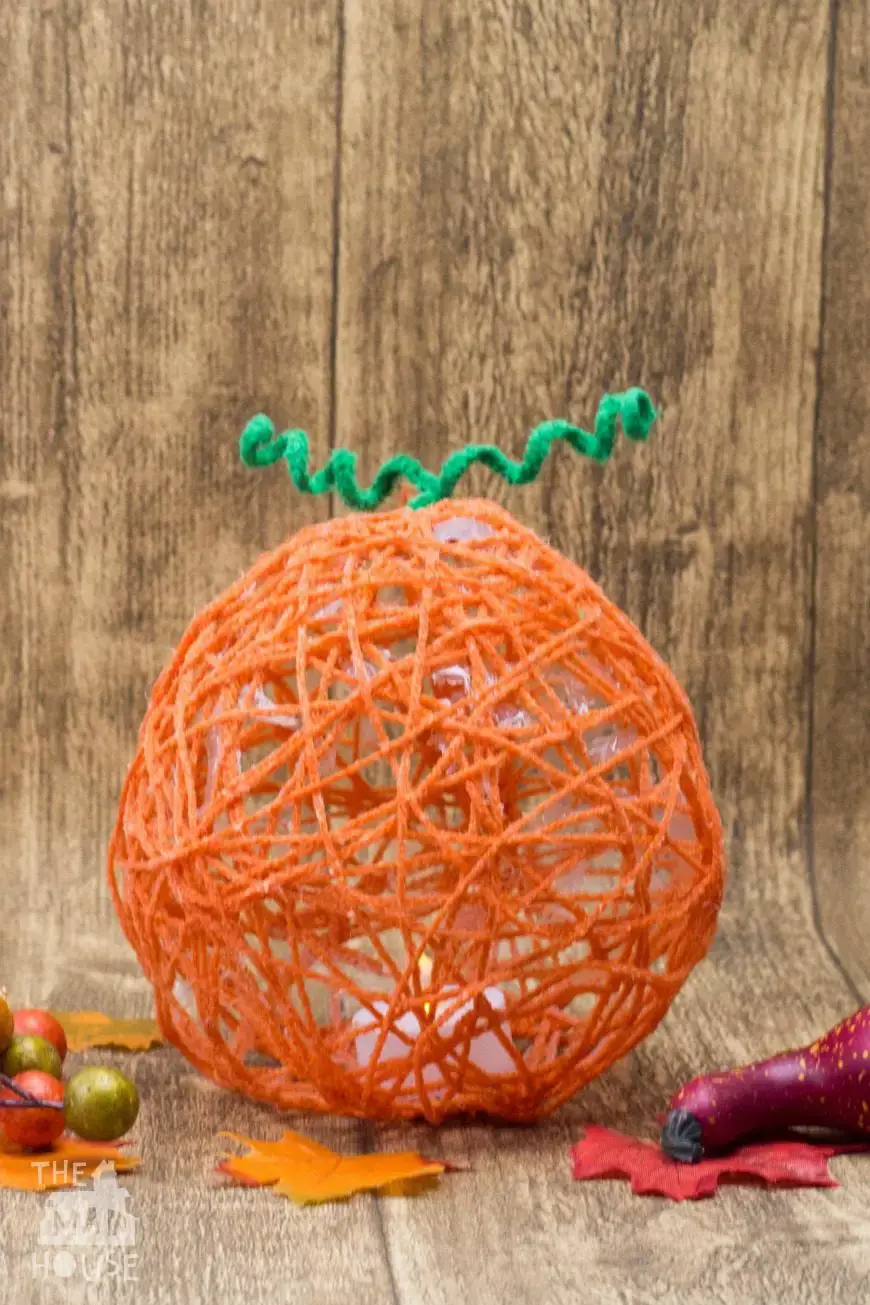
String lanterns can be a fun and creative way to add a unique touch to your home decor or a special event. These lanterns are simple to make and require just a few materials. With some string, balloons, and glue, you can create stunning lanterns that will impress your friends and family.
To make string lanterns, start by blowing up a balloon to your desired size. This will serve as the base shape for your lantern. Then, cut a length of string that is long enough to wrap around the balloon several times.
Next, coat the string in a mixture of glue and water. You want the string to be saturated but not dripping. The glue will help the string stick to itself and create a solid structure when it dries.
Once the string is coated, start wrapping it around the balloon. You can wrap it in any pattern or design that you like. For a more uniform look, try wrapping the string in a grid-like pattern. For a more artsy look, wrap the string in a random pattern. Just make sure that the string is wrapped tightly and evenly around the balloon.
Continue wrapping the string until the entire balloon is covered, leaving a small opening at the top. This opening will allow you to insert a light source later on.
Once you are satisfied with the pattern and coverage, allow the string to dry completely. This can take a few hours or overnight, depending on the type of glue you are using and the humidity in your environment.
Once the string is dry and hardened, it is time to pop the balloon. Carefully insert a needle or pin into the top opening and slowly deflate the balloon. Make sure to do this slowly and gently, as you don't want to disturb the shape of the string.
Once the balloon is deflated and removed, you will be left with a beautiful string lantern. You can customize these lanterns by adding a light source inside. You can use battery-operated LED lights, fairy lights, or even small candles. Just make sure to follow all safety precautions when using candles.
Hang your string lanterns indoors or outside to create a magical and enchanting atmosphere. These lanterns can be a stunning addition to weddings, parties, or any special event. You can also hang them in your backyard or on your patio for a unique and beautiful decoration.
String lanterns are a wonderful way to get creative and add a touch of elegance to any space. So gather your materials and start making these beautiful lanterns today. Your friends and family will be amazed by your creativity and talent.
10 Exciting Things to Do in Dalaman on Your Next Vacation!
You may want to see also
![]()
String garlands: Use colored string to make festive garlands for parties or special occasions

String garlands are a simple and cost-effective way to add a festive touch to any party or special occasion. Whether you're celebrating a birthday, holiday, or just want to spruce up your home, making string garlands can be a fun and creative activity that will leave your venue looking beautiful and inviting.
To make a string garland, you will need colored string, scissors, and a measuring tape. Begin by deciding how long you want your garland to be. Measure the desired length on your measuring tape and cut the string accordingly. The length will depend on where you plan to hang the garland and how much space you have available.
Once you have your desired length of string, it's time to add some color. Choose a variety of colored strings to create a vibrant and eye-catching garland. You can opt for a single color theme or mix different shades for a more eclectic look. Cut the colored strings into equal lengths, making sure they are longer than the length of your main string.
Now, it's time to start assembling your garland. Take one of the colored strings and tie it around the main string, making a knot to secure it in place. Leave a gap of a few inches and repeat the process with another colored string. Continue adding colored strings until you reach the end of your main string, spacing them out evenly to create a visually appealing pattern.
If you want to add some extra flair to your garland, consider incorporating embellishments. You can tie small bows, beads, or even miniature paper airplanes onto the colored strings to give your garland a more festive and personalized touch. Additionally, you can use different textures of string, such as twine or metallic threads, to add another layer of visual interest.
Once you've finished tying all the colored strings onto your main string, your garland is ready to be hung. You can attach it to a wall, drape it across a table, or even hang it outdoors for a beautiful and whimsical touch to your decorations. Be sure to secure the ends of the garland with tape or hooks to prevent it from falling down.
String garlands are a versatile and easy DIY project that can be customized to suit any occasion. By using colored strings and incorporating creative elements, you can create a visually stunning garland that will be the highlight of your party or event. So, gather your materials and get crafting – string garlands are sure to bring a festive and joyful ambiance to any space!
12 Fun Things to Do at Robbers Cave State Park
You may want to see also
![]()
String painting: Dip string in paint and create unexpected and abstract artwork by dragging it across a canvas

String painting is a unique and creative way to make art. By dipping string into paint and dragging it across a canvas, you can create unexpected and abstract designs that are visually stunning. This art form allows you to experiment with different colors, textures, and movements to create one-of-a-kind pieces.
To start string painting, gather your materials. You will need a canvas or paper, acrylic or fabric paint, string, and a tray or plate to hold the paint. It's best to use a thick, durable string like cotton or nylon, as it will hold more paint and create bold lines. Thin, lightweight string may not hold enough paint and could cause the design to become faint or uneven.
Once you have your materials, choose your paint colors. Consider selecting a variety of hues that complement each other or create contrasting effects. You can also experiment with different paint consistencies, such as using thicker paint for more defined lines or thinner paint for a more fluid and blended look.
To begin the string painting process, pour a small amount of paint onto the tray or plate. You can either dip the string into the paint directly or use a paintbrush to apply the paint onto the string. Make sure the string is evenly coated with paint but not overly saturated, as this can cause drips and smears.
Once your string is ready, carefully place it onto the canvas or paper and start dragging it across the surface. You can experiment with different motions and techniques to create different effects. For example, you can drag the string in straight lines for a structured design or move it in random patterns for a more abstract look. You can also twist and turn the string to create interesting shapes and textures.
Feel free to explore different variations of string painting. You can use multiple colors at once, layering them on top of each other to create depth and dimension. You can also experiment with different types of string, such as adding multiple strings or using different thicknesses for different effects.
As you create your string painting, remember to go with the flow and let your intuition guide you. This art form is all about embracing the unexpected and embracing imperfections. Don't be afraid to make mistakes or deviate from your original plan. Sometimes the most beautiful designs come from happy accidents.
Once you have finished your string painting, allow it to dry completely before displaying or framing it. You can also add additional touches, such as adding more paint or embellishments, to enhance the final piece.
String painting is a fun and engaging way to create unique and abstract artwork. It allows you to unleash your creativity and experiment with different colors and movements. Whether you're an experienced artist or just starting, string painting is a cool and exciting technique to try. So grab some string, dip it in paint, and let your imagination run wild.
13 Fun and Exciting Things to Do in Stone Harbor, NJ
You may want to see also
![]()
String bowl: Use string and fabric stiffener to make funky and functional bowls for holding small items
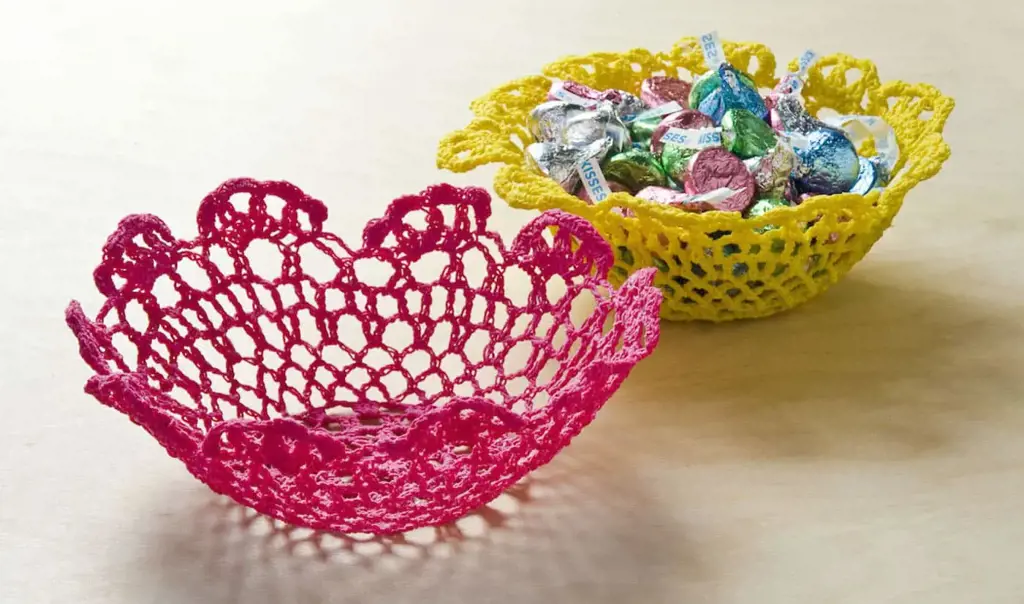
If you're looking for a fun and creative project to do with string, why not try making a string bowl? With just a few materials, you can create funky and functional bowls that are perfect for holding small items like keys, coins, or jewelry. All you need is some string and fabric stiffener to get started.
To make a string bowl, you will need the following materials:
- String: You can use any type of string for this project. Cotton or polyester string works well, but you can also use yarn or even twine for a more rustic look.
- Fabric Stiffener: Fabric stiffener is a liquid product that helps to harden fabric or string. You can find fabric stiffener at most craft stores, or you can make your own by mixing equal parts white glue and water.
- Balloon: A balloon will serve as the mold for your string bowl. Use a small balloon for a small bowl, or a larger one for a bigger bowl.
- Plastic wrap: Cover your balloon with plastic wrap to prevent the string from sticking to it.
- Scissors: You will need scissors to cut the string into smaller pieces.
Now that you have your materials, here's how to make a string bowl:
- Inflate your balloon to the desired size and tie a knot to secure it.
- Cover the balloon with plastic wrap. This will prevent the string from sticking to the balloon and make it easier to remove later.
- Cut your string into smaller pieces, about 6-8 inches long. The exact length will depend on the size of your balloon and how big you want your bowl to be.
- Pour some fabric stiffener into a bowl or container. Dip the string into the fabric stiffener, making sure to coat it evenly.
- Wrap the string around the balloon, starting at the knot and working your way down. You can wrap the string in any pattern or design you like. Experiment with different colors and textures to create a unique look.
- Continue wrapping the string around the balloon until you have covered it completely. You can overlap the string to make the bowl sturdier.
- Once you are happy with the design, let the string bowl dry for about 24 hours. The drying time may vary depending on the type of fabric stiffener you used, so check the label for specific instructions.
- Once the string bowl is completely dry, carefully pop the balloon with a pin. The balloon will deflate, leaving you with a hollow string bowl.
- Remove the plastic wrap from inside the bowl and trim any excess string if necessary.
And there you have it - a funky and functional string bowl! You can use your string bowl to hold small items like keys, coins, or jewelry, or simply display it as a unique piece of decor. Experiment with different patterns and colors to create a collection of string bowls that will add a touch of creativity to any space. So grab your string and fabric stiffener, and get ready to create something cool and unique with this fun and easy DIY project.
13 Offbeat London Experiences for Non-Tourists
You may want to see also
![]()
String sculptures: Mold and shape string into different forms to create abstract sculptures
Creating sculptures out of string is a unique and creative way to utilize this versatile material. Whether you are an experienced artist or just looking for a fun and artistic project, string sculptures offer endless possibilities for creative expression. In this article, we will explore the process of creating string sculptures and provide some ideas for cool things you can do with string.
To create a string sculpture, you will need a few basic materials: string of different colors and thicknesses, a wire frame or armature, and some adhesive such as glue or tape. The first step is to prepare your wire frame or armature. This will serve as the structure and support for your sculpture. You can create your own frame using wire or purchase a pre-made one from an art supply store.
Once you have your armature ready, you can start shaping and molding the string to create your desired form. One technique to try is wrapping the string around the armature, crisscrossing it at different angles to add texture and dimension. You can experiment with varying tension and density of the string to create different effects. Another technique is to twist and knot the string to create intricate patterns or shapes. You can also combine different colors of string to add visual interest to your sculpture.
With string sculptures, the possibilities are endless. You can create abstract geometric shapes, animals, plants, or even human figures. The key is to let your imagination run wild and experiment with different techniques and styles. You can manipulate the string to create smooth curves, sharp angles, or even create a sense of movement in your sculpture.
One cool idea for string sculptures is to create a mobile. A mobile is a type of sculpture that is designed to move and rotate freely. By attaching strings of different lengths to your armature and balancing them, you can create a mesmerizing kinetic sculpture that moves with the slightest breeze. Hang your mobile in a well-lit area, and watch as the strings twist and turn, casting beautiful shadows on the surrounding surfaces.
Another cool thing you can do with string is to create string art. String art involves weaving string between nails or pins to create intricate patterns or designs. You can create colorful and abstract designs or even spell out words or phrases. String art can be done on a piece of wood, a canvas, or any other flat surface. It is a relaxing and therapeutic activity that can be enjoyed by people of all ages.
In conclusion, creating string sculptures is a fun and artistic way to utilize this versatile material. Whether you want to create abstract sculptures, mobiles, or string art, there are countless cool things you can do with string. The process of shaping and molding string allows you to let your imagination run wild and create unique and visually captivating artworks. So go ahead, gather your materials, and start creating your own string sculptures today!
12 Amazing Things to Do in Franklin WI
You may want to see also
![]()
String jewelry: Create one-of-a-kind necklaces and bracelets by stringing together beads and charms
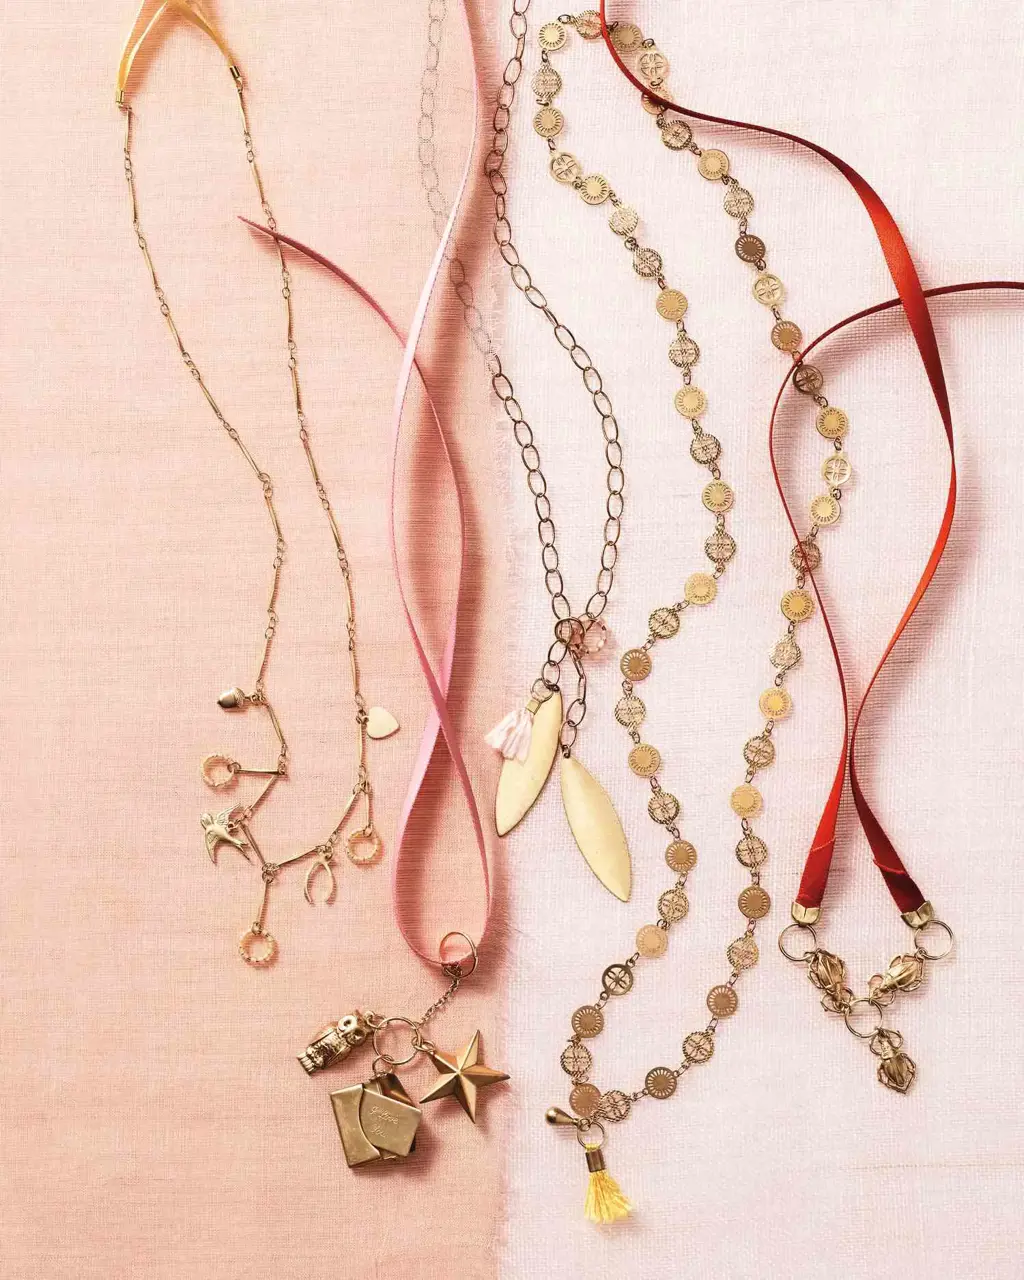
String jewelry is a fun and creative way to express your personal style. With just a few supplies and some imagination, you can create beautiful and unique necklaces and bracelets that are sure to turn heads.
To get started, gather your materials. You will need some string or cord, a variety of beads and charms, scissors, and a clasp or closure. You can find these supplies at craft stores or online.
Once you have your supplies, it's time to unleash your creativity. Start by choosing your string or cord. There are many options available, such as leather, cotton, or nylon. Consider the look you want to achieve and choose a string that complements your beads and charms.
Next, select your beads and charms. You can use a variety of materials, such as glass, wood, metal, or plastic. Mix and match different shapes, sizes, and colors to create a unique design. If you want to add some sparkle, consider using beads with crystals or rhinestones.
Now it's time to start stringing your beads and charms. Cut a piece of string or cord to the desired length, keeping in mind that you will need extra length for attaching the clasp or closure. You can use a ruler or measuring tape to ensure accurate sizing.
Begin by threading a bead onto the string, followed by a charm, and continue alternating between beads and charms until you reach the desired length. You can create a pattern or mix and match randomly for a more eclectic look.
Once you have strung all your beads and charms, it's time to secure the ends. Depending on the type of cord you're using, you can either tie a knot or use crimp beads to secure the ends. If using crimp beads, simply slide one onto the end of the cord, loop the cord through the closure, and then back through the crimp bead. Use pliers to flatten the crimp bead, ensuring a secure closure.
Finally, attach your clasp or closure to the ends of the string. There are many options available, such as lobster clasps, toggle clasps, or magnetic closures. Choose the one that best fits your design and attach it using jump rings or by tying knots.
Now you have a beautiful and one-of-a-kind necklace or bracelet that you made yourself. String jewelry is a great way to express your creativity and showcase your personal style. It also makes for a thoughtful and unique gift.
Experiment with different materials, colors, and designs to create a variety of string jewelry pieces. You can even incorporate other elements, such as feathers, shells, or tassels, to add extra interest. The possibilities are endless.
So, gather your supplies, let your imagination run wild, and start creating your own string jewelry today. It's a fun and rewarding hobby that is sure to bring out your inner artist.
13 Fun Indoor Activities to Enjoy in Phoenix
You may want to see also
![]()
String bookmarks: Make personalized bookmarks by attaching decorative string to a paperclip or cardboard
String bookmarks are a fun and practical way to add a personal touch to your reading experience. By simply attaching decorative string to a paperclip or cardboard, you can create unique bookmarks that will make your reading time even more enjoyable. Not only are they easy to make, but they also make great gifts for your book-loving friends.
To create a string bookmark, you will need a few basic materials. First, gather some decorative string or yarn in colors and patterns that you love. You can find a wide variety of options at your local craft store or even repurpose leftover string from past projects. Additionally, you will need a paperclip or a small piece of cardboard cut into a bookmark shape.
Once you have your materials ready, it's time to start making your string bookmark. Here's a step-by-step guide to help you get started:
- Choose your string: Select the decorative string that you want to use for your bookmark. You can go for a single color or mix and match different strings to create an intricate pattern.
- Cut the string: Measure and cut the string to your desired length. Keep in mind that the length should be slightly longer than the height of your book.
- Attach the string: Take one end of the string and loop it through the top of the paperclip or the hole at the top of the cardboard bookmark. Pull the string through to create a loop at the top.
- Create a pattern: Now it's time to get creative. Use the remaining length of the string to create different patterns or designs. You can make loops, knots, or weave the string through itself to add texture and visual interest to your bookmark.
- Secure the ends: Once you are satisfied with your design, carefully tie the ends of the string together to secure them. You can double knot the ends to ensure they won't come undone while using the bookmark.
- Trim excess string (optional): If the ends of the string are too long, you can trim them to your desired length. Be careful not to cut the knot that secures the string.
- Enjoy your new bookmark: Your string bookmark is now ready to use. Slip it onto a page in your current book, and you'll always know exactly where you left off.
Aside from being functional, string bookmarks also make great accessories for your books. You can create bookmarks to match the themes or colors of specific books or series. They are also an excellent way to use up leftover bits of string and reduce waste.
Next time you sit down to read a book, bring a touch of creativity by using a string bookmark. With just a few materials and a little bit of time, you can create unique and personalized bookmarks that will add a special touch to your reading experience. So grab your favorite string and get crafting!
12 Amazing Things to Do in Caracas, Venezuela
You may want to see also
![]()
String hairstyles: Incorporate colorful string into your hair for a fun and temporary style
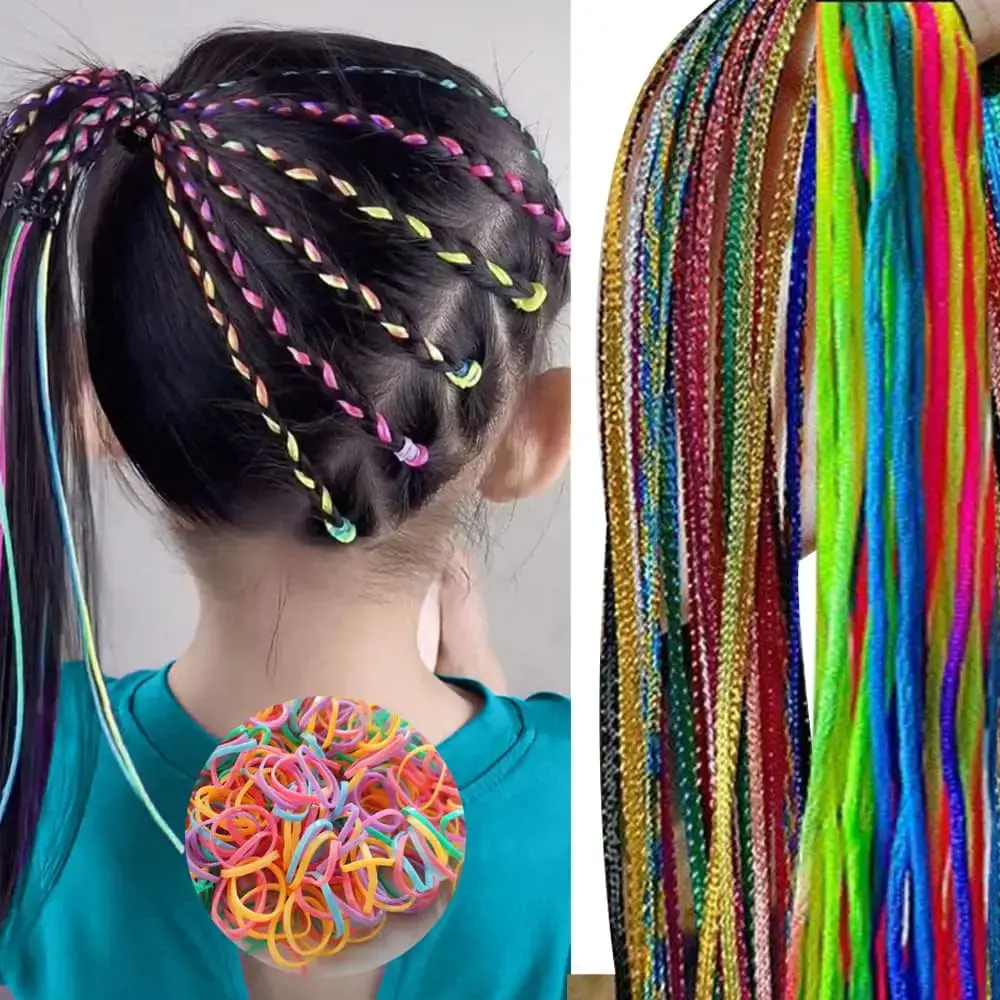
Looking to add some extra flair to your hairstyle? Look no further than string hairstyles! Using colorful string, you can create unique and eye-catching looks that are sure to turn heads. Whether you're attending a music festival, a party, or simply want to try something new, string hairstyles are a great way to express your creativity and stand out from the crowd.
Here are a few ideas to get you started on incorporating colorful string into your hair:
Braided string accents: Add a splash of color to your braided hairstyles by weaving string into your braids. Start by sectioning your hair and braiding it as usual. Then, take a piece of string in your desired color and tie it around the base of one of the braids. As you braid your hair, incorporate the string by weaving it in and out of the sections. Repeat this step with different colors of string to create a vibrant and playful look.
Wrapped ponytail: Elevate your everyday ponytail by wrapping it with colorful string. Start by styling your hair into a high or low ponytail and securing it with an elastic. Then, take a few pieces of string in different colors and tie them around the base of the ponytail. Start wrapping each piece of string tightly around the ponytail, overlapping them to create a striped effect. Once you've reached the end of the ponytail, secure the string with a knot or a small hair elastic.
String headband: Create a bohemian-inspired look by transforming colorful string into a headband. Start by tying one end of the string around the base of your neck or behind your ear. Then, cross the string over the top of your head, just above your forehead, and tie it at the nape of your neck or behind your other ear. Repeat this process with different colors of string, creating a pattern or a mix of different shades. Not only will this add a pop of color to your hairstyle, but it will also keep your hair out of your face.
Hair wraps: Channel your inner free spirit by wrapping pieces of string around small sections of your hair. Start by selecting a few pieces of string in your desired colors and cutting them to the length of your hair. Then, take one of the pieces of string and tie it around a small section of hair near the roots. Begin wrapping the string tightly around the hair, moving towards the ends. Once you've reached the end of the section, tie the string in a knot to secure it. Repeat this step with different colors of string, creating as many wraps as you desire.
When it comes to string hairstyles, the possibilities are endless. Don't be afraid to experiment with different colors, patterns, and styles to create a look that is uniquely you. Just remember to remove the string carefully to avoid damaging your hair. So go ahead, have fun, and embrace the colorful world of string hairstyles!
13 Fun and Interesting Things to Do in Caribou, Maine
You may want to see also
Frequently asked questions
- You can create beautiful string art by wrapping colorful strings around a wooden board or nails in various patterns.
- Try making friendship bracelets using different string colors and weaving techniques.
- Create a hanging macrame plant holder to display your favorite indoor plants in a unique way.
- Use string to create a DIY cat toy by tying knots along the length of the string and attaching a feather or small toy at the end.
- You can make a simple instrument called a "kazoo" by attaching a small piece of wax paper or tissue paper to the end of a small cardboard tube using a rubber band. Humming or blowing into the tube will create a string-like sound.
- If you're feeling more adventurous, you can try making a homemade guitar using a shoebox, rubber bands as strings, and a popsicle stick as a makeshift neck.
- "Cat's Cradle" is a classic string game where two people pass the string back and forth through various hand movements to create different shapes.
- "Jacob's Ladder" is another popular string game where you create a ladder-like structure using the string and then make it "flip" or "collapse" through a series of movements.
- "String figures" involve creating different shapes and pictures using the string between your fingers and hands. The "Cup and Saucer" or "Witches Broom" are two popular examples.
- Yes! You can use string for various science experiments. For example, you can create a homemade pulley system using string, a small spool or wheel, and a lightweight object to lift.
- You can also use string with different objects to create a simple "balance" experiment to teach about weight and balance.
- Another fun experiment involves creating a "catapult" using string and popsicle sticks to launch lightweight objects across the room.


2 Comments
Alec Perkins
Alexa OSullivan