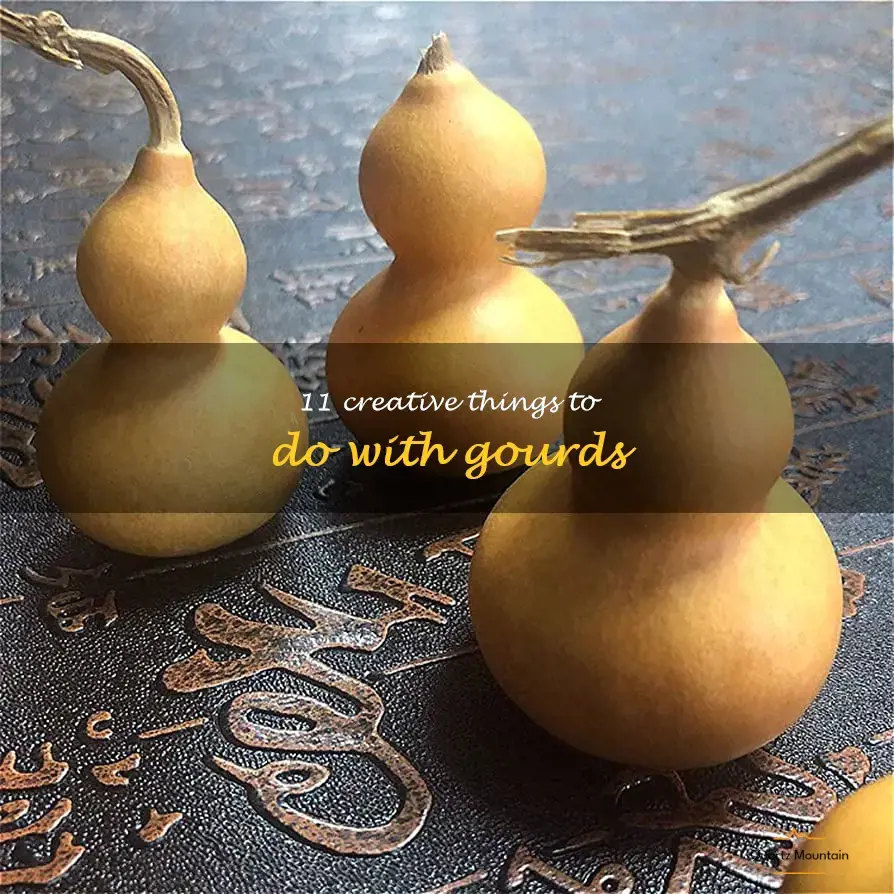
As the leaves begin to change colors and the air gets crisp, the fall season is the perfect time to experiment with different types of decorative squashes like gourds. These versatile vegetables have a variety of unique shapes, colors, and textures that make them perfect for DIY projects. Whether you're looking for a new centerpiece idea, a festive Halloween decoration, or just a fun activity to do with the family, there are so many creative things you can do with gourds. In this article, we've compiled a list of 11 innovative ways to use gourds, so get ready to embrace your inner artist and add a touch of autumnal charm to your home!
What You'll Learn
- Make gourd birdhouses - At home
- Create gourd centerpieces - Party Decorations
- Carve gourd jack-o-lanterns - Halloween Decorations
- Paint gourd lanterns - Backyard Parties
- Make gourd bowls - Food Serving
- Create gourd candle holders - Home Decor
- Carve gourd vases - Flower Arrangements
- Make gourd masks - Costume Parties
- Create gourd musical instruments - School Projects
- Make gourd sculptures - Art Exhibits
- Paint gourd Christmas ornaments - Holiday Decorations
![]()
Make gourd birdhouses - At home
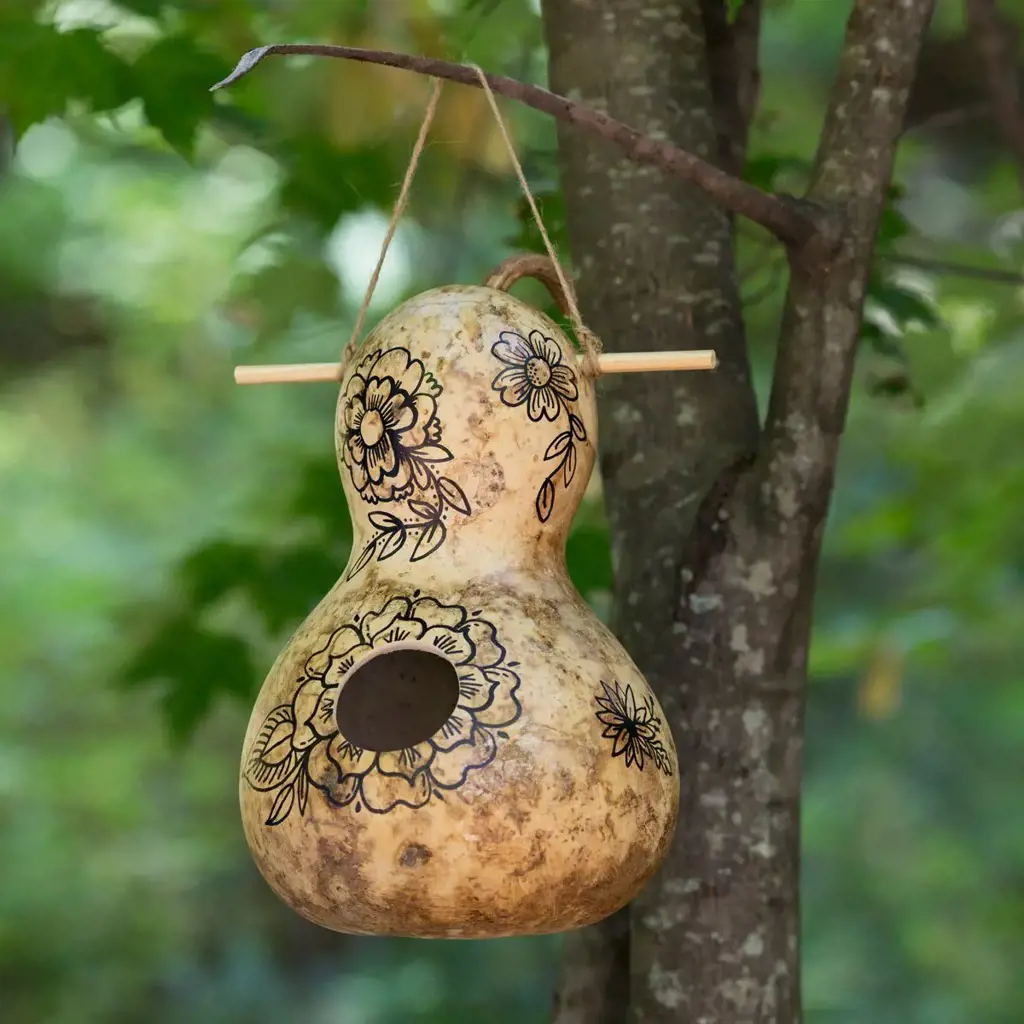
Gourds are a versatile and unique material to use for crafting and decorating. One creative idea for gourds is to make birdhouses! The process is simple and can be done at home with a few supplies.
To start, you'll need a dried gourd. You can either grow your own or purchase one from a craft store. Choose a gourd with a large enough opening on one end for a bird to enter. You'll also need a drill, a jigsaw or handsaw, sandpaper, and some twine or rope.
First, you'll need to clean and prepare the gourd. Soak it in warm water for a few hours to soften the exterior. Then scrub it clean with a rough sponge or brush to remove any dirt or debris. Let it dry completely before moving on to the next step.
Next, using a drill, carefully make a hole in the top of the gourd. This will be where the birds enter and exit. Be sure to make the hole big enough for the types of birds you want to attract. You can also drill a few small holes in the bottom for ventilation.
Once you've made the openings, use a jigsaw or handsaw to cut a small hole in the bottom of the gourd. This will be where the birds will perch. Sand the edges of the openings down so they're smooth.
At this point, you can get creative with decorating the gourd. You can paint it, use wood-burning tools to create designs, or even decoupage it with images or patterns.
Finally, attach some twine or rope to the top of the gourd and hang it in a tree or on a post. You can also add some nesting material inside the gourd, such as small twigs or grass.
Not only are gourd birdhouses a fun and unique way to add some charm to your garden, but they also provide a safe and cozy place for birds to make their homes. So why not try making one yourself?
12 Must-Do Activities in Beacon Hill, Boston
You may want to see also
![]()
Create gourd centerpieces - Party Decorations
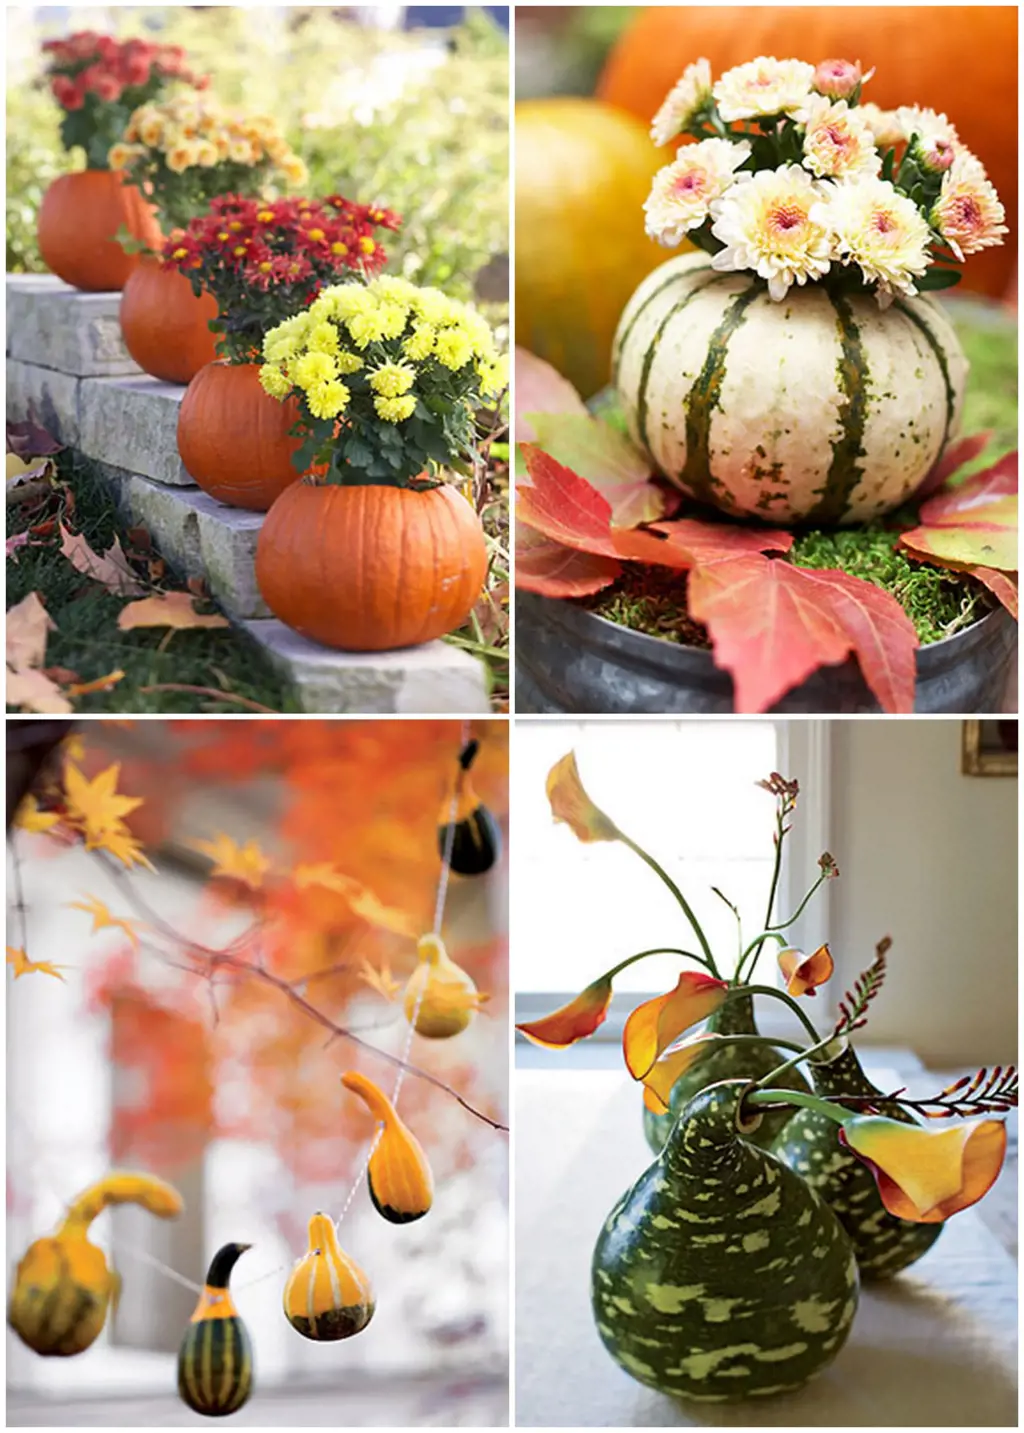
Gourds come in many shapes, sizes, and colors, making them a versatile material for creative projects. One fun way to use gourds is to turn them into centerpieces for parties and other celebrations. In this article, we'll go over some tips and ideas for creating gourd centerpieces that are sure to impress your guests!
Choose a Variety of Gourds
To create interesting and eye-catching centerpieces, it's a good idea to select a mix of gourds in different colors and sizes. Look for gourds with interesting shapes or textures, such as warty or ribbed gourds. The more variety you can incorporate into your centerpiece, the better!
Carve or Paint Your Gourds
One way to customize your gourd centerpieces is to carve or paint them. You can carve designs or patterns into the gourd skin using a sharp knife or carving tools. Alternatively, paint the gourds with acrylic paint to create unique designs or add a pop of color to your centerpiece.
Mix and Match with Other Decorations
To make your gourd centerpieces even more festive, consider mixing and matching them with other decorations. You can add fresh flowers, candles, or other items that complement the colors and textures of your gourds. Use your imagination and have fun experimenting with different combinations until you find the perfect look!
Use Gourd Centerpieces for Different Occasions
Gourd centerpieces can be used for a variety of occasions, from fall harvest parties to rustic weddings and everything in between. Consider using smaller gourds for tabletop centerpieces or larger gourds for floor standing displays. You can even hang gourds from the ceiling using string or ribbon to create a unique and festive look!
In conclusion, creating gourd centerpieces is a fun and creative way to decorate for parties and special occasions. With a mix of gourds in different colors and sizes, and a bit of carving or paint, you can create unique and beautiful centerpieces that are sure to impress your guests. So, next time you're looking for a creative project, grab some gourds and get started on your own festive and seasonal decor!
12 Fun Activities in Royal Palm Beach
You may want to see also
![]()
Carve gourd jack-o-lanterns - Halloween Decorations
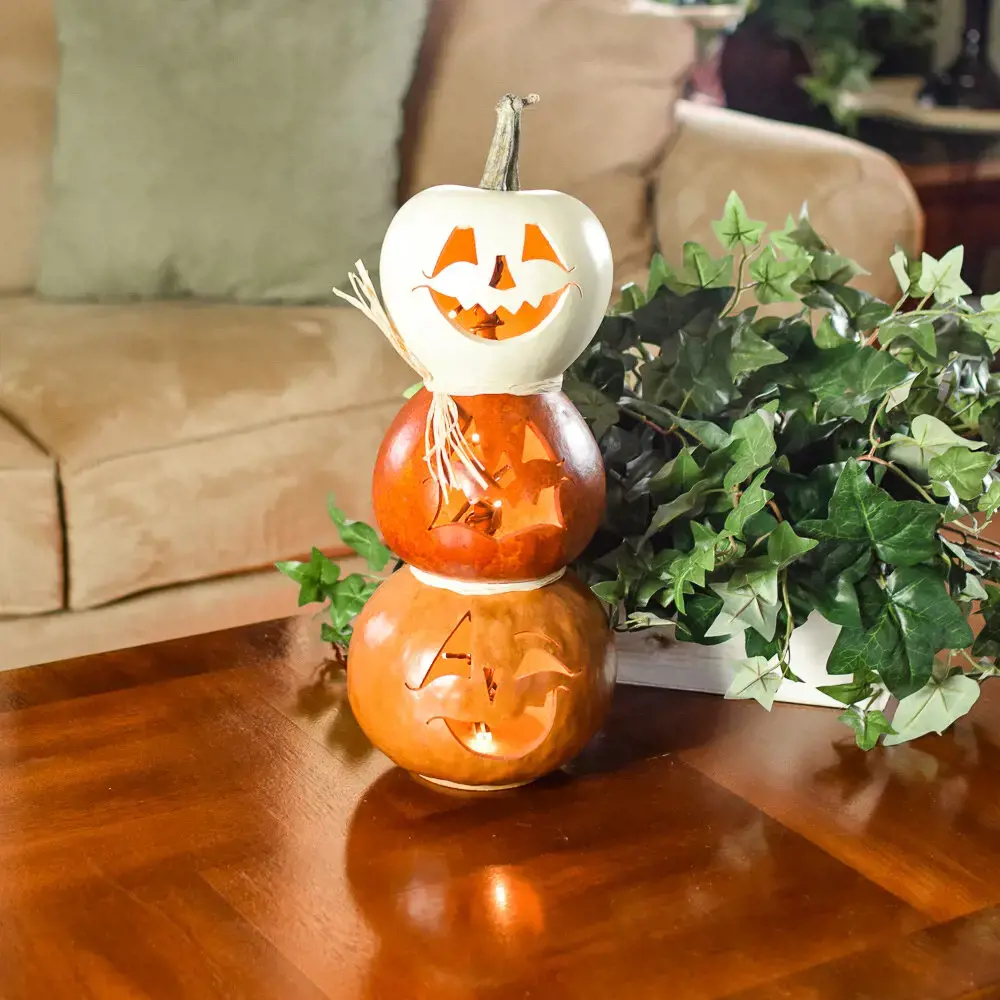
Fall is here, and what better way to celebrate the arrival of this season of harvest than by finding creative things to do with gourds? One fun and exciting way to turn gourds into festive decorations is by carving them into jack-o-lanterns for Halloween.
Carving gourd jack-o-lanterns is a fun and creative way to bring the Halloween spirit into your home. The first step is to find the perfect gourd. You can grow your own or find gourds at your local farmers' market or grocery store. Choose a gourd that is round, symmetrical, and has a smooth outer surface. Avoid those with soft spots or bruises.
Once you have your gourd, the first thing you should do is clean it. You can do this by wiping it down with a damp cloth or scraping any dirt off with a knife or vegetable peeler. After cleaning, let the gourd dry completely.
Next, sketch out your design on the gourd with a pencil or marker. Once you have your design, you can start cutting. Use a sharp knife to cut a circle around the stem of the gourd to create the opening for the jack-o-lantern's face. You can then use a spoon or scoop to remove the seeds and flesh from inside the gourd.
Now comes the fun part – carving your design into the gourd. You can either freehand your design or use a stencil. Use a saw or carving tool to cut out your design, being careful not to cut too deeply or too shallowly. Remember to take your time and work slowly, checking your progress frequently.
Once you're finished carving, light a candle or place a battery-operated tea light inside your gourd. This will bring your jack-o-lantern to life and make it glow from within, creating a warm and inviting atmosphere.
Gourd jack-o-lanterns can be a great addition to your Halloween decorations, and they're easy to make once you get the hang of it. They can be carved into a variety of shapes and sizes, from the traditional face to more intricate designs like bats, ghosts, and witches. Get creative and see what you can come up with!
In conclusion, carving gourd jack-o-lanterns is a fun and creative way to celebrate the Halloween season. With just a little time and effort, you can turn a simple gourd into a beautiful and festive decoration for your home. Happy carving!
12 Fun Things to Do in Bergen County, New Jerse
You may want to see also
![]()
Paint gourd lanterns - Backyard Parties
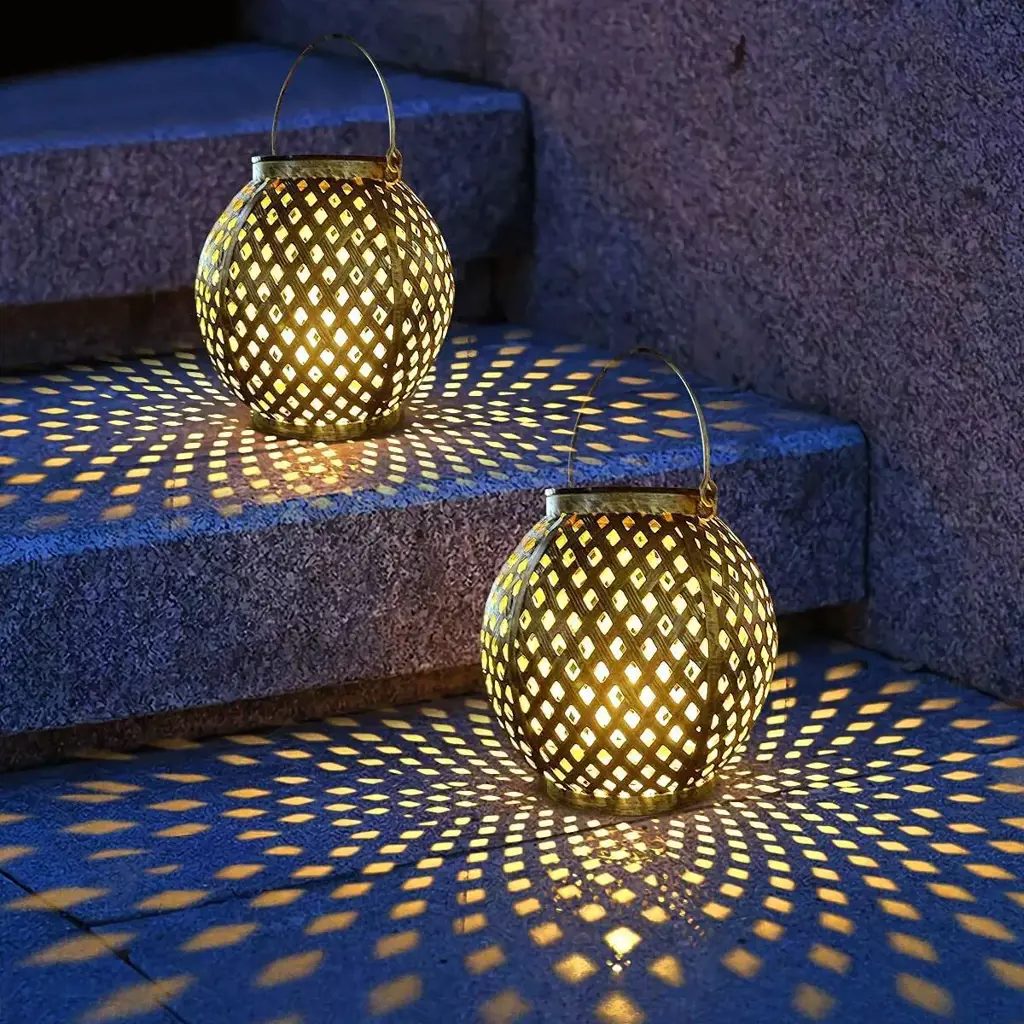
Gourds are versatile vegetables that can be used in a variety of creative ways. One of the most popular ways to use them is to paint them and turn them into lanterns, perfect for backyard parties and other outdoor events. In this article, we'll explore some creative ideas for painting gourd lanterns and making your backyard party a special and memorable occasion.
The first step in painting gourd lanterns is to choose the right kind of gourd. Look for gourds that are firm and symmetrical, with a smooth surface. Wash the gourds with mild soap and warm water, then dry them thoroughly. Use sandpaper to smooth any rough spots on the surface, or to remove any remaining bits of stem or dried vine.
Next, it's time to choose your painting supplies. Acrylic paints are the most popular choice for painting gourd lanterns because they dry quickly and are long-lasting. You can find acrylic paints in a variety of colors and finishes, including metallic, matte, and glossy. You'll also need paint brushes, a palette, and a container of water for cleaning your brushes.
Before you start painting, think about the design you want to create. There are countless possibilities, from simple stripes and polka dots to intricate patterns and scenes. You can use stencils or freehand your design, depending on your skill level and creativity. One popular idea is to paint your gourds to match your backyard party theme, adding a festive touch to your decor.
As you're painting your gourd lanterns, keep in mind that they'll be used as light sources. Consider using lighter colors or a white base coat to help reflect the light and make the lanterns more luminous. You can also add glitter or other sparkly accents to enhance the festive mood.
Once your gourd lanterns are painted and dry, it's time to add the lighting. One option is to use battery-operated tea lights, which are safe and easy to use. Simply insert the tea lights into the gourd lanterns, and voila – you have beautiful and unique lighting for your backyard party. You could even consider carving small holes in the gourd to let the light out in a more dramatic fashion.
In conclusion, painting gourd lanterns is a fun and creative way to add some personality to your backyard party. By following these simple steps, you can turn plain gourds into stunning light sources. Whether you're hosting a casual outdoor gathering or a more formal dinner party, your guests are sure to be captivated by your artistic flair. So gather your supplies, let your imagination run wild, and get ready to paint some gourd lanterns for your next backyard party!
12 Fun Things To Do In Beirut
You may want to see also
![]()
Make gourd bowls - Food Serving

Gourds are considered one of the most versatile and economical crafting materials that nature can offer. These autumnal fruits are perfect for home decor, seasonal table centerpieces, and even functional food serving bowls. Here are some creative things that you can do with gourds, particularly in making food-serving bowls.
Making gourd bowls isn't complicated, and the best part is that all of the materials you need are readily available at home. You will need a pear-shaped gourd, sandpaper, paint or food coloring, and a sealant.
To start with, clean your gourd under running water and let it dry. Sand the exterior of the gourd with sandpaper until it's smooth, then wipe it clean with a soft cloth. It's important to sand the surface of the gourd so that the paint or food coloring adheres better.
Next, you can paint the exterior of the gourd with your chosen color to help it blend with the theme of your table. Acrylic paint can be used to create colorful and attractive designs. However, if you plan to use your gourd for serving food, you should use food coloring to dye it to avoid any potential health concerns. Dip a brush in food coloring and apply evenly over the gourd surface.
After painting or coloring, allow the gourd to dry for several hours until the paint or dye is well-set. Once dried, you can apply a sealant to avoid future cracking, splitting, or decay.
Finally, to turn your gourd into a proper serving bowl, carefully cut off the top of the gourd using a sharp paring knife. You should cut the gourd at an angle to make it sit sturdily on the tables while creating a pleasing visual. Once the top has been removed, scoop out the flesh and seeds from the gourd, so you have a hollow bowl.
Your gourd bowl is now ready to serve food. To make it more exciting, you can fill it up with delicious treats. You can use it as a salad bowl, fruit bowl, or as a vessel for your favorite hot soup. Experiment with your serving ideas to create the best display for your autumnal table.
In conclusion, gourds are a fantastic and inexpensive way to create functional and seasonal decor. These autumnal fruits are versatile and can be used in a variety of crafts, including creating serving bowls for food. With the right materials and process, you can achieve an elegant, homemade bowl that will satisfy your creative mind while adding autumnal flair to your table.
11 Fun and Cheap Things to Do on Oahu
You may want to see also
![]()
Create gourd candle holders - Home Decor
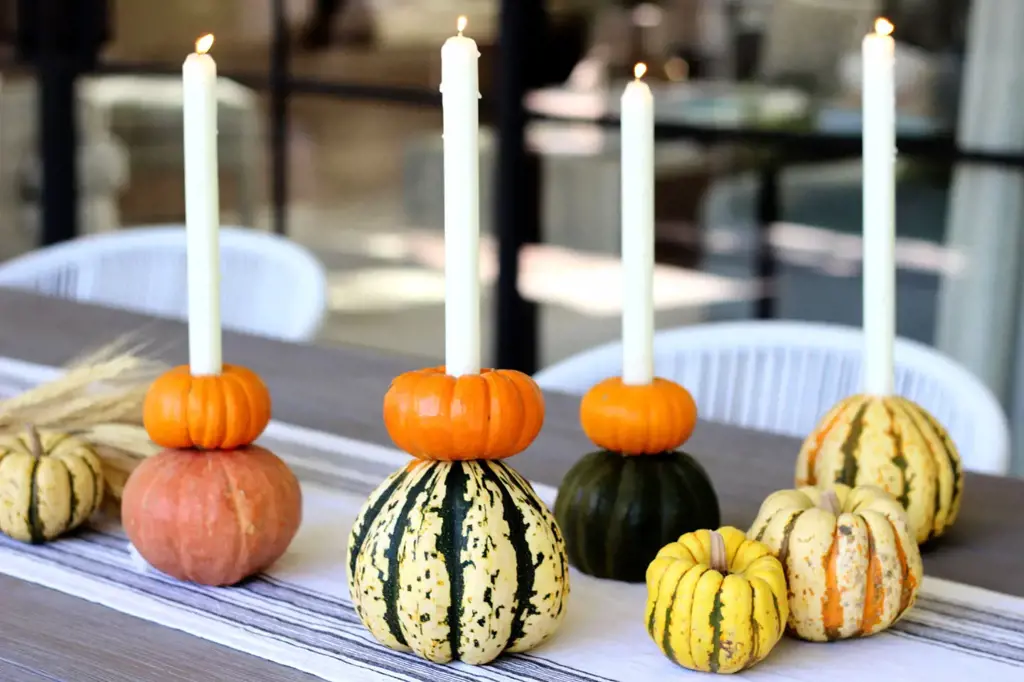
If you're looking for a unique and creative way to decorate your home, gourds may be the perfect solution. These versatile vegetables can be transformed into beautiful candle holders, adding a cozy and rustic touch to your living space. Here's how to create gourd candle holders for your home decor.
Step 1: Choose your gourds. Look for gourds that are sturdy and have a flat bottom so that they can stand upright. The shape and size of your gourds will determine the style of your candle holders, so pick out a variety of shapes to create a visually interesting display.
Step 2: Prepare your gourds. First, clean your gourds thoroughly with soap and water to get rid of any dirt and debris. Then, use a sharp knife or carving tool to cut off the top of the gourd and scoop out the inside. You can use a spoon or an ice cream scoop to remove the seeds and flesh.
Step 3: Create your design. Once your gourds are cleaned and hollowed out, you can start creating your design. You can use a stencil or freehand your design to make your candle holder unique. You can also use a drill or small saw to create patterns or holes in the gourd for the light to shine through.
Step 4: Add your candles. Place your candles inside the gourds and light them up. You can add tea light candles, small votives, or even pillar candles depending on the size and shape of your gourds.
Step 5: Display your candle holders. Arrange your gourd candle holders on a table or mantle for a stunning and cozy display. You can create a centerpiece with a group of gourds or display them individually throughout your home.
Gourd candle holders are a creative and easy way to add a rustic touch to your home decor. With just a few simple steps, you can transform plain gourds into beautiful and unique candle holders that will add warmth and charm to any room in your house.
12 Exciting Activities to Try in McKinney, TX
You may want to see also
![]()
Carve gourd vases - Flower Arrangements
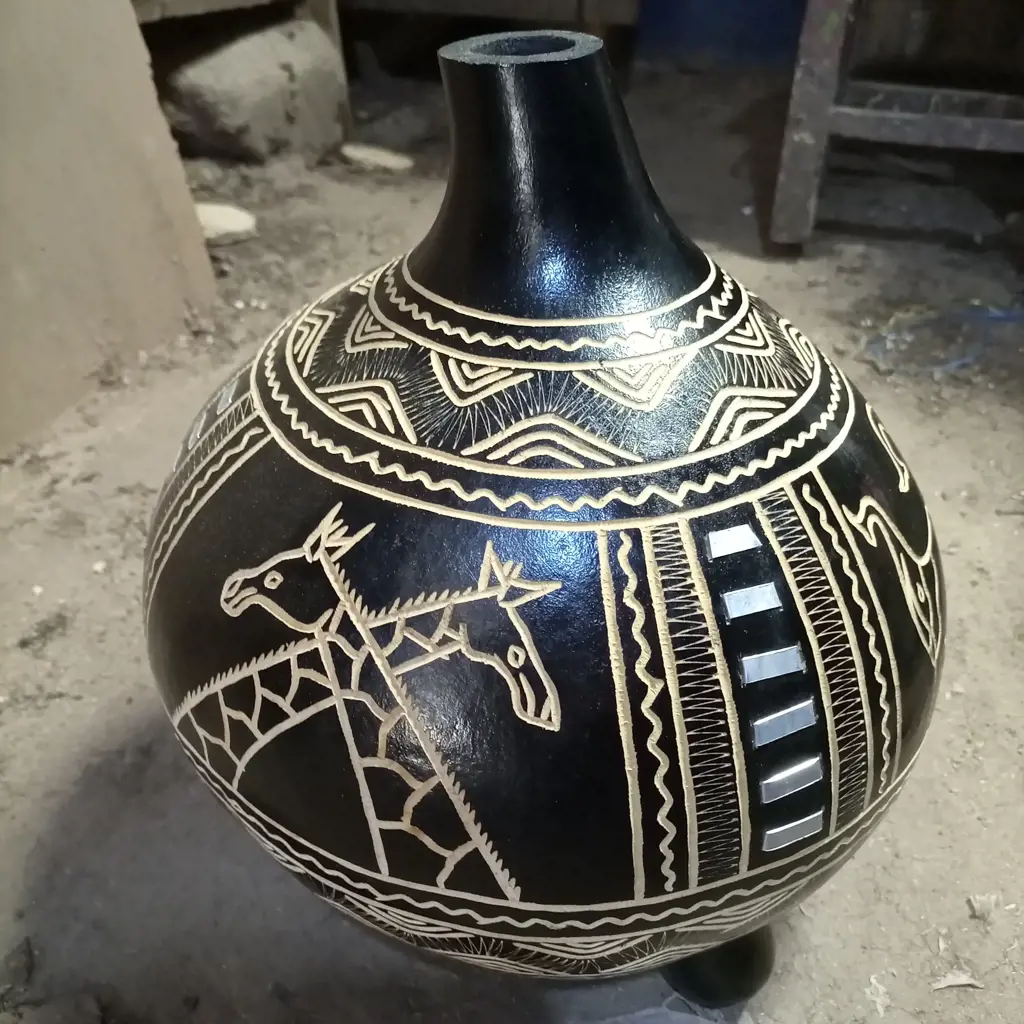
Gourds are a unique and versatile vegetable that can be used for a variety of purposes, including decorative art. One of the most creative things you can do with gourds is to carve them and turn them into beautiful vases for flower arrangements.
Here are some steps to consider when creating a carved gourd vase:
- Choose the right gourd – When selecting a gourd for carving, it is important to choose one that is firm and unblemished. Gourds come in a variety of shapes and sizes, so choose one that suits your preference. You may also want to consider the stem of the gourd as this can add an additional visual element to your vase.
- Clean and dry the gourd – Before carving, it is important to clean the gourd and dry it thoroughly. You can do this by scrubbing the gourd with a brush and soapy water, then allowing it to air dry for a few days.
- Create a design – Decide on a design for your vase. You could create a simple design with geometric shapes, or a more intricate design with flowers, vines, or animals. Sketch your design onto the gourd with a pencil before carving.
- Carve the gourd – Use a sharp knife or carving tool to carefully carve your design into the gourd. Take your time to ensure that the lines are clean and even. As you carve, be sure to remove the flesh and seeds from the inside of the gourd.
- Sand and finish – Once you have finished carving, use sandpaper to smooth any rough edges or uneven areas. You may also want to apply a coat of varnish or sealant to protect the gourd and give it a glossy finish.
- Arrange your flowers – With your new gourd vase ready, choose your favorite flowers and arrange them inside. Consider adding some greenery or other decorations to enhance the visual appeal of your arrangement.
Overall, carving gourd vases can be a fun and creative activity that produces beautiful, unique results. Whether you choose to create a simple or intricate design, your carved gourd vase is sure to be a conversation piece and add unique charm to any room.
12 Must-Do Activities in Dallas during Thanksgiving Week
You may want to see also
![]()
Make gourd masks - Costume Parties
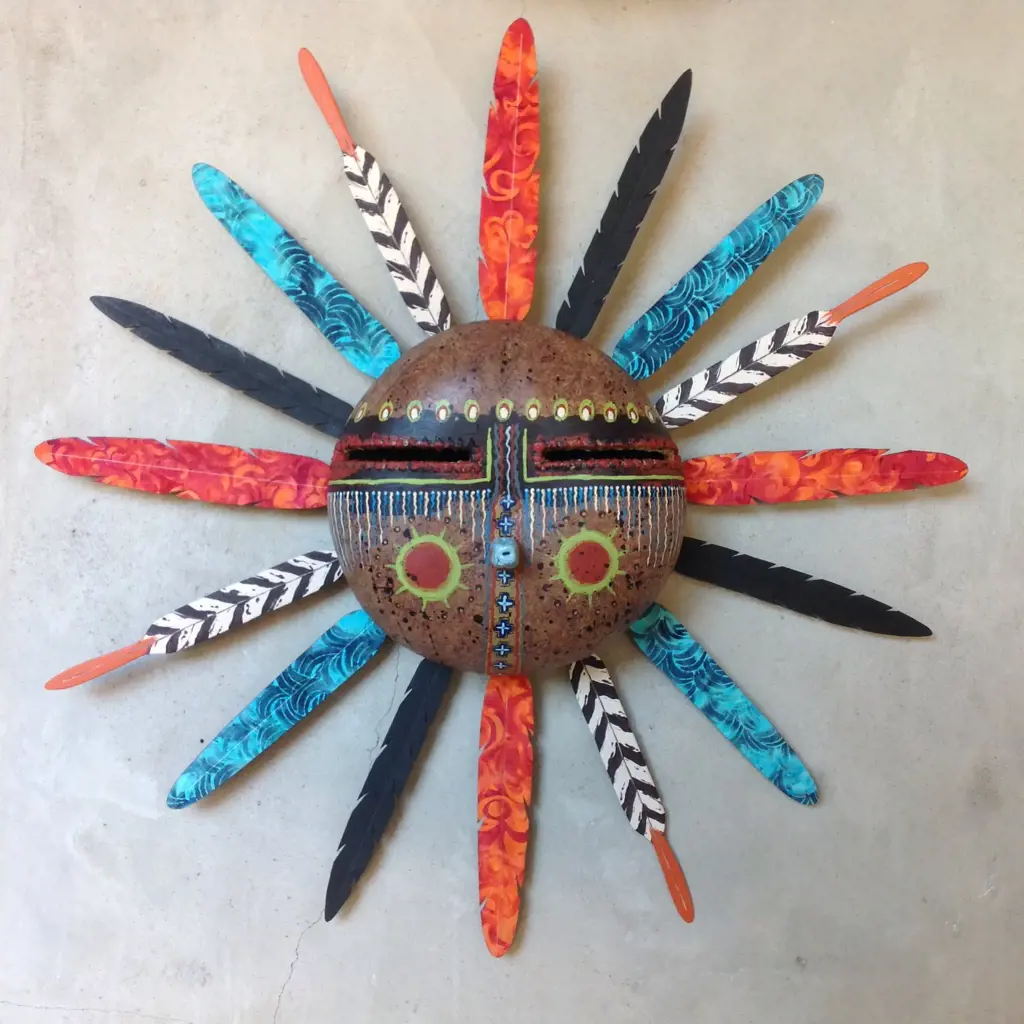
If you're looking for a creative and unique idea for your next costume party, look no further than gourd masks! Use the natural shape of the gourd to create imaginative masks that will surely impress your friends. Here are some tips to get you started:
- Select your gourds: While any type of gourd may work, some of the best options include birdhouse gourds, bottle gourds, and pumpkin gourds. Make sure they are clean and dry before starting.
- Draw your design: Begin by sketching out your desired mask design onto the surface of the gourd using a pencil. Remember to consider the shape of the gourd and try to work with its natural contours to create a three-dimensional effect.
- Carve the mask: Use a sharp knife or carving tool to carefully carve your design into the surface of the gourd. Work slowly and patiently to avoid any mistakes or accidents.
- Add color and detail: Once you have finished carving, you can add color and detail to your mask using paints, markers, or other decorative elements. Consider adding feathers, beads, or other accessories to create a truly unique and eye-catching mask.
- Wear your masterpiece: Once your gourd mask is complete, it's time to show it off! Wear it to your next costume party or event and be prepared to impress.
Gourd masks are a fun and creative way to elevate your next costume party. They require some patience and skill, but the results are well worth it. So why not give it a try and see what kind of unique and imaginative masks you can create?
10 Best Things to Do in Karachi for the Ultimate Experience
You may want to see also
![]()
Create gourd musical instruments - School Projects
Gourds are commonly used to make decorative items or birdhouses, but did you know that they can also be turned into musical instruments? In fact, gourds have been used for centuries to create musical instruments in many cultures around the world. With a little creativity and effort, you can create your own unique gourd musical instruments for school projects. Here are some ideas to get you started.
- Shakers - Gourd shakers are some of the easiest instruments to make. All you need is a small gourd and some beads, rocks, or beans to put inside. Simply drill holes in the top and bottom of the gourd and fill it with your chosen material. Close the holes with a wooden or cork stopper and decorate the outside with paint or markers. You can even attach a handle or strap to make it easier to hold and play.
- Drums - Gourd drums are a bit trickier to make, but they can produce some great sounds. You'll need a large, thick-walled gourd and some goatskin or other sturdy material for the drumhead. Cut off the top of the gourd and clean out the inside. Stretch the drumhead over the opening and secure it with nails or glue. Decorate the outside of the drum with paint or carvings and attach a strap for playing.
- Flutes - Gourd flutes are a unique and beautiful instrument to make. You'll need a long, thin gourd with a straight shape. Cut off one end of the gourd and scoop out the inside to create a hollow chamber. Drill a small hole near the bottom of the gourd and another near the top for the mouthpiece. You can shape the mouthpiece like a traditional flute or use a reed or plastic mouthpiece. Decorate the outside of the flute with paint or carvings.
- Lutes - Gourd lutes are a fun and challenging project for advanced students. You'll need a large, round gourd and some wooden parts, such as a neck, fretboard, and tuning pegs. Cut off the top of the gourd and clean out the inside. Attach the wooden parts to create the lute's body and neck. String the lute with nylon or gut strings and tune it to your desired pitch. Decorate the outside of the lute with paint or carvings.
Creating gourd musical instruments can be a fun and educational project for school. Not only will you learn about the history and culture of these instruments, but you'll also develop your creativity and craftsmanship skills. So grab some gourds and get started on your musical masterpiece!
12 Amazing Things to Do in Erie PA in Winter
You may want to see also
![]()
Make gourd sculptures - Art Exhibits
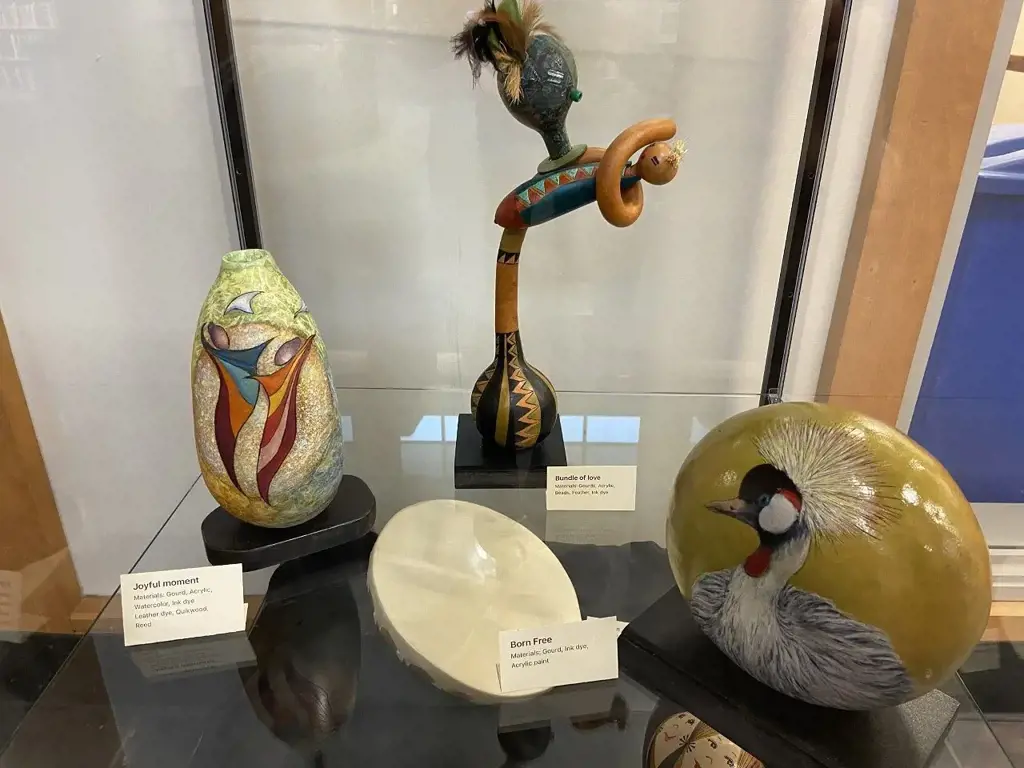
Gourds are a versatile and fascinating material to work with when creating art pieces. With their unique shapes, textures, and colors, gourds can inspire endless creativity and imagination. One of the most exciting ways to utilize gourds in art is by making sculptures. By carving, painting, and manipulating these natural objects, artists can create captivating pieces that are sure to turn heads at art exhibits.
When making gourd sculptures, it's important to consider the shapes and sizes of the gourds you're working with. Some gourds are long and narrow, while others are round and bulbous. Each individual gourd can be used to create different parts of a larger sculpture or to stand alone as a work of art. To start, you'll need to choose gourds that are in good condition, with undamaged skins and no soft spots.
One technique for making gourd sculptures involves carving the gourd's skin to create intricate designs and patterns. This can be done with a knife, chisel, or other carving tools. Some artists choose to carve deeply into the gourd, revealing the lighter, inner flesh, while others make delicate cuts that simply remove the top layer of skin. Whichever method you choose, the result can be a stunning work of art that highlights the natural beauty of the gourd.
Another approach to making gourd sculptures involves painting the gourds with various colors and patterns. This can be done with acrylic or oil paints, and can be as simple or complex as you like. Some artists use stencils or stamps to create repeating patterns, while others freehand their designs, creating one-of-a-kind pieces. Painting can also be combined with carving to create sculptures with more complex and dynamic aesthetics.
Once you've created your gourd sculptures, the next step is to exhibit them at art shows and galleries. Gourd art has gained popularity in recent years, with many organizations hosting gourd-themed events and competitions. By showcasing your creations at these events, you can connect with other artists and enthusiasts, and gain exposure for your art.
Overall, making gourd sculptures is a fun, creative, and rewarding way to explore the world of art. Whether you're a professional artist or a weekend hobbyist, the unique shapes and textures of gourds are sure to inspire you to create something truly amazing. So next time you're looking for a new artistic challenge, give gourd sculpture a try – you might just be surprised at what you can create!
13 Fun Things to Do in Camp Hill, PA
You may want to see also
![]()
Paint gourd Christmas ornaments - Holiday Decorations

When fall comes around, people often think about pumpkins and gourds as the perfect decorations for Halloween and Thanksgiving. But did you know that gourds can also make beautiful Christmas ornaments? With some creativity and simple supplies, you can transform plain gourds into festive and unique decorations for the holiday season. Here are some tips on painting gourd Christmas ornaments.
First, choose the right gourds. Look for small to medium-sized gourds that are symmetrical and have a flat bottom. You can find gourds in different shapes and colors, such as round, pear-shaped, or elongated. Some popular varieties for painting and decorating are birdhouse gourds, bottle gourds, and apple gourds.
Next, prepare the gourds for painting. Wash them with soap and water to remove any dirt or residue. Dry them thoroughly with a towel or let them air-dry overnight. Then, use sandpaper or a sanding sponge to smooth out the surface of the gourds. This will help the paint adhere better and give a smoother finish.
Now, it's time to paint the gourds. You can use acrylic or spray paint in any color or combination you like. Some popular colors for Christmas ornaments are red, green, gold, and silver. You can also use a base coat of white or black to create a contrast with the colors. Be creative and experiment with different patterns, such as stripes, polka dots, or snowflakes.
After the paint dries, you can add some embellishments to the gourd ornaments. For example, you can use a metallic or glitter glue to create a border or add some sparkle. You can also glue on some beads, sequins, or ribbon for extra decoration. Another idea is to drill a small hole in the top of the gourd and insert a hook or wire for hanging.
Finally, display your beautiful gourd ornaments on a Christmas tree, wreath, or garland. They will add a rustic and natural touch to your holiday decorations and impress your guests with your creativity. You can also give them as gifts to friends and family who appreciate handmade and unique items.
In conclusion, painting gourd Christmas ornaments is a fun and easy DIY project that allows you to unleash your creativity. With some simple steps and supplies, you can transform plain gourds into festive and charming decorations that will bring joy and cheer to your holiday season. Give it a try and see how much fun you can have with gourds!
12 Exciting Things to Do in Vermilion, Ohio
You may want to see also
Frequently asked questions
Painting them with fall designs such as leaves, pumpkins or acorns; carving them to make autumnal scenes; or using decoupage to attach fall-themed images or cut outs.
Yes, gourds can be made into birdhouses, bowls, vases, and even musical instruments.
Some cultures believe that drinking tea made from gourds can help with digestive issues, and also claim that applying gourd juice to the scalp can help with hair growth.
Sanding the surface of the gourd smooth and using a clear sealant or varnish can make the finished product look more polished. Adding embellishments such as beads, feathers or other decorative details can also help.


3 Comments
Nevaeh Everett
Matteo Giordani
AuthorDafydd Pineda