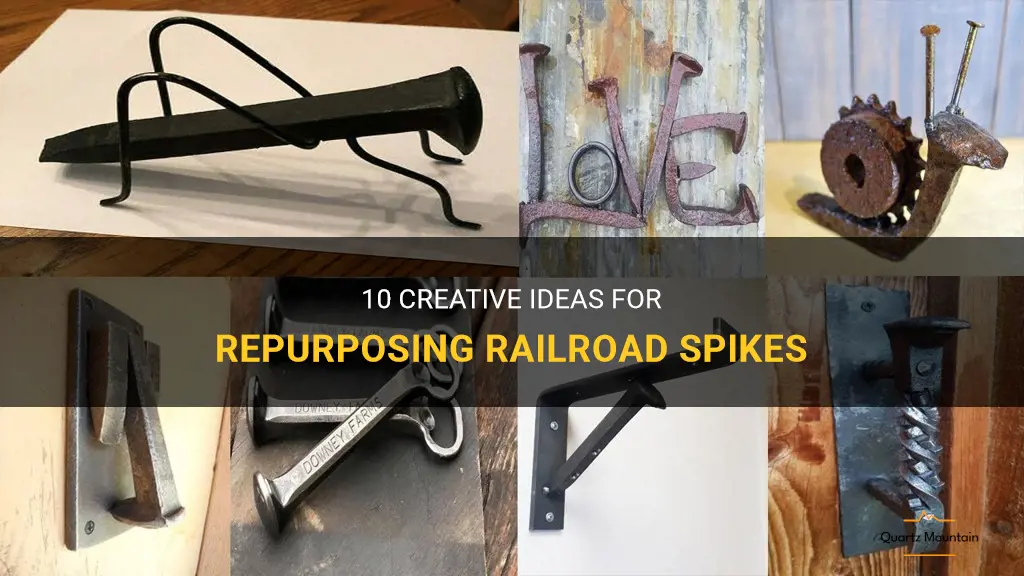
Have you ever come across a pile of railroad spikes and wondered what you could do with them? Instead of letting them rust away or tossing them in the trash, why not get creative and repurpose them into something new and unique? From rustic home decor to practical tools, there are countless possibilities for repurposing railroad spikes. In this article, we will explore 10 creative ideas that will inspire you to give these discarded objects a new lease on life. So grab your collection of railroad spikes and let's get repurposing!
| Activity | Description |
|---|---|
| Railroad Spike Art | Repurpose railroad spikes into unique art pieces like sculptures or wall decor. |
| Knife Making | Use railroad spikes as the raw material for creating handcrafted knives. |
| Home Décor | Incorporate railroad spikes into your home decor by using them as hooks or handles. |
| Garden Art | Use railroad spikes to create garden sculptures, plant stakes, or decorative borders. |
| Bottle Opener | Transform a railroad spike into a stylish and functional bottle opener. |
| Fire Poker | Make a sturdy fire poker by sharpening one end of a railroad spike and adding a handle. |
| Coat Rack | Create a rustic coat rack using railroad spikes as hooks. |
| Keychains | Craft personalized keychains by attaching railroad spikes to key ring loops. |
| Paperweights | Decorate your workspace with unique paperweights made from railroad spikes. |
| Wind Chimes | Craft melodic wind chimes by attaching railroad spikes to hanging strings or chains. |
What You'll Learn
- Hat rack: Hang railroad spikes on a board to create a unique and rustic hat rack
- Door handles: Attach railroad spikes to doors for a stylish and industrial touch
- Garden markers: Use railroad spikes as stylish plant markers in your garden
- Candle holders: Drill holes in railroad spikes to create unique candle holders
- Coat hooks: Mount railroad spikes on a wall to create rustic coat hooks
- Key holders: Attach a railroad spike to a wooden board to create a rustic key holder
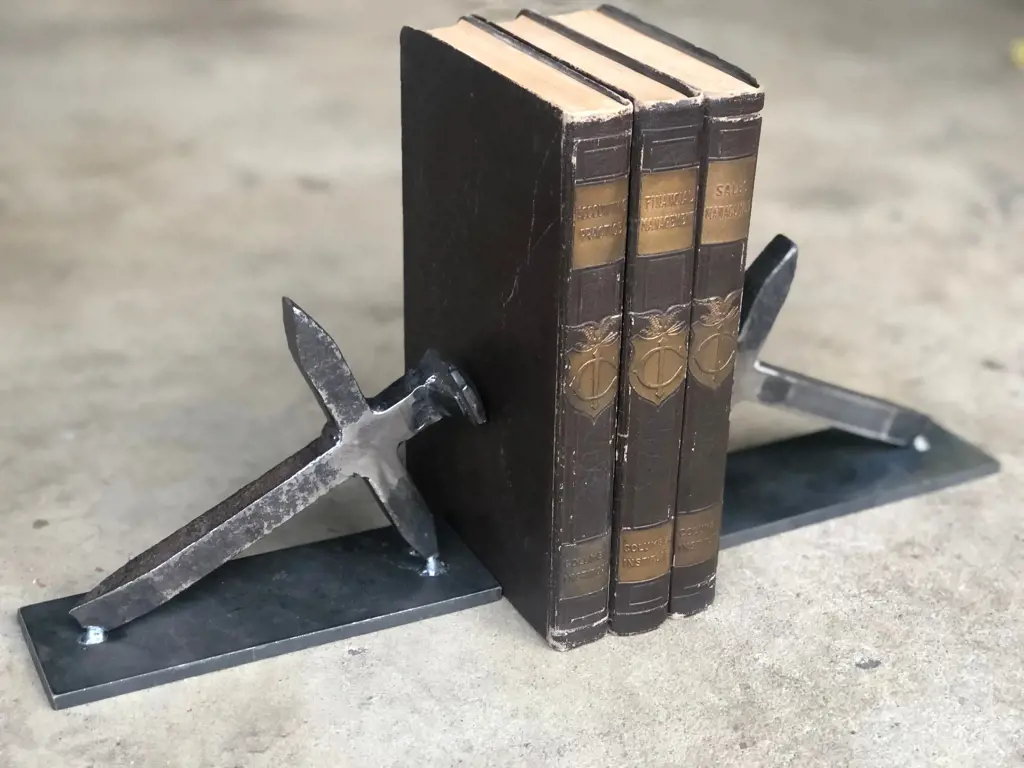
- Bookends: Create unique and stylish bookends using repurposed railroad spikes
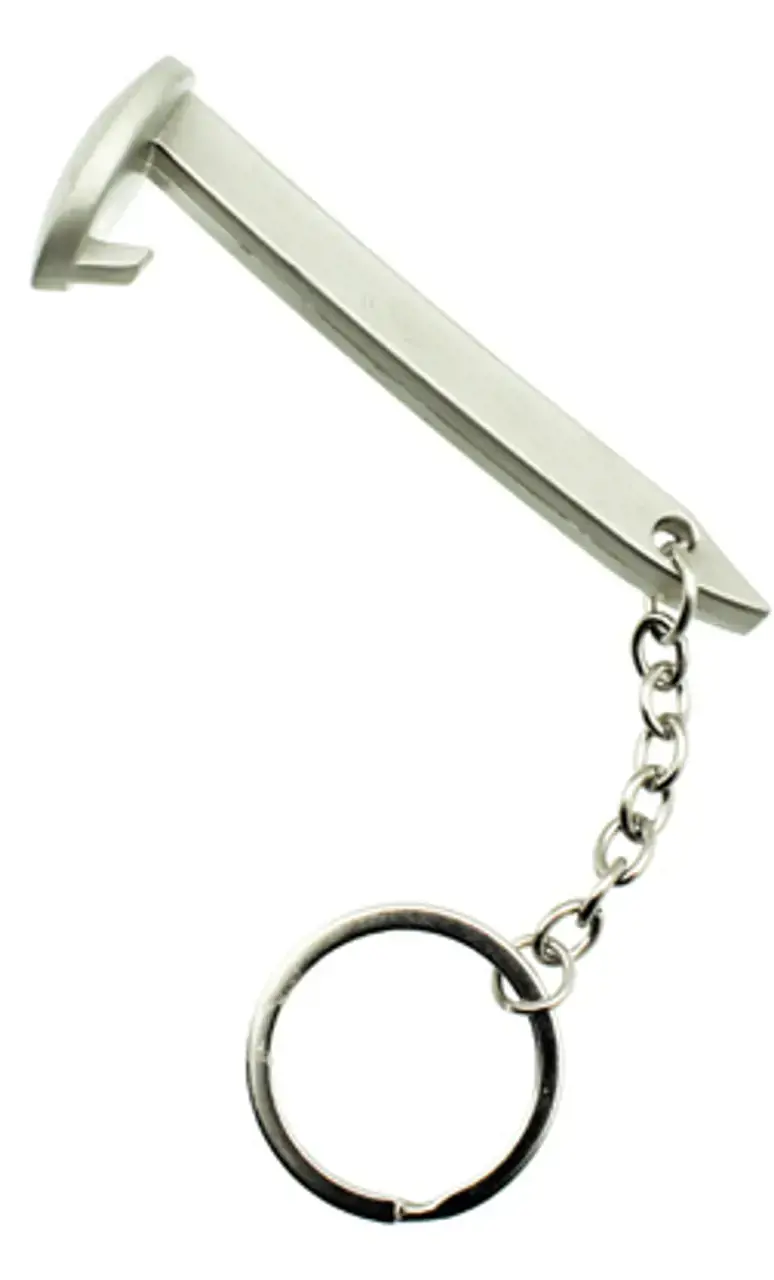
- Bottle openers: Transform railroad spikes into functional and decorative bottle openers
- Wine rack: Build a one-of-a-kind wine rack using repurposed railroad spikes
- Drawer pulls: Replace traditional drawer pulls with repurposed railroad spikes for an industrial look
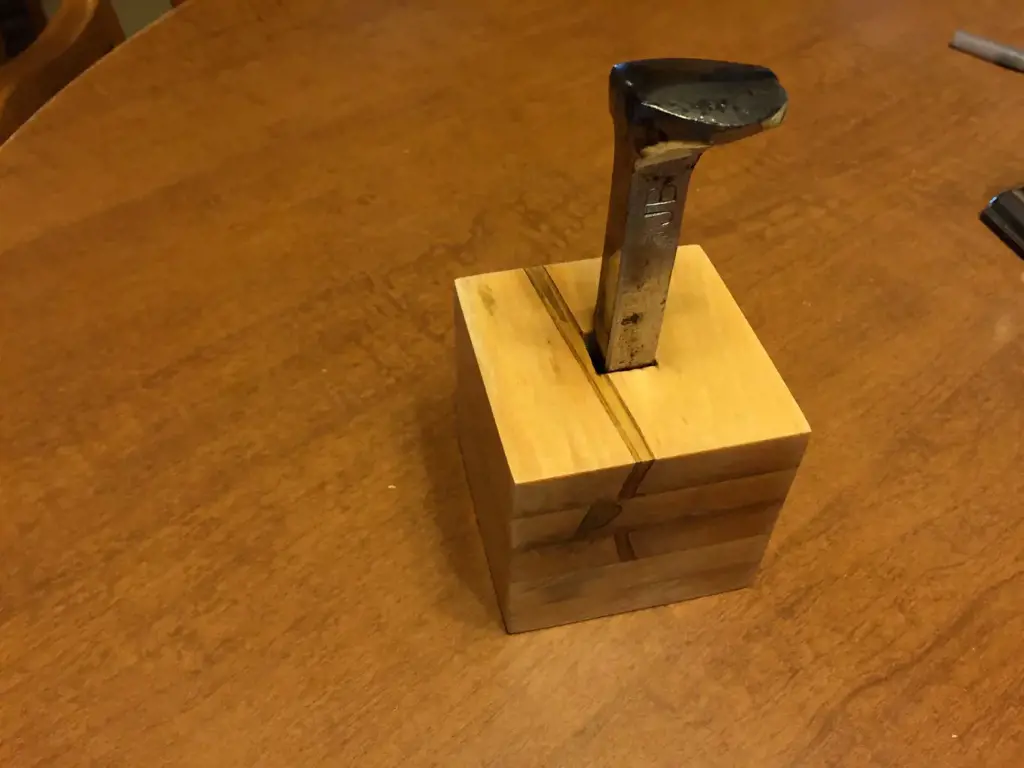
![]()
Hat rack: Hang railroad spikes on a board to create a unique and rustic hat rack
If you're looking for a unique and rustic way to hang your hats, why not create a hat rack using railroad spikes? Railroad spikes are not only durable and strong but their industrial look adds a touch of character to any space. Follow these simple steps to create your own railroad spike hat rack.
Materials you'll need:
- Railroad spikes (the number depends on how many hats you plan on hanging)
- A wooden board (size and type of wood depends on your preference)
- Screws or mounting hardware
- Power drill
- Sandpaper
- Stain or paint (optional)
- Brush or cloth (if staining or painting)
Step 1: Prep the board
Start by prepping your wooden board. If the board is rough or has any splinters, use sandpaper to smooth it out. You can also stain or paint the board to match your decor if desired. Allow the stain or paint to dry completely before proceeding.
Step 2: Mark and drill holes
Decide on the layout of your hat rack and mark where you want the railroad spikes to be placed on the board. Use a tape measure to ensure that the spacing between each spike is even. Once you've determined the placement, use a power drill to create holes at the marked locations. The size of the holes should be slightly smaller than the diameter of the railroad spikes to ensure a snug fit.
Step 3: Attach the spikes
Next, insert the railroad spikes into the drilled holes. Make sure they are secure and tightly fit into the board. If needed, you can use a rubber mallet to gently tap them in. If the spikes are not tight enough, you can add a small amount of wood glue to the holes before inserting the spikes.
Step 4: Secure the board
Once all the spikes are in place, secure the board to the wall using screws or mounting hardware. Make sure the board is level before attaching it. If you're using screws, drill pilot holes first to prevent the wood from splitting. If you're using mounting hardware, follow the manufacturer's instructions for installation.
Step 5: Hang your hats
Now that your railroad spike hat rack is securely mounted to the wall, it's time to hang your hats! Simply place each hat over a spike, allowing the brim or crown to rest on the spike. You can hang multiple hats on each spike, depending on their size and weight.
And there you have it! A unique and rustic hat rack made from railroad spikes. Not only does it provide a functional way to store and display your hats, but it also adds a cool and industrial touch to your space. Give it a try and enjoy your new hat rack!
14 Fun Things to Do in Columbus, Mississippi!
You may want to see also
![]()
Door handles: Attach railroad spikes to doors for a stylish and industrial touch
If you're a fan of industrial decor and looking for a unique way to add some flair to your doors, then attaching railroad spikes as door handles might be the perfect project for you. Not only are railroad spikes sturdy and durable, but they also bring a touch of history and character to any space. In this article, we will guide you through the steps to create your own railroad spike door handles.
Here's what you'll need:
- Railroad spikes: You can find these at antique stores, flea markets, or online marketplaces. Make sure they are clean from rust and debris.
- Door handles: Depending on your preference, you can choose door handles that will complement the rustic look of the railroad spikes. You can find a wide variety of options at hardware stores or online.
- Drill
- Screws
- Screwdriver
- Sandpaper
- Optional: Rust-resistant spray paint or clear coat
Step 1: Prepare the spikes
Start by cleaning the railroad spikes thoroughly. Use sandpaper to remove any rust or rough spots. If you prefer a polished look, you can also use a metal polish to shine them up. Make sure they are clean and smooth before moving on to the next step.
Step 2: Attach the spikes to the door
Decide where you want to place the railroad spike on your door. Mark the spot and use a drill to create pilot holes for the screws. Make sure the holes align with the holes in the spikes.
Step 3: Attach the door handles
Now it's time to attach the door handles. Place the screws through the holes in the spike and align them with the pilot holes on the door. Use a screwdriver to tighten the screws, ensuring that the spikes are securely attached.
Step 4: Optional: Finishing touches
If you want to add extra protection to the spikes, you can apply a rust-resistant spray paint or clear coat. This will help maintain their appearance and prevent any future rusting.
Step 5: Enjoy your new door handles
Once everything is securely in place, step back and admire your handiwork. The railroad spike door handles will add a unique and industrial touch to your doors, creating an eye-catching focal point in any room.
Remember, safety always comes first. When drilling or working with tools, wear protective gear and exercise caution. If you're unsure about any step, consult with a professional.
In conclusion, attaching railroad spikes as door handles is a creative way to incorporate an industrial and historical element into your home decor. Whether you're a fan of the rustic look or simply want something out-of-the-box, this DIY project will give your doors a stylish and unique touch. So why not give it a try and enjoy the charm that railroad spikes bring to your space?
10 Must-See Attractions on the South Coast: Explore the Best of the Southern Coastline
You may want to see also
![]()
Garden markers: Use railroad spikes as stylish plant markers in your garden
If you're looking for a unique and stylish way to label your plants in the garden, look no further than railroad spikes. These sturdy metal stakes can be repurposed as plant markers, adding a touch of industrial charm to your outdoor space. Here are a few ideas on how to use railroad spikes as garden markers.
Firstly, gather the necessary materials. You will need railroad spikes, a hammer or mallet, and some sturdy, weather-resistant labels. You can use metal or engraved plastic labels that can withstand outdoor conditions.
Start by cleaning the railroad spikes. Scrub off any dirt or rust using a wire brush or sandpaper. This will ensure that your garden markers look polished and ready to be displayed.
Next, decide on the labeling method. You can either engrave the labels directly onto the railroad spikes or attach individual labels to each spike. Engraving can be done using a metal engraving tool or by taking the spikes to a specialized engraving service. If you prefer the latter option, make sure to choose labels that are weather-resistant and won't fade or peel under sunlight or rain.
Once you have your labels ready, it's time to hammer the railroad spikes into the ground. Choose a spot next to each plant where the label can be easily seen without obstructing the growth of the plant itself. Use a hammer or mallet to drive the spike firmly into the soil, making sure it stands upright and secure.
Now, attach the labels to the railroad spikes. If you opted for engraved labeling, simply slide the labels onto the spike. If you chose individual labels, fasten them securely using wire or a weather-resistant adhesive.
Your garden markers are now ready to go! Not only will these railroad spike markers add a unique touch to your garden, but they will also help you keep track of your plants. Whether you have a vegetable garden, a flower bed, or a collection of herbs, these markers will allow you to easily identify and showcase your plants.
Another benefit of using railroad spikes as garden markers is their durability. These sturdy metal stakes will withstand the elements and last for years to come. They won't warp or rot like some other types of markers, ensuring that your garden remains well-labeled and organized.
In conclusion, repurposing railroad spikes as garden markers is a creative and stylish way to label your plants. With a little bit of cleaning, engraving, and hammering, you can create unique markers that will add a touch of industrial charm to your garden. So the next time you find yourself with a few extra railroad spikes, don't throw them away - give them a new life in your garden and enjoy the beauty of these repurposed markers.
11 Amazing Things to Do Near Cumberland Falls
You may want to see also
![]()
Candle holders: Drill holes in railroad spikes to create unique candle holders
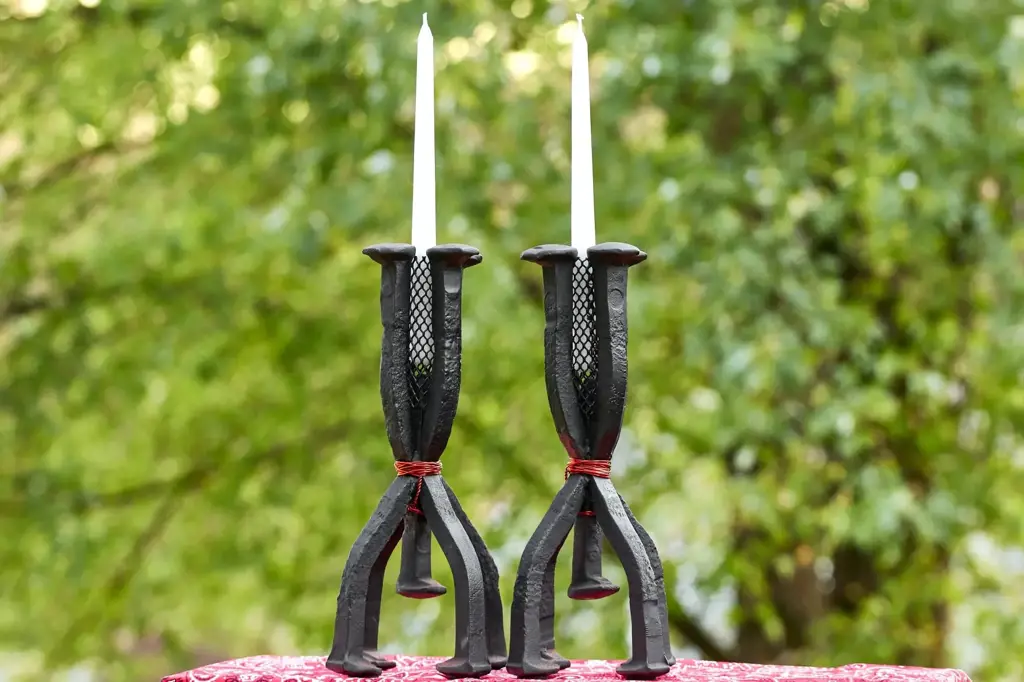
Railroad spikes can actually be repurposed into many different items, and one creative idea is to turn them into unique candle holders. With just a few simple steps, you can create a one-of-a-kind piece that adds a rustic touch to any room. Here's how:
Gather the necessary materials:
- Railroad spikes (the number depends on how many candle holders you want to make)
- Drill
- Metal drill bits (appropriate for drilling into steel)
- Sandpaper
- Safety goggles
- Tea lights or small candles
Prepare your workspace:
Before you begin, make sure you have a safe and well-ventilated area to work in. It's also a good idea to wear protective goggles to shield your eyes from any flying debris during the drilling process.
Clean the railroad spikes:
Depending on where you sourced your railroad spikes from, they might have accumulated rust or dirt. Use sandpaper to clean off any surface impurities and create a smooth surface.
Mark the spots for drilling:
Decide where you want the candles to be located on the spike, and make a small mark with a pencil or a marker. You can choose to position them at the top, middle, or towards the bottom of the spike, depending on your preference.
Drill the holes:
With your safety goggles on, carefully drill holes at the marked spots. It's essential to use a drill bit designed for drilling into metal, as regular bits may break or become dull. Start by using a smaller drill bit and gradually increase the size until it fits the candle snugly.
Smooth the edges:
After drilling, you may notice some sharp edges or burrs around the holes. Use sandpaper to smooth them out, creating a safer surface for your candles.
Test the fit:
Place a tea light or small candle in each hole to ensure they fit securely. Adjust the size of the holes if necessary by using a larger drill bit or a round metal file.
Optional: Add a finishing touch:
If desired, you can enhance the look of your candle holders by painting or staining the railroad spikes. Consider using metallic colors, such as bronze or silver, to accentuate the industrial vibe.
Light up your candle holders:
Once your candle holders are complete, insert the tea lights or small candles into the holes. Light them up, and enjoy the cozy and unique ambiance they create!
By repurposing railroad spikes, you can create stylish and functional candle holders that add character to your space. Whether you're decorating for a special occasion or simply enjoying a quiet evening at home, these handmade pieces are sure to impress. So, gather your materials and get ready to transform these ordinary objects into extraordinary decor!
Exploring the Beauty of Rosman, NC
You may want to see also
![]()
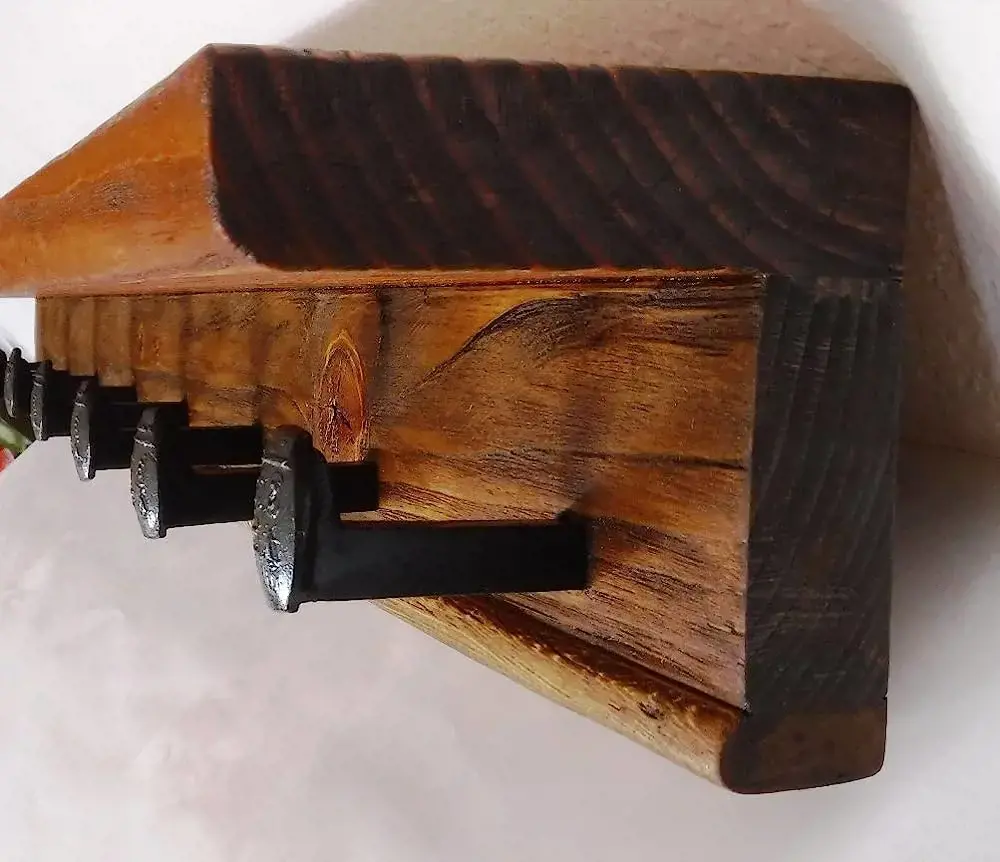
Coat hooks: Mount railroad spikes on a wall to create rustic coat hooks
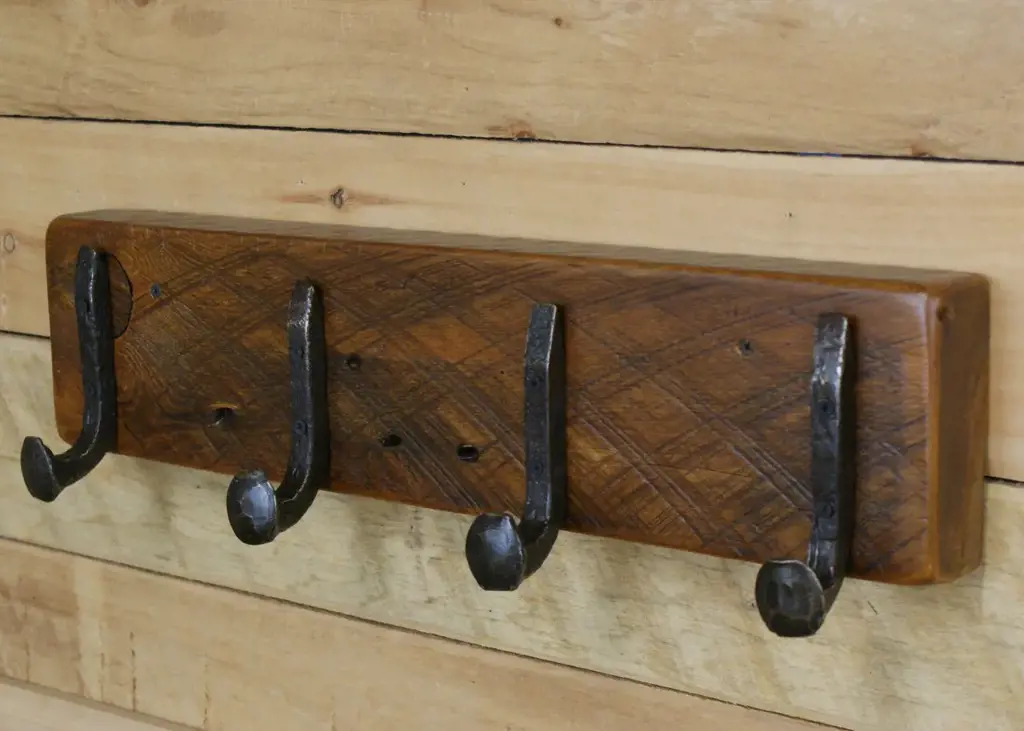
If you're looking for a unique and rustic way to enhance your home decor, consider using railroad spikes as coat hooks. These sturdy and weathered iron spikes have a charming industrial appeal that can add a touch of vintage charm to any space. Whether you're a railroad enthusiast or simply appreciate the rugged beauty of these historic artifacts, here's how you can create your own railroad spike coat hooks.
First, you'll need to gather the necessary materials. Of course, the most crucial item is the railroad spikes themselves. You can find old railroad spikes at flea markets, salvage yards, or even online auction sites. Make sure to select spikes that are still in good condition, without excessive rust or damage.
Next, you'll need to prepare the spikes for use. Start by cleaning off any dirt, rust, or grease that may have accumulated over the years. You can use a wire brush or steel wool to scour away the surface grime. If the spikes are heavily rusted, you may need to soak them in a vinegar or rust-removing solution for a few hours to loosen the rust before scrubbing. Once the spikes are clean, wipe them dry with a clean cloth.
Now comes the fun part – mounting the spikes on your wall. Choose a location where you want your coat hooks to be, making sure it's easily accessible and convenient for hanging coats and other items. Using a stud finder, locate the wall studs in that area. This is important because the spikes, being made of heavy iron, will require a strong anchor point for secure mounting.
Once you've marked the locations of the wall studs, it's time to drill pilot holes. The size of the holes will depend on the screws or wall anchors you plan to use, so make sure to select the appropriate drill bit. Drill the pilot holes into the marked spots on the wall studs, making sure the holes are straight and level.
Now you're ready to attach the spikes to the wall. Position each spike over a pilot hole and insert a screw or wall anchor through the hole in the spike and into the wall stud. Using a screwdriver or drill, tighten the screws until the spikes are securely fastened to the wall. Make sure the spikes are level and evenly spaced for a pleasing visual effect.
Finally, it's time to enjoy your new railroad spike coat hooks. Hang coats, hats, scarves, or any other items you need to keep organized and easily accessible. The rugged, vintage charm of the railroad spikes will add a unique touch to your space and serve as a conversation starter for guests.
In addition to being functional, these DIY railroad spike coat hooks can also be a fun and creative project. You can personalize the spikes by painting them in different colors or distressing them with sandpaper for a more weathered look. You can also experiment with different arrangements and mounting methods to suit your personal style and needs.
Using railroad spikes as coat hooks is a great way to incorporate a piece of history into your home decor. These rugged iron artifacts not only provide a practical solution for hanging coats and other items but also add an element of rustic charm and character to any space. So, why not give it a try and create your own unique coat hooks with railroad spikes?
13 Cool Activities to Beat the Freeze: Fun Things to Do in Extreme Cold Weather
You may want to see also
![]()
Key holders: Attach a railroad spike to a wooden board to create a rustic key holder
If you're looking for a unique and rustic way to organize your keys, why not repurpose some old railroad spikes? These sturdy metal spikes can be transformed into a functional and aesthetically pleasing key holder with just a few simple steps. Here's how you can create your own railroad spike key holder.
Materials you'll need:
- Railroad spike(s)
- Wooden board
- Screws or nails
- Screwdriver or hammer
- Sandpaper
- Stain or paint (optional)
- Hooks (optional)
Step 1: Gather your materials
Start by collecting all the materials you'll need for this project. Railroad spikes can often be found at salvage yards or online. Choose a wooden board that is wide enough to accommodate the number of railroad spikes you plan to use.
Step 2: Prepare the board
If your wooden board is rough or has any splinters, use sandpaper to smooth it out. You can also stain or paint the board to add a touch of color or to match your decor. Let the stain or paint dry completely before moving on to the next step.
Step 3: Mark the placement of the spikes
Decide where you want to place the railroad spikes on the board. You can position them in a straight line, stagger them, or create a unique pattern. Mark the spots where you'll be attaching the spikes using a pencil or marker.
Step 4: Attach the railroad spikes
Using screws or nails, firmly attach the railroad spikes to the wooden board. Make sure they are securely fastened and will be able to hold the weight of your keys. If you're using screws, use a screwdriver to tighten them. If you're using nails, use a hammer to drive them in.
Step 5: Optional: Add hooks
If you want to further enhance the functionality of your key holder, you can add hooks below the railroad spikes. You can find small hooks at hardware stores or repurpose hooks from old coat racks. Attach them to the wooden board using screws or nails, making sure they are centered beneath each railroad spike.
Step 6: Mount the key holder
Once all the railroad spikes and hooks are securely attached, you can mount the key holder on your wall. Use screws or nails to hang the board, making sure it is level. You can also add additional hooks or hangers on the back of the board to make it easier to hang.
Step 7: Hang your keys
Now that your railroad spike key holder is ready, you can start hanging your keys on the spikes. Each spike can hold multiple keys, and the hooks below can be used for other items like hats or bags. With this rustic and unique key holder, you'll never have to worry about misplacing your keys again.
Creating a key holder out of railroad spikes is not only a practical solution for organizing your keys, but it also adds a touch of rustic charm to your home. This simple DIY project can be completed in just a few hours, and the end result is a functional piece of decor that will make a statement in any room. So gather your materials and start repurposing those old railroad spikes into a stylish new key holder today.
12 Exciting Activities to Try in Hermosa Beach this Weekend
You may want to see also
![]()
Bookends: Create unique and stylish bookends using repurposed railroad spikes
If you're a book lover looking for a creative way to display your favorite novels, why not try making your own bookends using repurposed railroad spikes? Not only will this project add a touch of uniqueness to your bookshelf, but it is also an eco-friendly way to reuse materials that may have otherwise ended up in a landfill.
To get started, you will need a few railroad spikes, which can typically be found at salvage yards, antiques stores, or online marketplaces. Make sure to choose spikes that are in good condition and free from rust or other damage.
First, clean the railroad spikes thoroughly to remove any dirt or debris. You can use warm water and dish soap, or a metal cleaner if necessary. Once cleaned, dry the spikes thoroughly.
Next, you will need to decide on a design for your bookends. The possibilities are endless, but a simple yet stylish option is to create a triangle shape using two spikes. This design provides stability and support for your books while adding visual interest to your bookshelf.
To assemble the bookends, place one spike flat on your work surface, pointing upwards. Take the second spike and position it at an angle, with the pointed end meeting the first spike near the top. This will create a triangular shape. Weld the two spikes together at the point where they meet, ensuring a secure bond. If you're not comfortable with welding, you can also use a strong adhesive or even tie the spikes together with wire.
Once your bookends are assembled, you can leave them as is for a rustic look, or you can get creative with paint or other decorative techniques. Consider painting the bookends in a color that complements your bookshelf or adding personal touches like patterns or designs.
To protect your books and bookshelf from any potential scratches, consider adding felt pads or rubber feet to the bottom of the bookends. This will provide a cushioning effect and ensure the bookends stay in place.
Now that your bookends are complete, it's time to display them proudly on your bookshelf. Arrange your books between the two spikes, making sure they are secure and won't topple over.
In addition to being functional, these repurposed railroad spike bookends are a great conversation starter and can add a unique touch to your home decor. Plus, knowing that you have repurposed materials in a creative way can give you a sense of satisfaction and pride.
So, why not give this DIY project a try? Turn old railroad spikes into stylish bookends and enjoy the satisfaction of knowing you've created something unique and eco-friendly. Happy crafting!
13 Must-Do Activities for a 2-Day Trip to Washington DC
You may want to see also
![]()
Bottle openers: Transform railroad spikes into functional and decorative bottle openers
Railroad spikes can be transformed into various functional and decorative items, and one creative way to repurpose them is by turning them into unique bottle openers. These bottle openers not only have a rustic and industrial look but also provide a practical use for your favorite beverages. Here is a step-by-step guide to help you create your own railroad spike bottle opener.
Materials Needed:
- Railroad spike
- Bench vise
- Hammer
- Metal file
- Drill and metal drill bit
- Sandpaper
- Optional: Paint or sealant
Instructions:
- Collecting Railroad Spikes: Start by acquiring some railroad spikes. These can often be found at flea markets, salvage yards, or online marketplaces. Make sure to choose spikes that are in good condition and not heavily rusted.
- Cleaning and Preparing the Spike: Before beginning your project, thoroughly clean the railroad spike to remove any dirt or grime. You can use a wire brush or sandpaper for this purpose. If there is significant rust, you may need to sand it down to reveal the bare metal.
- Securing the Spike: With the spike clean and ready, securely clamp it in a bench vise. The vise will hold the spike steady while you shape it.
- Bending the Spike: Using a hammer, carefully bend the spike at the desired angle, creating the handle of the bottle opener. You can experiment with different designs and shapes to make it unique. Take your time and make sure to apply even pressure to avoid any unwanted kinks or bends.
- Shaping the Opener: Once you have formed the handle, use a metal file to shape the end of the spike into a functional bottle opener. Start by creating a small notch in the metal, then file down both sides to form the classic bottle opener shape. Regularly test the opener on a bottle to ensure it is forming correctly.
- Drilling a Hole: Determine where you want to attach a keyring or loop for hanging the bottle opener. Mark the spot on the handle and use a drill with a metal drill bit to carefully create a hole. Make sure the hole is large enough to accommodate your chosen attachment.
- Finishing Touches: After completing the shaping and drilling, use sandpaper to smooth out any rough edges or imperfections. This will give your bottle opener a clean and polished look. Optionally, you can paint or seal the metal to add a protective layer or apply a touch of color.
- Attach the Keyring: To make the bottle opener portable, attach a keyring or loop through the drilled hole. This will allow you to hang or attach it to a keychain, ensuring it is always within easy reach.
With these simple steps, you can transform a basic railroad spike into a one-of-a-kind bottle opener. These handmade pieces make great gifts or personal additions to your barware collection. So why not give it a try and create your own unique railroad spike bottle opener? Cheers!
15 Epic Things to Do in Amritsar That You Can't Miss
You may want to see also
![]()
Wine rack: Build a one-of-a-kind wine rack using repurposed railroad spikes
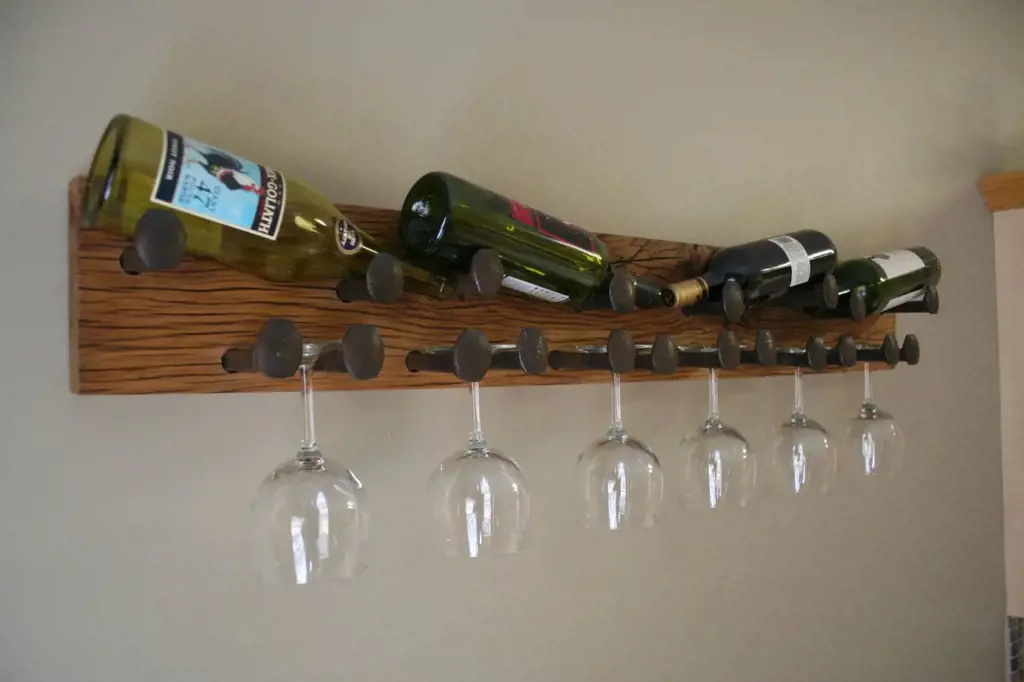
If you have a collection of railroad spikes and are looking for creative ways to repurpose them, one idea is to use them to build a unique wine rack. This project is not only a fun way to showcase your creativity, but it also adds a touch of rustic charm to your home.
Before getting started, make sure you have the following materials:
- Railroad spikes (the exact number will depend on the size of the wine rack you want to build)
- Scrap wood (preferably hardwood for durability)
- Wood screws
- Drill
- Sandpaper
- Clear varnish or paint (optional)
Here are the steps to build your railroad spike wine rack:
Step 1: Determine the size and design of your wine rack. Consider the number of bottles you want to store and the space you have available. Sketch out your design on paper to visualize the final product.
Step 2: Prepare the railroad spikes. Thoroughly clean each spike to remove any rust or dirt. If desired, you can add a coat of clear varnish or paint to protect the spikes and enhance their appearance.
Step 3: Cut the scrap wood to the desired length for the wine rack. It's recommended to choose a width that allows the wine bottles to fit snugly without being too tight.
Step 4: Sand the edges of the wood to ensure they are smooth and free from splinters.
Step 5: Position the railroad spikes on the wood, evenly spacing them according to your design. Mark the spots where the spikes will be attached.
Step 6: Pre-drill holes on the marked spots using a drill bit that is slightly smaller than the diameter of the wood screws. This will prevent the wood from splitting when you attach the spikes.
Step 7: Screw the spikes onto the wood using the pre-drilled holes. Make sure they are securely fastened.
Step 8: Once all the spikes are attached, give the wine rack a final sanding to smooth out any rough edges.
Step 9: If desired, apply a coat of clear varnish or paint to protect the wood and give it a polished look. Allow it to dry completely before using.
Step 10: Mount the wine rack on a wall or place it on a countertop or table. Insert your wine bottles and admire your one-of-a-kind creation!
Remember to always exercise caution when handling sharp objects like railroad spikes, and consider wearing protective gloves during the construction process.
Building a wine rack with repurposed railroad spikes is a fantastic way to showcase your DIY skills and add a touch of uniqueness to your home. Whether you're a wine connoisseur or simply enjoy a glass now and then, this project will surely be a conversation starter. So grab your materials and get ready to create a functional and eye-catching wine rack that will impress your guests.
12 Best Activities to Enjoy in Lake Geneva During October
You may want to see also
![]()
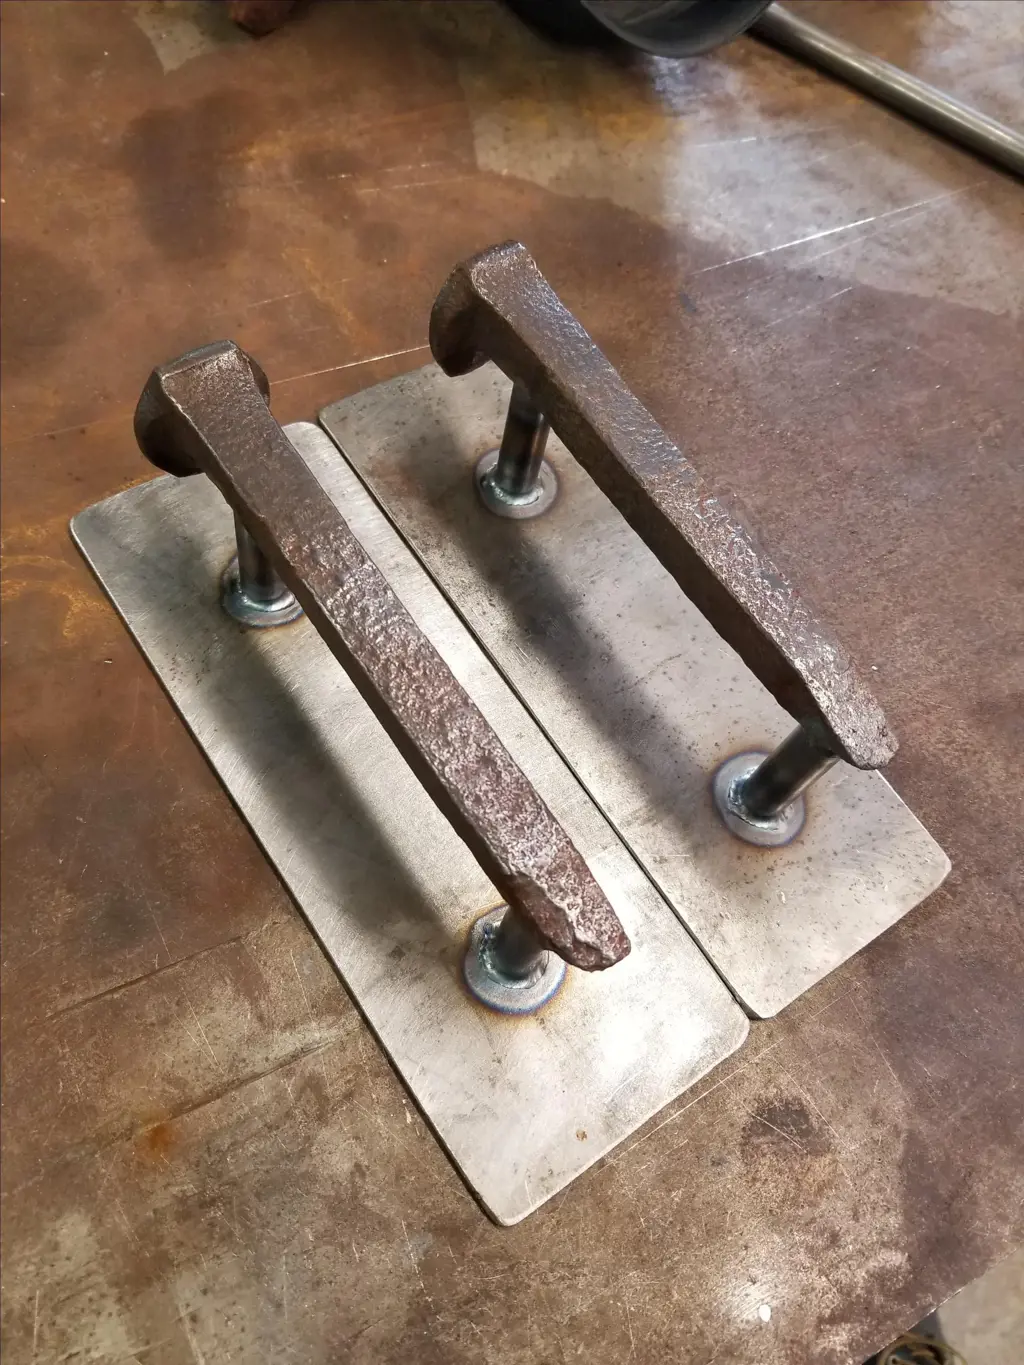
Drawer pulls: Replace traditional drawer pulls with repurposed railroad spikes for an industrial look
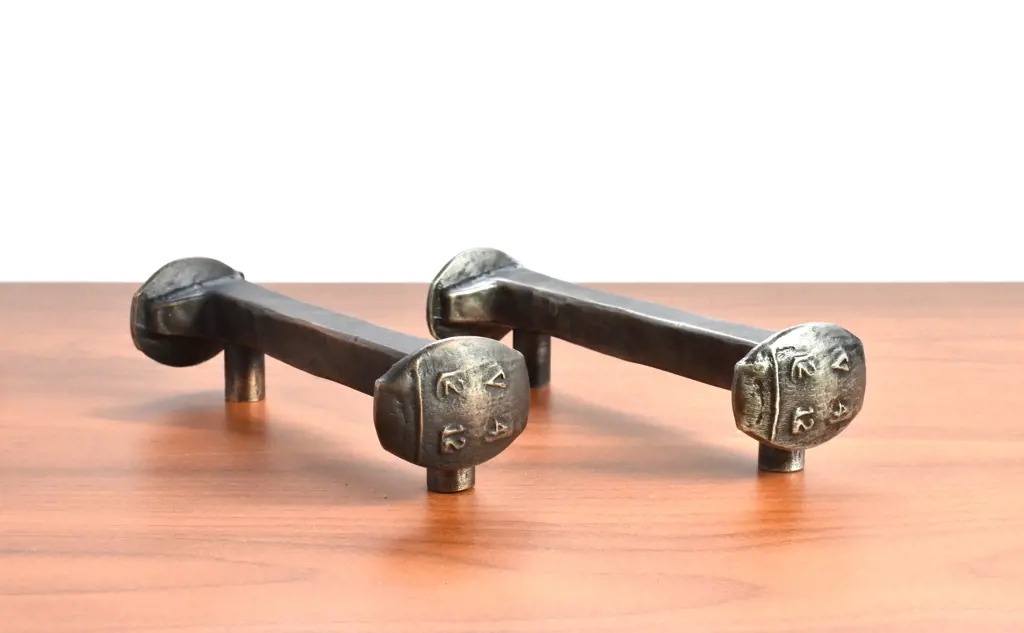
If you're looking for a unique and industrial-inspired way to spruce up your furniture, consider using repurposed railroad spikes as drawer pulls. Not only are they visually appealing and durable, but they also add a touch of history and character to your home. Here's a step-by-step guide on how to create your own railroad spike drawer pulls.
Step 1: Gather Materials
To get started, you'll need the following materials:
- Railroad spikes: These can often be found at antique stores, salvage yards, or online. Make sure to choose ones that are straight and in good condition.
- Power drill: You'll need a drill with a bit that's the same diameter as the screws you plan to use.
- Sandpaper: Use sandpaper to remove any rust or rough spots from the railroad spikes.
- Screws: Choose screws that are the right length to attach the railroad spike to your drawer. Make sure they're sturdy and will hold the weight of the pull.
Step 2: Prepare the Railroad Spikes
Before you can attach the spikes to your drawers, you'll need to clean and prep them. Start by cleaning off any excess dirt or grime using a wire brush or a damp cloth. If the spikes have any rust, you can use sandpaper to remove it and reveal the original metal underneath. Be sure to wear gloves and protective eyewear during this step to avoid injury.
Step 3: Mark Pilot Holes
Next, you'll need to mark where you'll be drilling pilot holes for the screws. Measure and mark the center point on each railroad spike, ensuring that it aligns with the center of the drawer. Use a pencil or marker to make these markings.
Step 4: Drill Pilot Holes
Using a power drill with the appropriate drill bit, carefully drill pilot holes into the marked areas on each railroad spike. Be sure to use a slow and steady motion, applying gentle pressure to avoid damaging the spike. The pilot holes should be smaller in diameter than the screws to ensure a secure fit.
Step 5: Attach Railroad Spikes
Now it's time to attach the railroad spikes to your drawer fronts. Line up the pilot holes on the spikes with the corresponding holes on your drawer. Insert screws through the holes in the spikes and tighten them securely with a screwdriver or drill.
Step 6: Finish and Enjoy
Once all the railroad spikes are securely attached, give them a final wipe down to remove any fingerprints or smudges. Stand back and admire your work! Your drawers now have unique and eye-catching pulls that give off an industrial and rustic vibe.
In conclusion, repurposing railroad spikes as drawer pulls is a creative way to add an industrial touch to your furniture. The process is simple and can be done by anyone with basic DIY skills. So why settle for traditional drawer pulls when you can have handmade, one-of-a-kind pieces that tell a story? Give this DIY project a try and see the difference it makes in the overall aesthetic of your home.
12 Fun Things to Do in Winthrop, WA
You may want to see also
Frequently asked questions
There are many creative and practical ways to repurpose old railroad spikes. One popular option is to turn them into unique and rustic coat hooks. By attaching the spike to a piece of wood or metal, you can create a sturdy and interesting hook for hanging coats, hats, or keys.
Yes, railroad spikes can be transformed into fashionable and edgy jewelry pieces. A common approach is to cut and shape the spike, then polish or decorate it as desired. Some people use the spike as a pendant for necklaces or bracelets, while others incorporate them into earrings or rings for a statement accessory.
Railroad spikes can add a touch of industrial charm to your garden. One idea is to use them as edging for flower beds or pathways. By burying them partially in the ground, you can create a defined border that also serves as a visual accent. Additionally, railroad spikes can be repurposed as decorative stakes for climbing plants or as unique plant markers.