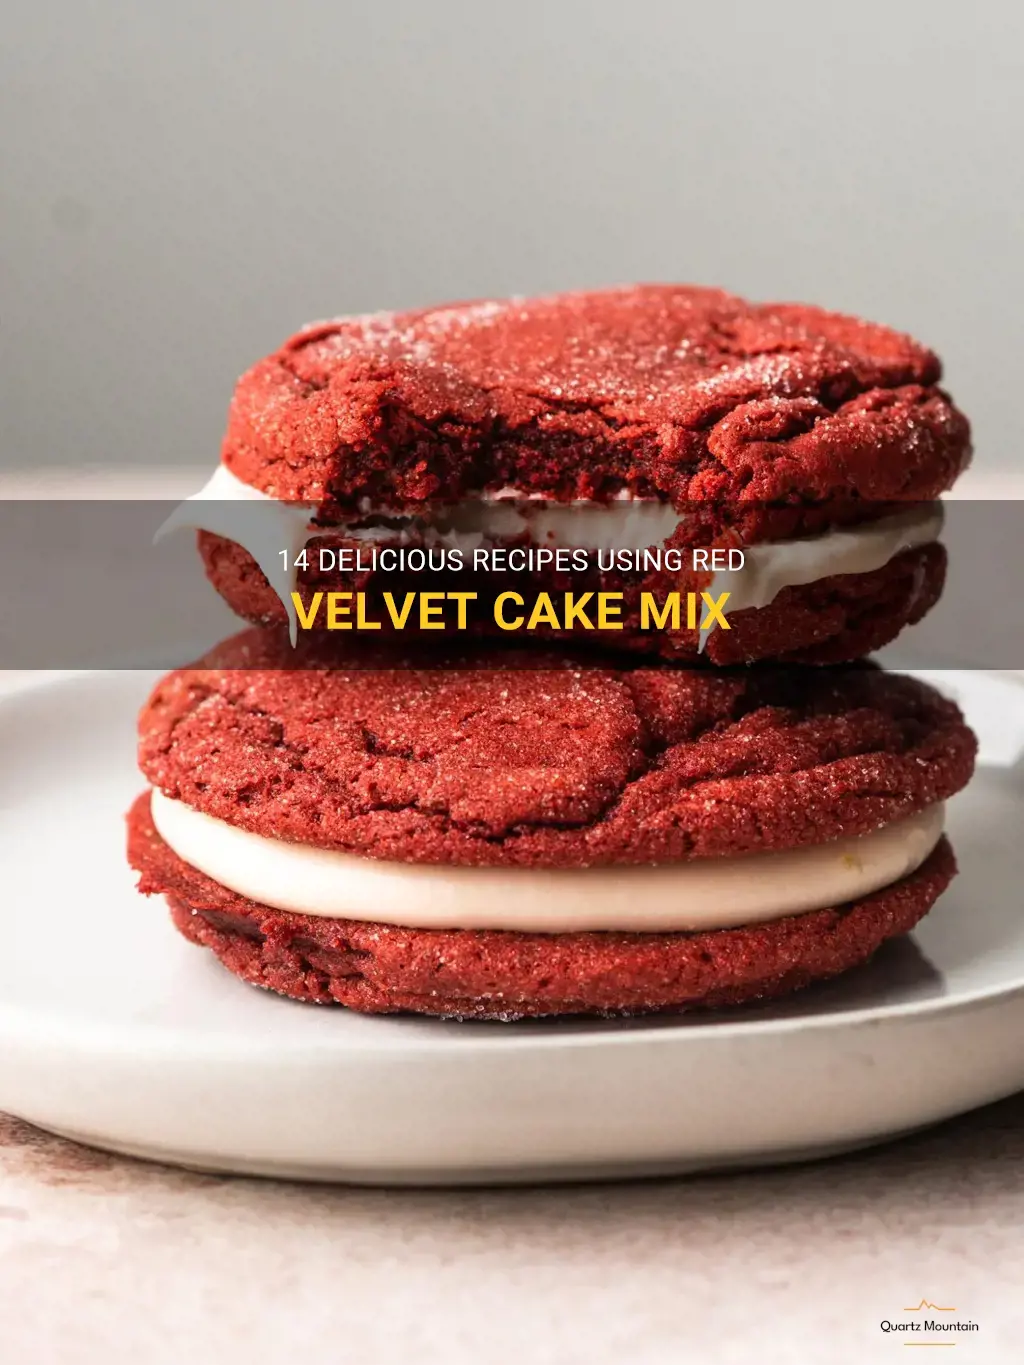
Red velvet cake is a beloved dessert known for its rich, moist texture and vibrant red color. But did you know that you can use red velvet cake mix as a versatile ingredient to create a whole range of delicious treats? From cookies and bars to milkshakes and cheesecakes, the possibilities are endless. Whether you're a red velvet lover or simply looking for a new and exciting way to use cake mix, these 14 recipes will tantalize your taste buds and leave you craving for more. So grab your apron and get ready to whip up some mouthwatering treats using red velvet cake mix!
What You'll Learn
- Red Velvet Cake Cookies - bake in your kitchen
- Red Velvet Pancakes - cook on a stovetop
- Red Velvet Cake Pops - make in your kitchen
- Red Velvet Cupcakes - bake in your oven
- Red Velvet Whoopie Pies - make in your kitchen
- Red Velvet Cake Truffles - prepare in your kitchen
- Red Velvet Milkshake - blend in your blender
- Red Velvet Cheesecake Bars - bake in your oven
- Red Velvet Ice Cream - make in an ice cream maker
- Red Velvet Brownies - bake in your oven
- Red Velvet Waffles - cook on a waffle iron
- Red Velvet Doughnuts - fry in your kitchen
- Red Velvet French Toast - cook on a stovetop
- Red Velvet Mug Cake - make in your microwave
![]()
Red Velvet Cake Cookies - bake in your kitchen
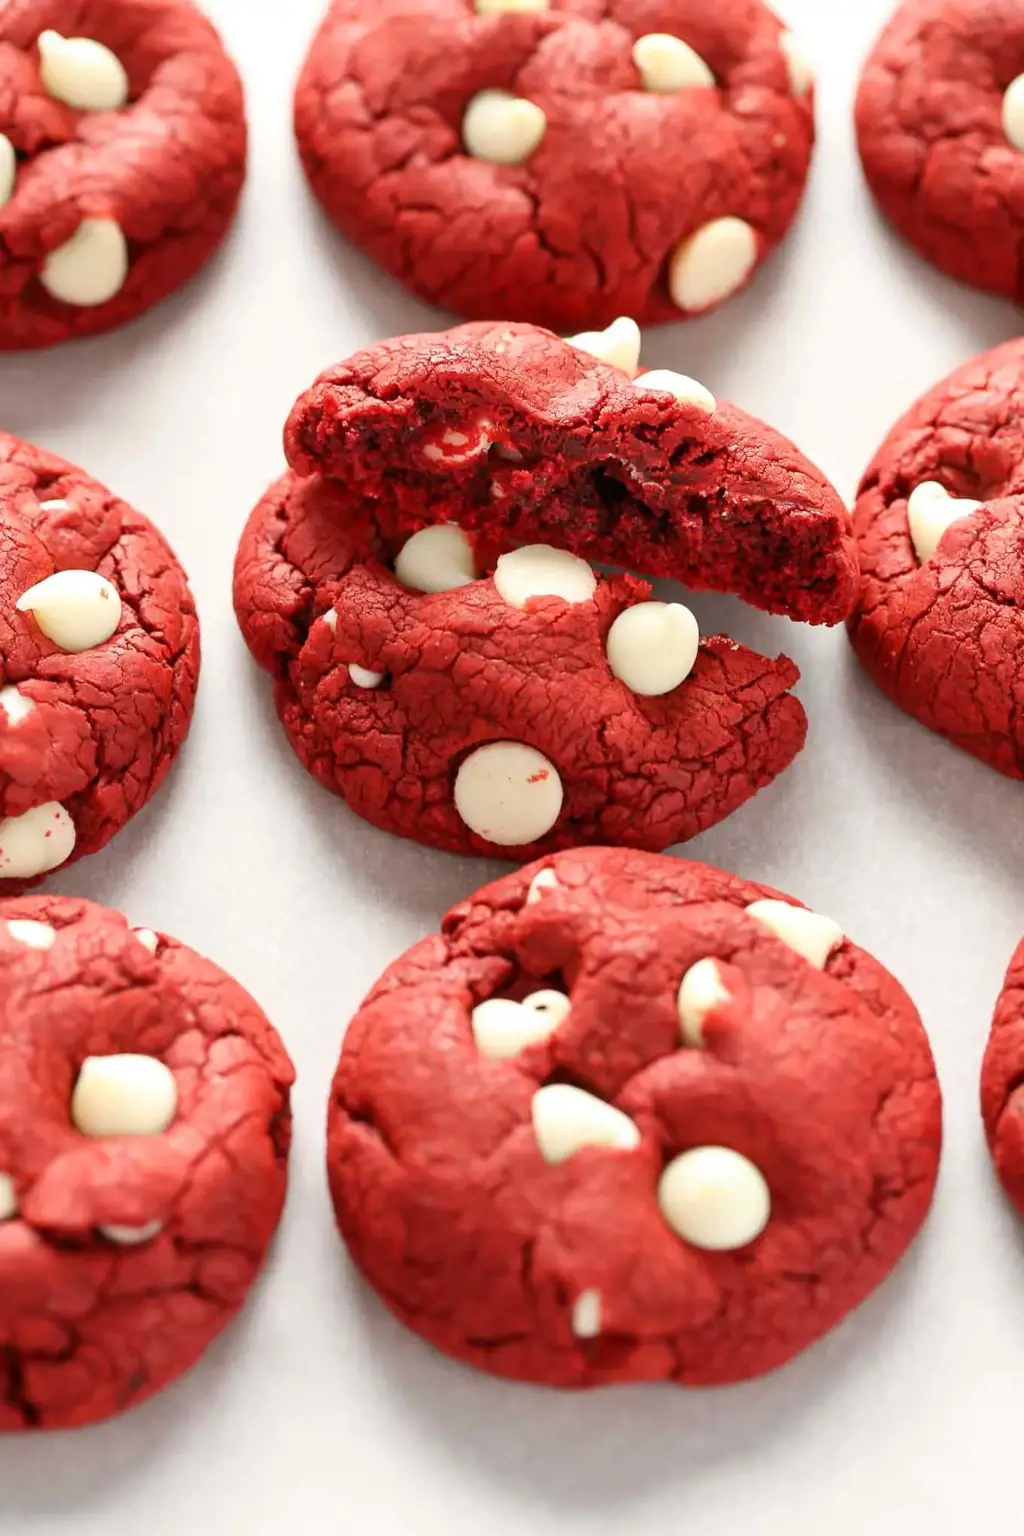
Red velvet cake is a classic dessert known for its vibrant red color and rich flavor. While it's commonly enjoyed in cake form, there are plenty of other delicious ways to use red velvet cake mix. One popular option is to make red velvet cake cookies, which are a fun and tasty twist on the traditional treat. With just a few additional ingredients and some creativity, you can easily whip up a batch of these delightful cookies in your own kitchen.
To make red velvet cake cookies, you'll first need to gather your ingredients. Along with the red velvet cake mix, you'll also need butter, eggs, and vanilla extract. Additionally, you can add in extras like white chocolate chips, cream cheese frosting, or even crushed Oreos for added flavor and texture. Once you have everything ready, it's time to start baking!
Start by preheating your oven to the temperature specified on the cake mix box. In a large bowl, combine the cake mix, melted butter, eggs, and vanilla extract. Using an electric mixer or a spoon, mix the ingredients together until they form a thick and sticky dough. At this point, you can fold in any additional ingredients, such as chocolate chips or crushed Oreos, for extra flavor.
Next, you'll want to line a baking sheet with parchment paper or silicone mats to prevent sticking. Using a cookie scoop or a spoon, drop rounded tablespoons of dough onto the prepared baking sheet. Make sure to space them out evenly, as the cookies will spread as they bake. If desired, you can gently press down on each dough ball with the back of a spoon to flatten them slightly.
Place the baking sheet in the preheated oven and bake for the time indicated on the cake mix box, usually around 10-12 minutes. Keep an eye on the cookies as they bake, as they can quickly go from perfectly cooked to overdone. You'll know they're ready when the edges start to turn golden brown and the centers are no longer glossy.
Once baked, remove the cookies from the oven and let them cool on the baking sheet for a few minutes. Then, transfer them to a wire rack to cool completely. If desired, you can top the cookies with a drizzle of cream cheese frosting or dust them with powdered sugar for a decorative touch.
Red velvet cake cookies are a delicious treat that are sure to impress friends and family. They have the same distinct flavor and beautiful red hue as traditional red velvet cake, but in a fun and portable form. Whether you enjoy them on their own or paired with a glass of milk or cup of coffee, these cookies are sure to satisfy any sweet tooth. So why wait? Grab a box of red velvet cake mix and start baking your own batch of these delightful cookies today!
12 Sexy Things to Do in Vegas
You may want to see also
![]()
Red Velvet Pancakes - cook on a stovetop
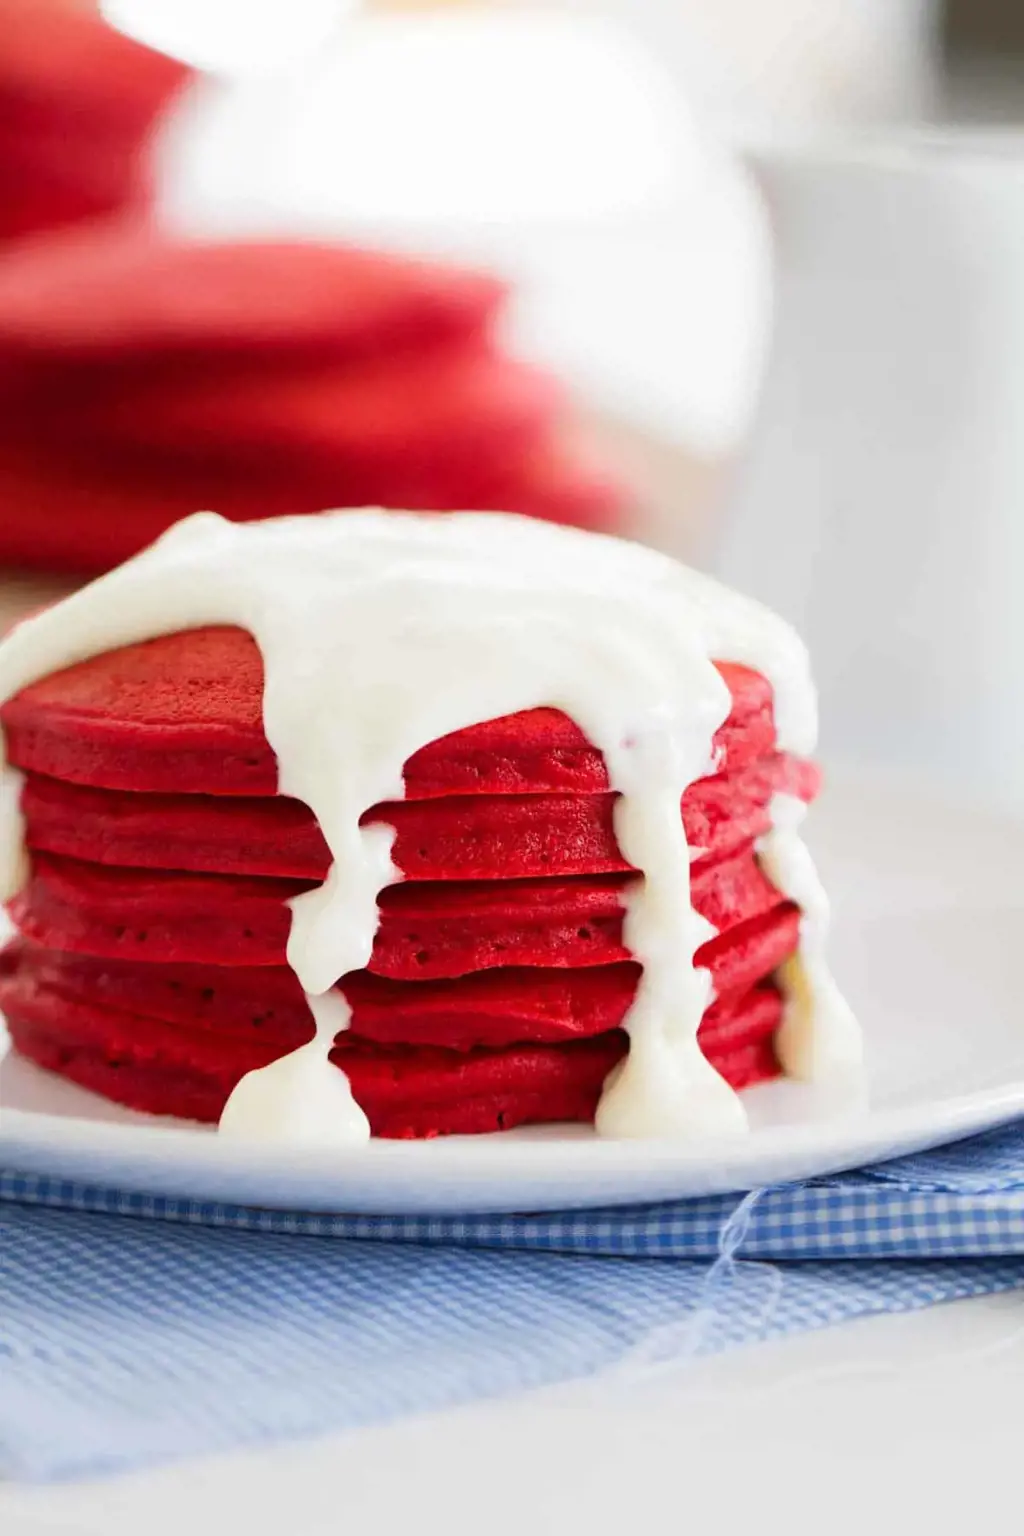
Red velvet cake is a deliciously rich and decadent dessert that is known for its deep red color and moist texture. But did you know that you can do more with red velvet cake mix than just make a cake? One creative and tasty option is to make red velvet pancakes!
To make red velvet pancakes, you will need a box of red velvet cake mix, along with the ingredients listed on the box. In addition, you will need some pancake toppings of your choice, such as whipped cream, cream cheese frosting, or fresh fruit.
First, prepare the red velvet cake mix according to the instructions on the box, adding any additional ingredients that may be required, such as eggs, oil, and water. Mix the batter until smooth and well combined.
Next, heat a griddle or a non-stick skillet over medium-high heat. Once the griddle is hot, lightly grease it with cooking spray or butter. Using a ladle or a measuring cup, pour about 1/4 cup of the red velvet cake batter onto the griddle for each pancake.
Cook the pancakes for approximately 2-3 minutes on each side, or until they are golden brown and cooked through. Flip the pancakes carefully using a spatula, making sure not to break them.
Once the pancakes are cooked, transfer them to a serving plate. You can stack them up to make a more visually appealing presentation. Top the pancakes with your favorite toppings, such as a dollop of whipped cream, a drizzle of cream cheese frosting, or some fresh fruit like strawberries or raspberries.
Serve the red velvet pancakes immediately while they are still warm. The pancakes will have a slightly sweet and tangy flavor from the red velvet cake mix, making them a delightful and unique twist on traditional pancakes.
Red velvet pancakes are a great breakfast or brunch option for special occasions or whenever you feel like treating yourself to something indulgent. They are sure to impress your family and friends, and they also make for a fun and delicious Valentine's Day or Christmas morning breakfast.
So, next time you have a box of red velvet cake mix sitting in your pantry, consider making red velvet pancakes. They are easy to make, and the result is a mouthwatering and visually stunning dish that will have everyone asking for seconds. Enjoy!
10 Fun Labor Day Activities in Chicago
You may want to see also
![]()
Red Velvet Cake Pops - make in your kitchen
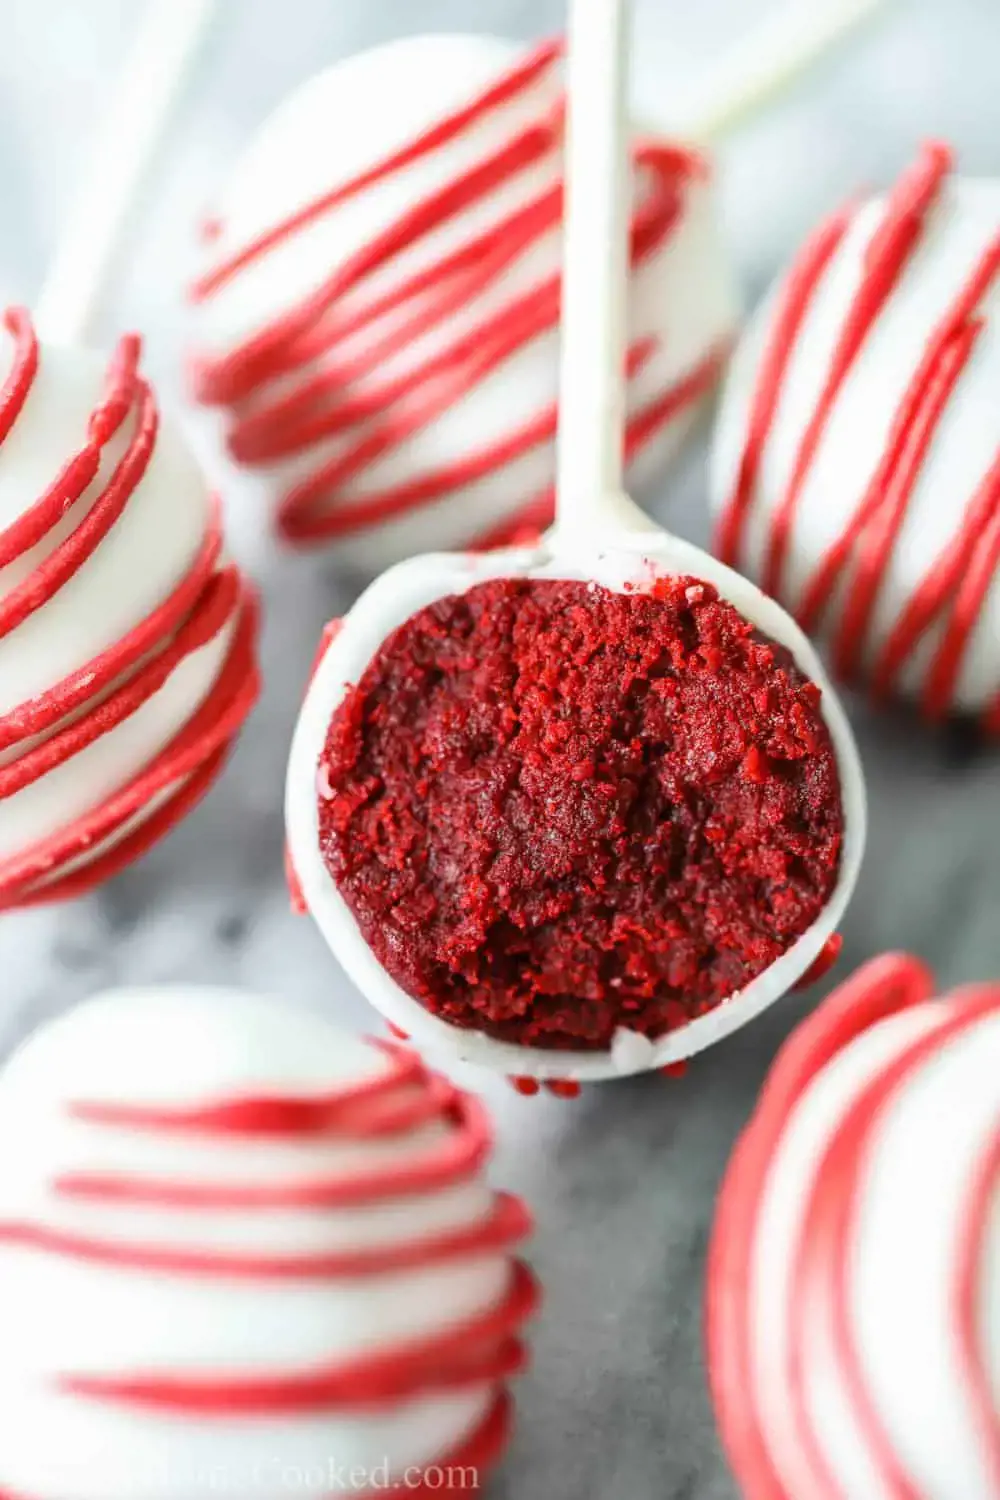
If you have a box of red velvet cake mix sitting in your pantry, you might be wondering what else you can do with it besides making a traditional cake. Look no further! In this article, we will show you how to make delicious and adorable Red Velvet Cake Pops right in your own kitchen.
Red Velvet Cake Pops are a fun and trendy dessert that can be served at parties, baby showers, or enjoyed as a sweet treat any time. They are made by crumbling up red velvet cake, mixing it with cream cheese frosting, rolling it into balls, and coating them in chocolate or candy melts. They are then placed on lollipop sticks and decorated according to your preference.
Here's a step-by-step guide to making Red Velvet Cake Pops:
Ingredients:
- 1 box of red velvet cake mix
- Ingredients specified on the cake mix box (usually eggs, oil, and water)
- 1 container of cream cheese frosting
- 1 package of chocolate or candy melts
- Lollipop sticks
- Sprinkles or other decorations
Instructions:
- Prepare the red velvet cake according to the instructions on the box. Allow it to cool completely.
- Once the cake is cooled, crumble it up into a large mixing bowl.
- Add the cream cheese frosting to the crumbled cake and mix it together until well combined. You can use a spoon or your hands for this step.
- Once the cake and frosting are mixed together, use your hands to roll the mixture into small balls, about the size of a golf ball.
- Place the rolled balls on a lined baking sheet or plate and put them in the freezer for about 20 minutes to firm up.
- While the cake pops are in the freezer, melt the chocolate or candy melts according to the instructions on the package. You can use a microwave or a double boiler for this step.
- Once the cake pops have firmed up, dip the tip of a lollipop stick into the melted chocolate or candy melts, and then insert it into a cake ball. Repeat this step for all the remaining cake balls.
- Once all the cake balls have lollipop sticks inserted, carefully dip each one into the melted chocolate or candy melts, making sure to coat the entire cake ball. Gently tap off any excess chocolate.
- While the chocolate is still wet, decorate the cake pops with sprinkles or other decorations of your choice. You can get creative and add different colors or shapes to match the occasion.
- Place the finished cake pops upright in a foam block or a cake pop stand to let the chocolate set completely.
And there you have it - homemade Red Velvet Cake Pops that are sure to impress your friends and family! These sweet treats are not only delicious but also fun to make. So the next time you find yourself with a box of red velvet cake mix, don't just settle for a regular cake - get creative and make some cake pops!
14 Fun and Exciting Things to Do in Clarion, PA
You may want to see also
![]()
Red Velvet Cupcakes - bake in your oven
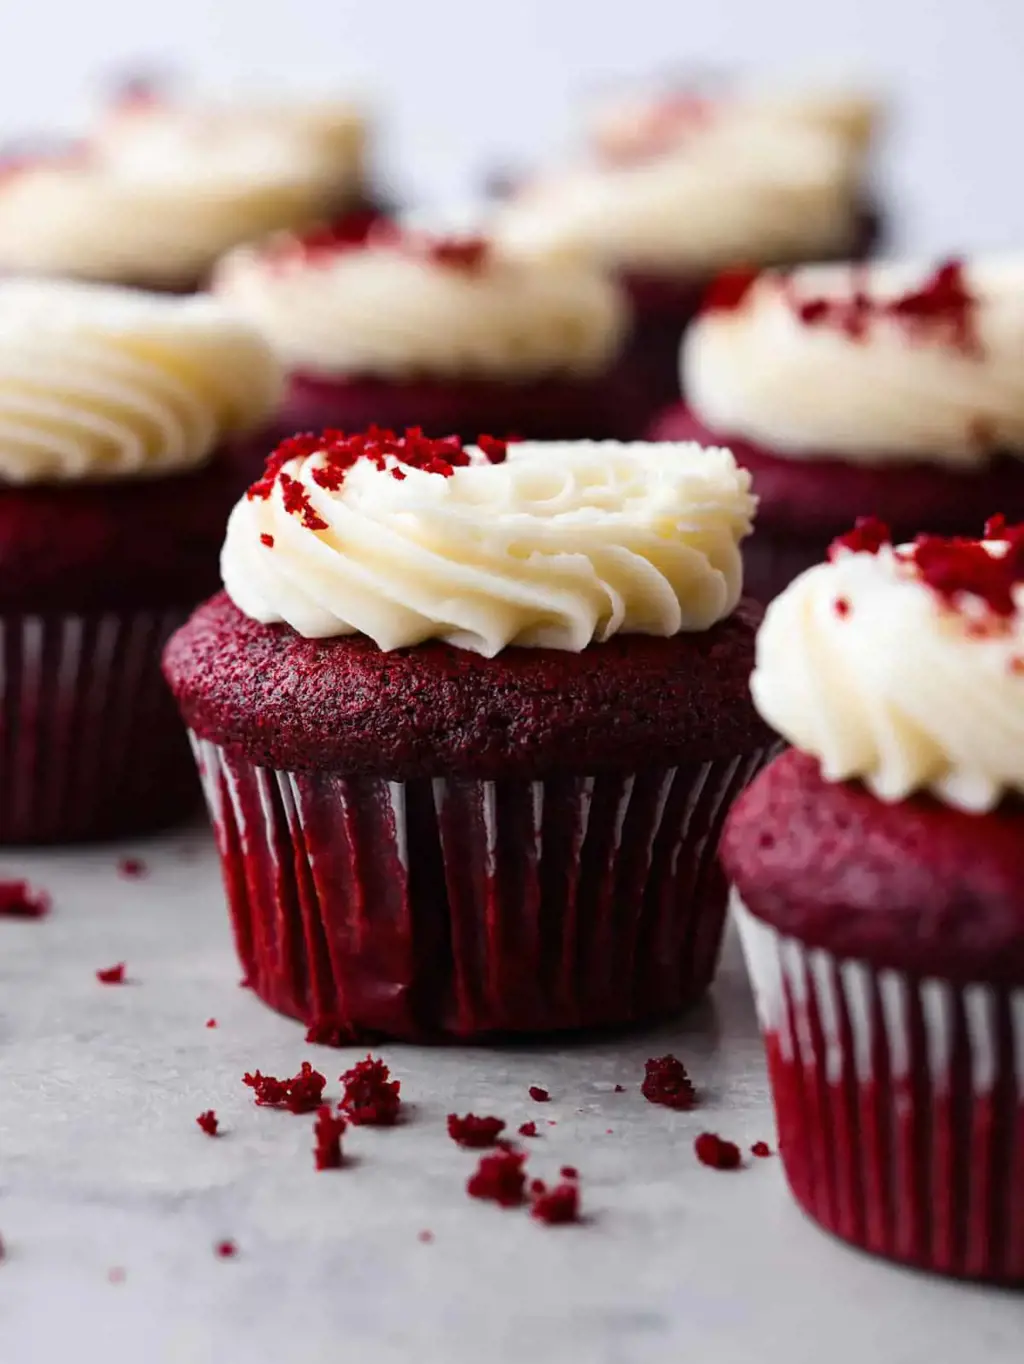
Red velvet cake is a delicious and visually stunning dessert that is perfect for any occasion. If you have a box of red velvet cake mix on hand, why not use it to make some mouthwatering red velvet cupcakes? Here is a simple recipe that will guide you through the process of creating these delectable treats in your own oven.
To start, gather all the necessary ingredients. You will need one box of red velvet cake mix, as well as the additional ingredients listed on the box such as eggs, oil, and water. It's best to let the eggs and oil come to room temperature before beginning.
Preheat your oven to the temperature recommended on the cake mix box. Typically, this is around 350°F (175°C). While the oven is preheating, line a cupcake tin with paper liners. This recipe will make about 24 cupcakes.
Next, prepare the cake batter according to the instructions on the box. In a large mixing bowl, combine the red velvet cake mix, eggs, oil, and water. Use an electric mixer on medium speed to beat the ingredients together until a smooth batter forms. Be careful not to overmix, as this can cause the cupcakes to become tough.
Once the batter is ready, use an ice cream scoop or spoon to fill each cupcake liner about two-thirds full. This will allow room for the cupcakes to rise as they bake. Place the cupcake tin in the preheated oven and bake for the amount of time specified on the box, usually around 18-22 minutes.
To test if the cupcakes are done, insert a toothpick into the center of one cupcake. If it comes out clean or with a few crumbs clinging to it, the cupcakes are ready. Remove the tin from the oven and let the cupcakes cool in the pan for a few minutes. Then, transfer them to a wire rack to cool completely.
While the cupcakes are cooling, you can prepare a delicious cream cheese frosting to top them off. Mix together softened cream cheese, butter, powdered sugar, and vanilla extract until smooth and fluffy. Feel free to add a few drops of red food coloring to achieve a vibrant red color.
Once the cupcakes have cooled, frost them generously with the cream cheese frosting. You can use a piping bag for a professional-looking swirl or simply spread the frosting with a knife. For added decoration, you can sprinkle some red velvet cake crumbs or red sprinkles on top.
These homemade red velvet cupcakes will surely impress your family and friends. They are perfect for birthdays, holidays, or any time you're craving a sweet treat. So, grab that box of red velvet cake mix and get baking!
12 Fun Things to Do in Warm Springs, GA
You may want to see also
![]()
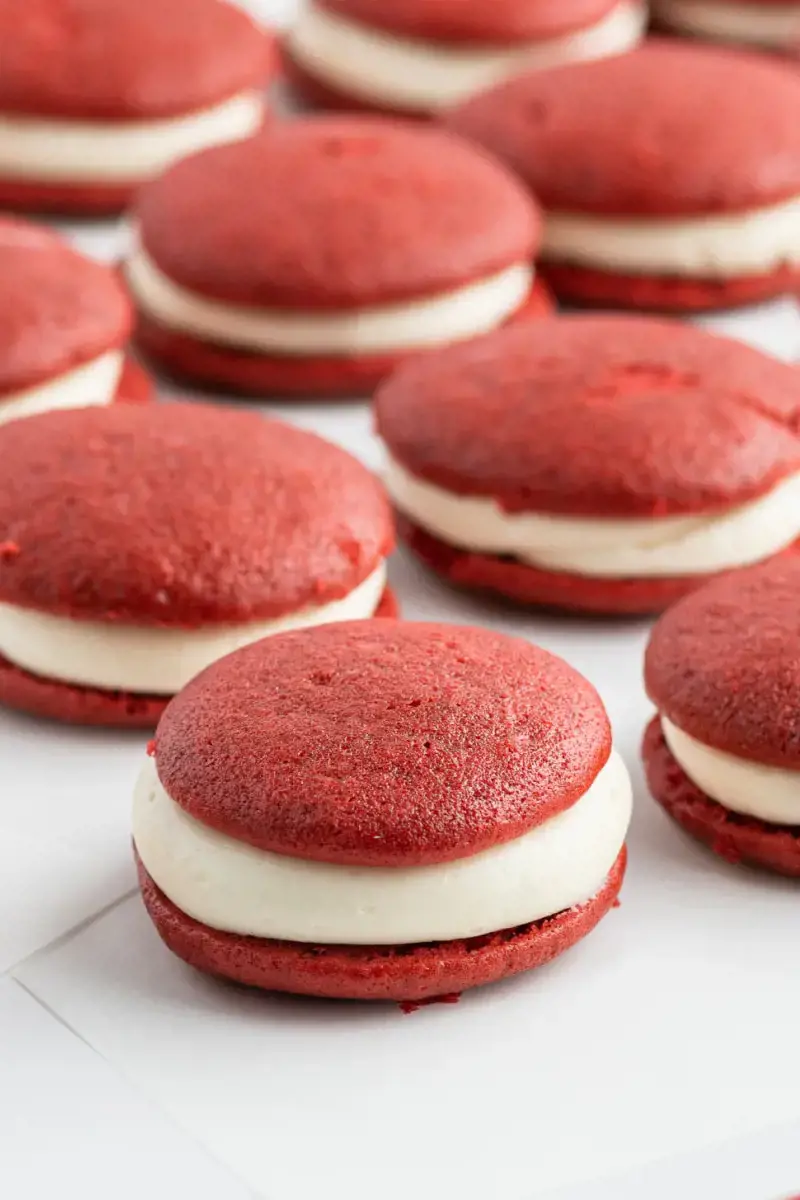
Red Velvet Whoopie Pies - make in your kitchen
Red velvet cake is a beloved dessert known for its rich and vibrant red color, paired with a light and moist texture. But did you know that you can do more with red velvet cake mix than just bake a traditional cake? With a few additional ingredients and a little creativity, you can transform red velvet cake mix into delightful red velvet whoopie pies.
Whoopie pies are a delightful treat that consists of two cake-like cookies sandwiched together with a creamy filling. They are easy to make and can be customized to suit your taste. Here's how you can make red velvet whoopie pies in your kitchen:
Ingredients:
- 1 box of red velvet cake mix
- 2 eggs
- 1/2 cup oil
- 1/4 cup water
- 1 teaspoon vanilla extract
- Cream cheese frosting or buttercream frosting (homemade or store-bought)
- Optional: red food coloring for a deeper red color
- Optional: powdered sugar for dusting
Instructions:
- Preheat your oven to the temperature indicated on the cake mix box.
- In a large mixing bowl, combine the red velvet cake mix, eggs, oil, water, and vanilla extract. Mix until well combined. If desired, add a few drops of red food coloring for a deeper red color.
- Line a baking sheet with parchment paper or silicone mats. Using a cookie scoop or tablespoons, drop spoonfuls of the red velvet batter onto the baking sheet, spacing them apart to allow room for spreading.
- Bake the cookies in the preheated oven for the time indicated on the cake mix box, or until the edges are set and the tops are slightly firm to the touch. Remove from the oven and let cool completely on a wire rack.
- Once the cookies have cooled, it's time to assemble the whoopie pies. Pair up the cookies based on their size and shape.
- Spoon a dollop of cream cheese frosting or buttercream frosting onto the flat side of one cookie. Gently press a second cookie on top to create a sandwich. Repeat with the remaining cookies.
- Optional: Dust the tops of the whoopie pies with powdered sugar for a decorative touch.
- Serve and enjoy! These red velvet whoopie pies make a great treat for parties, potlucks, or simply indulging yourself.
With just a few simple steps, you can create delicious homemade red velvet whoopie pies to satisfy your sweet tooth. Experiment with different fillings, such as chocolate ganache or marshmallow fluff, to add your own twist to this classic treat. So get your red velvet cake mix and start baking these delightful whoopie pies in your kitchen today!
12 Great Activities to Enjoy in Fairmount Philadelphia
You may want to see also
![]()
Red Velvet Cake Truffles - prepare in your kitchen
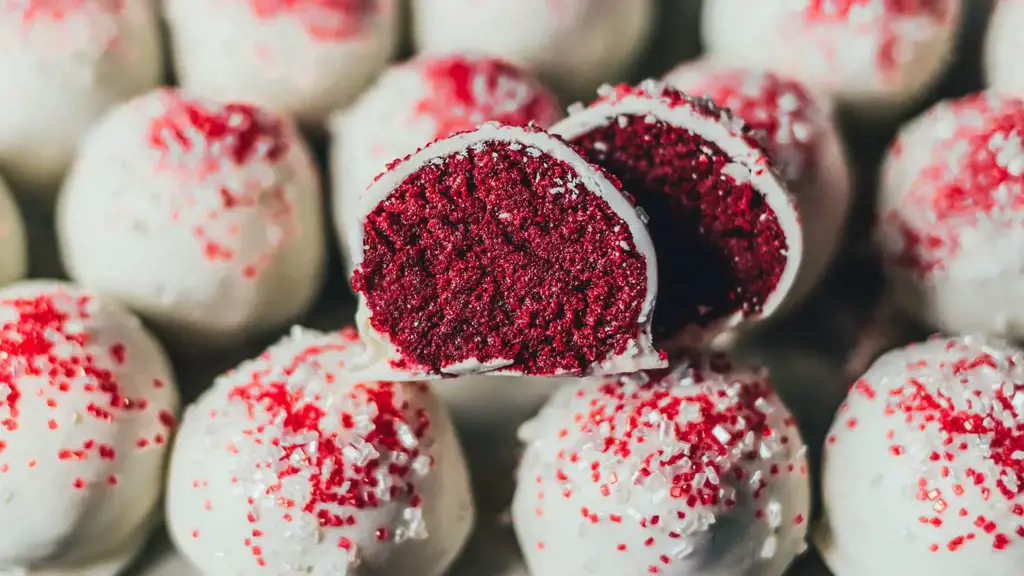
If you have a box of red velvet cake mix sitting in your pantry and you're not in the mood to make a traditional cake, don't worry! There are plenty of other delicious treats you can make with this versatile ingredient. One option is to whip up some Red Velvet Cake Truffles. These bite-sized treats are easy to make and perfect for any occasion. Here's how you can prepare them in your kitchen.
First, gather all the ingredients you'll need. You'll obviously need a box of red velvet cake mix, as well as the additional ingredients listed on the box (usually eggs, oil, and water). You'll also need a can of cream cheese frosting, some white chocolate or semi-sweet chocolate for coating, and any additional decorations or toppings you want to use, such as sprinkles or crushed candy canes.
Start by preparing the cake mix according to the instructions on the box. Once the cake has cooled completely, crumble it into a large mixing bowl. Add about three-quarters of the can of cream cheese frosting to the bowl and mix until the cake and frosting are well combined. The mixture should be moist enough that you can roll it into balls without it falling apart, but not too wet or sticky.
Once the mixture is ready, use your hands to roll it into small, bite-sized balls. Place the balls on a baking sheet lined with parchment paper and refrigerate them for about an hour, or until firm.
While the cake balls are chilling, melt the white chocolate or semi-sweet chocolate in a microwave-safe bowl according to the package instructions. Once melted, use a fork or toothpick to dip each cake ball into the melted chocolate, tapping off any excess before placing it back on the baking sheet. If desired, sprinkle or coat the truffles with decorations or toppings while the chocolate is still warm and melted.
Once all the truffles are coated and decorated, return them to the refrigerator to allow the chocolate to harden. This will typically take about 15-20 minutes. Once the chocolate has set, your Red Velvet Cake Truffles are ready to be enjoyed!
These rich and decadent treats are perfect for parties, potlucks, or simply as a sweet indulgence for yourself. You can store them in an airtight container in the refrigerator for up to a week, although they're usually so delicious that they won't last that long!
So, the next time you find yourself with a box of red velvet cake mix, don't limit yourself to just making a cake. Try making these Red Velvet Cake Truffles instead, and impress your friends and family with this unique and tasty treat!
14 Fun Things to Do in Fairfield Glade, TN
You may want to see also
![]()
Red Velvet Milkshake - blend in your blender
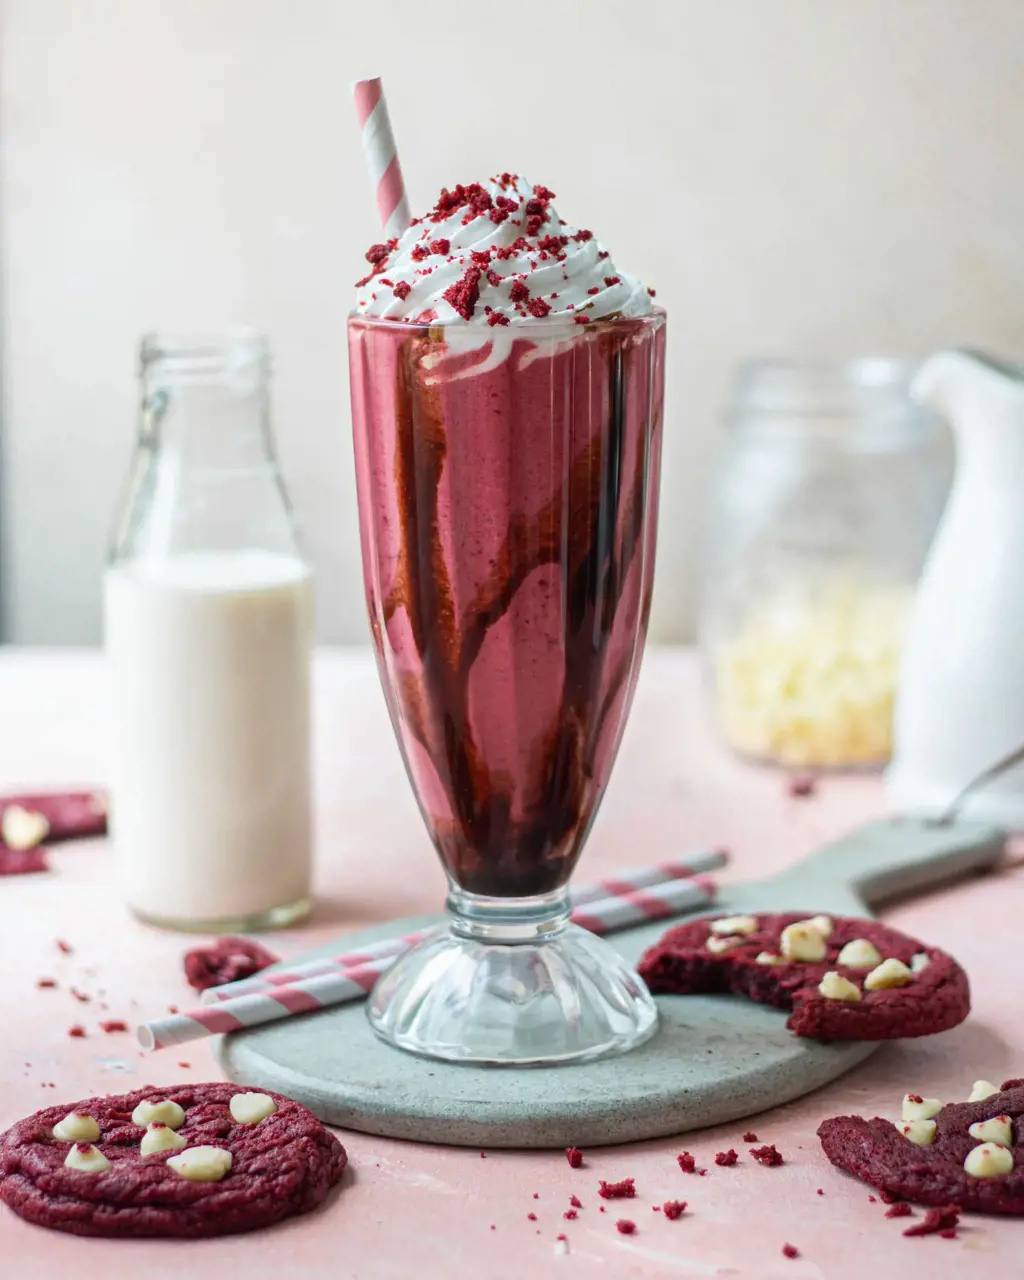
Red velvet cake is a popular dessert known for its rich, velvety texture and beautiful red color. But did you know that you can do more with red velvet cake mix than just bake a cake? With a little creativity, you can create a variety of delicious treats using red velvet cake mix as the base ingredient. In this article, we will be focusing on how to make a Red Velvet Milkshake using your blender.
To make this indulgent treat, you will need the following ingredients:
- 1 cup red velvet cake mix (dry)
- 1 ½ cups vanilla ice cream
- 1 cup milk
- 1 teaspoon vanilla extract
- Whipped cream (for topping)
- Red velvet cake crumbs (for garnish, optional)
Now that you have gathered the ingredients, let's get started with making the Red Velvet Milkshake:
Step 1: Start by crumbing your red velvet cake. You can do this by taking a small piece of the cake and crushing it into small crumbs using your hands or a food processor. Set the crumbs aside for later use as a garnish.
Step 2: In your blender, add the red velvet cake mix, vanilla ice cream, milk, and vanilla extract.
Step 3: Blend all the ingredients together until smooth and creamy. If your milkshake is too thick, you can add a little more milk to achieve your desired consistency.
Step 4: Once your milkshake is ready, pour it into a glass. You can top it off with whipped cream and sprinkle some red velvet cake crumbs on top for an extra touch of decadence.
Step 5: Serve your Red Velvet Milkshake immediately and enjoy!
The combination of the red velvet cake mix, vanilla ice cream, and milk creates a rich and creamy milkshake with all the flavors of a classic red velvet cake. The vanilla extract adds a hint of extra flavor, enhancing the overall taste of the milkshake.
This Red Velvet Milkshake is perfect for serving at parties or as a special treat for yourself. You can also get creative and add your own personal touch to the recipe by garnishing it with additional toppings like chocolate syrup, sprinkles, or even a cherry on top.
So, the next time you have some red velvet cake mix on hand, don't just limit yourself to baking a cake. Try making this delicious Red Velvet Milkshake instead, and indulge in a creamy and velvety treat that will surely satisfy your sweet tooth.
14 Must-Do Activities in Glen Ellyn for a Memorable Day Out
You may want to see also
![]()
Red Velvet Cheesecake Bars - bake in your oven
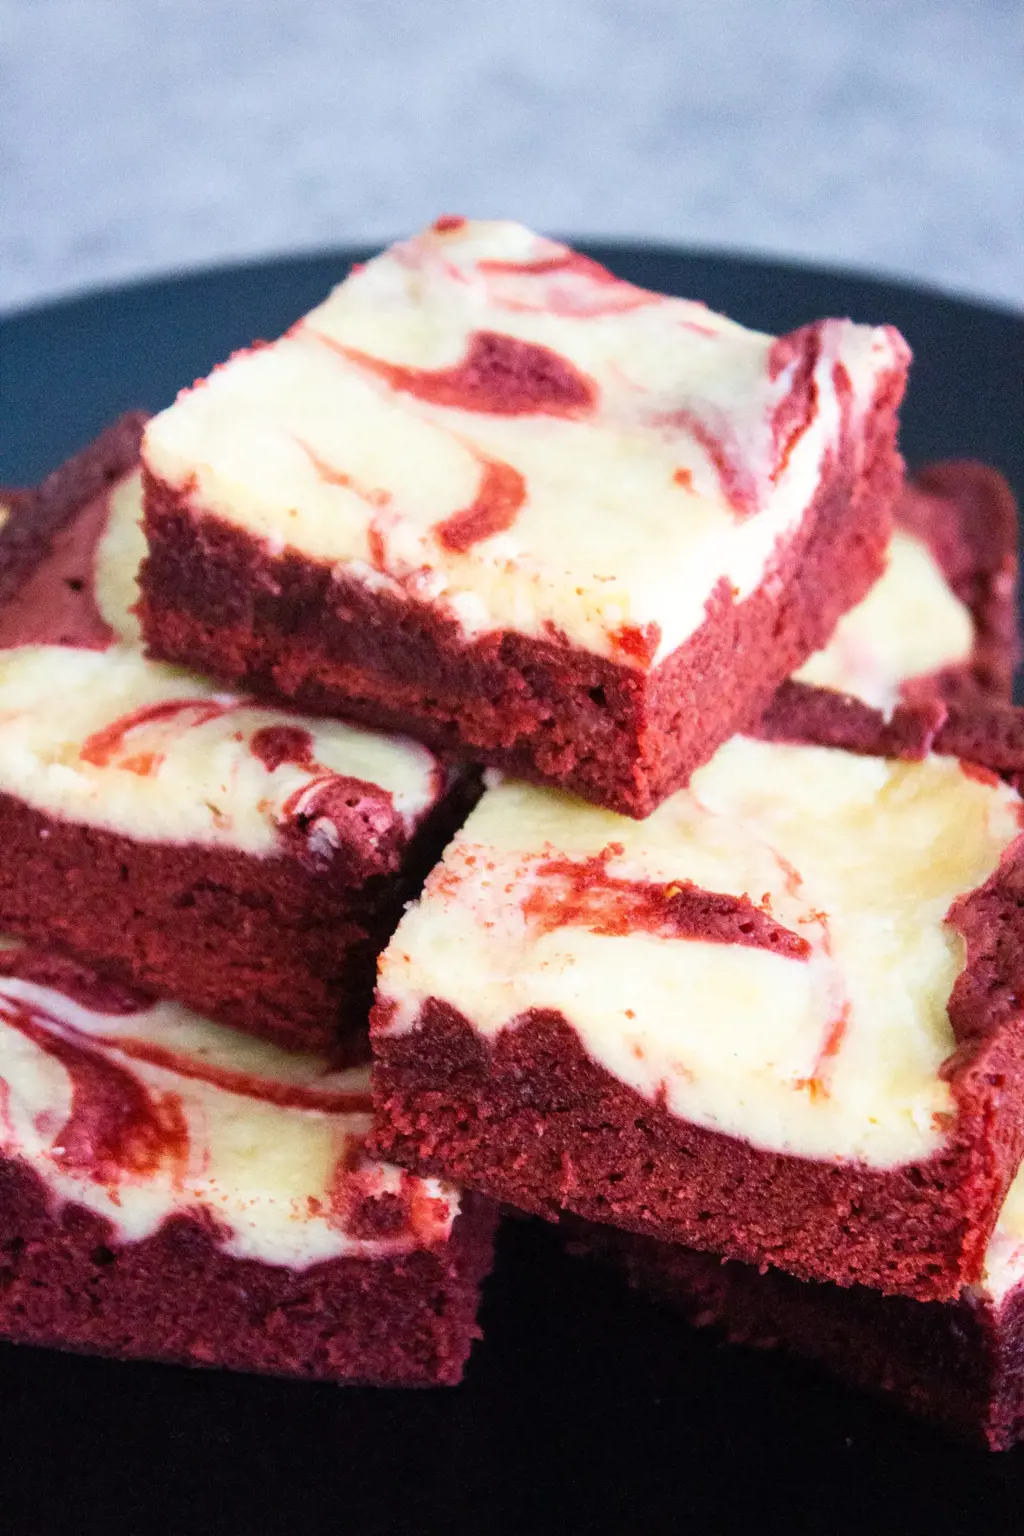
If you're a fan of red velvet cake and cheesecake, then you're in for a treat with these Red Velvet Cheesecake Bars! This delicious dessert combines the rich and velvety flavors of red velvet with the creamy and tangy taste of cheesecake. Best of all, these bars are easy to make using a red velvet cake mix. Here's how you can bake them in your own oven.
To begin, gather your ingredients. You will need a box of red velvet cake mix, cream cheese, sugar, eggs, vanilla extract, and butter. Preheat your oven to 350°F (175°C) and line an 8x8-inch baking dish with parchment paper.
Prepare the red velvet cake mix according to the instructions on the box. Most cake mixes require you to add eggs, water, and oil. Mix the batter until it is smooth and well-combined.
Pour two-thirds of the red velvet cake batter into the prepared baking dish. Use a spatula to spread it evenly. Set aside the remaining one-third of the batter for later.
In a separate bowl, beat the cream cheese until it is smooth and creamy. Add the sugar, eggs, and vanilla extract to the bowl and continue to beat until everything is well-incorporated. The cream cheese mixture should be light and fluffy.
Pour the cream cheese mixture over the red velvet cake batter in the baking dish. Use a spatula or knife to spread it evenly, covering the entire surface. Be careful not to mix the two layers together.
Take the remaining one-third of the red velvet cake batter and drop spoonfuls of it on top of the cream cheese layer. Use a toothpick or the tip of a knife to swirl the red velvet batter with the cream cheese mixture. This will create a marbled effect.
Place the baking dish in the preheated oven and bake for 35-40 minutes. The bars are done when the edges are set and a toothpick inserted into the center comes out with a few moist crumbs. The cream cheese layer should be slightly jiggly but not liquid.
Once the bars are done baking, remove them from the oven and allow them to cool in the baking dish for about 1 hour. Afterward, transfer the bars to a wire rack to cool completely. Once cooled, refrigerate the bars for at least 2 hours or overnight before serving. This will help them set and make them easier to slice.
When you're ready to serve, cut the chilled bars into squares and enjoy! The combination of the moist and fluffy red velvet cake with the creamy and tangy cream cheese layer is truly irresistible. These Red Velvet Cheesecake Bars make for a perfect dessert for any occasion, from casual gatherings to special celebrations.
So the next time you have a box of red velvet cake mix on hand, consider making these decadent Red Velvet Cheesecake Bars. They are sure to impress your family and friends with their beautiful marbled appearance and delicious flavor. Plus, with their simple preparation using a cake mix, you'll have more time to enjoy the treat yourself!
13 Fun Things to Do in Bastrop, TX
You may want to see also
![]()
Red Velvet Ice Cream - make in an ice cream maker
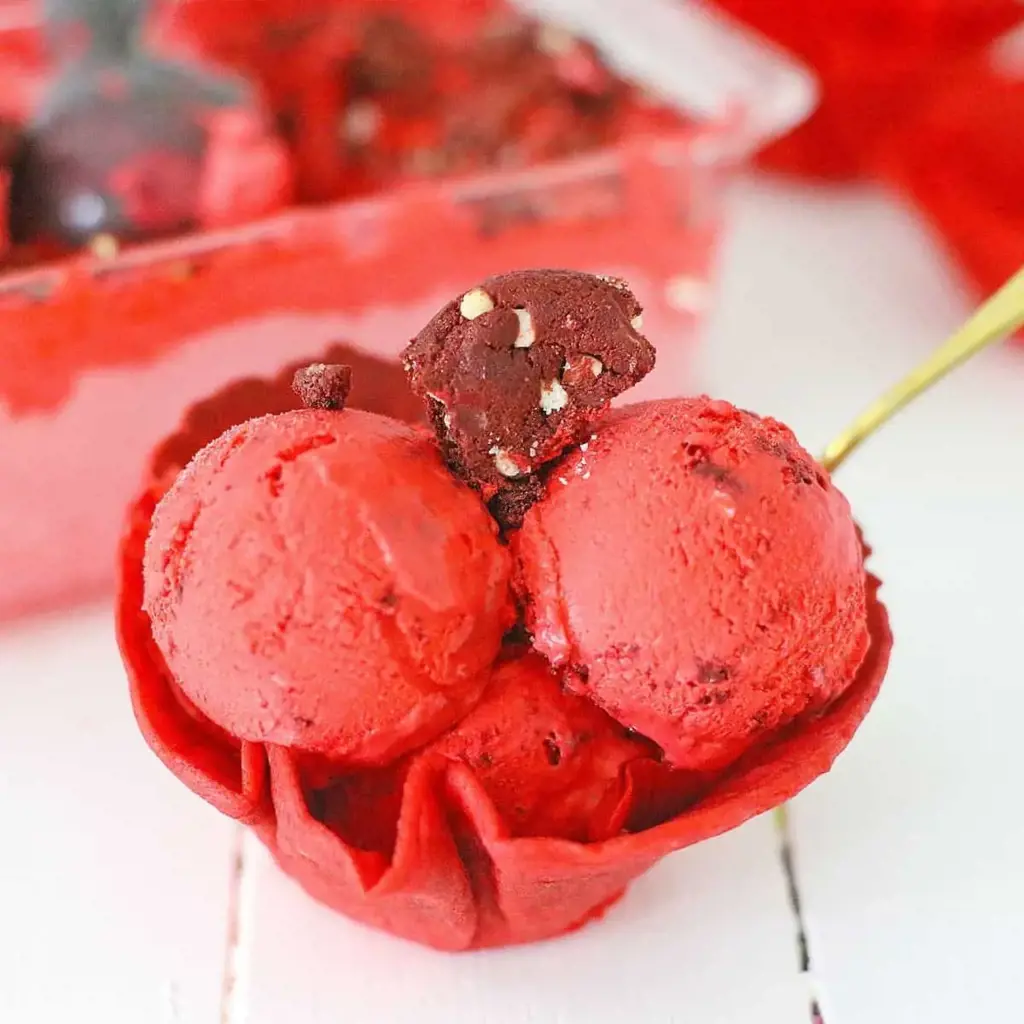
Red velvet cake is a delicious and popular treat that many people enjoy. But have you ever thought about turning that red velvet cake mix into something even more amazing? How about making red velvet ice cream?
With just a few simple ingredients and an ice cream maker, you can create a creamy and rich red velvet ice cream that is sure to impress your friends and family. Here's how to do it.
What you'll need:
- 1 box of red velvet cake mix
- 2 cups of heavy cream
- 1 cup of whole milk
- 1/2 cup of granulated sugar
- 2 teaspoons of vanilla extract
- Red food coloring (optional)
- Cream cheese frosting (optional, for serving)
Instructions:
- Prepare the cake mix according to the package instructions, but do not bake it. Instead, set it aside to cool completely. Once it is cooled, crumble the cake into small pieces using your hands or a fork.
- In a medium-sized saucepan, whisk together the heavy cream, milk, sugar, and vanilla extract. Heat the mixture over low heat until it is warm and the sugar has dissolved, stirring occasionally.
- Remove the saucepan from the heat and let the mixture cool completely. You can speed up the cooling process by placing the saucepan in an ice bath.
- Once the mixture is cooled, stir in the crumbled cake pieces. If desired, add a few drops of red food coloring to enhance the red velvet color.
- Pour the mixture into your ice cream maker and churn according to the manufacturer's instructions. This usually takes about 20-25 minutes.
- Transfer the ice cream to a lidded container and freeze for at least 4 hours, or until firm.
- Serve the red velvet ice cream in bowls or cones, and if you'd like, top it off with a dollop of cream cheese frosting. The tangy cream cheese flavor pairs perfectly with the sweet and velvety ice cream.
Enjoy your homemade red velvet ice cream! It's a decadent and unique twist on a classic dessert that is sure to impress. Plus, it's a fun and creative way to use a box of red velvet cake mix.
12 Exciting Things to Do in Piedmont, Italy
You may want to see also
![]()
Red Velvet Brownies - bake in your oven
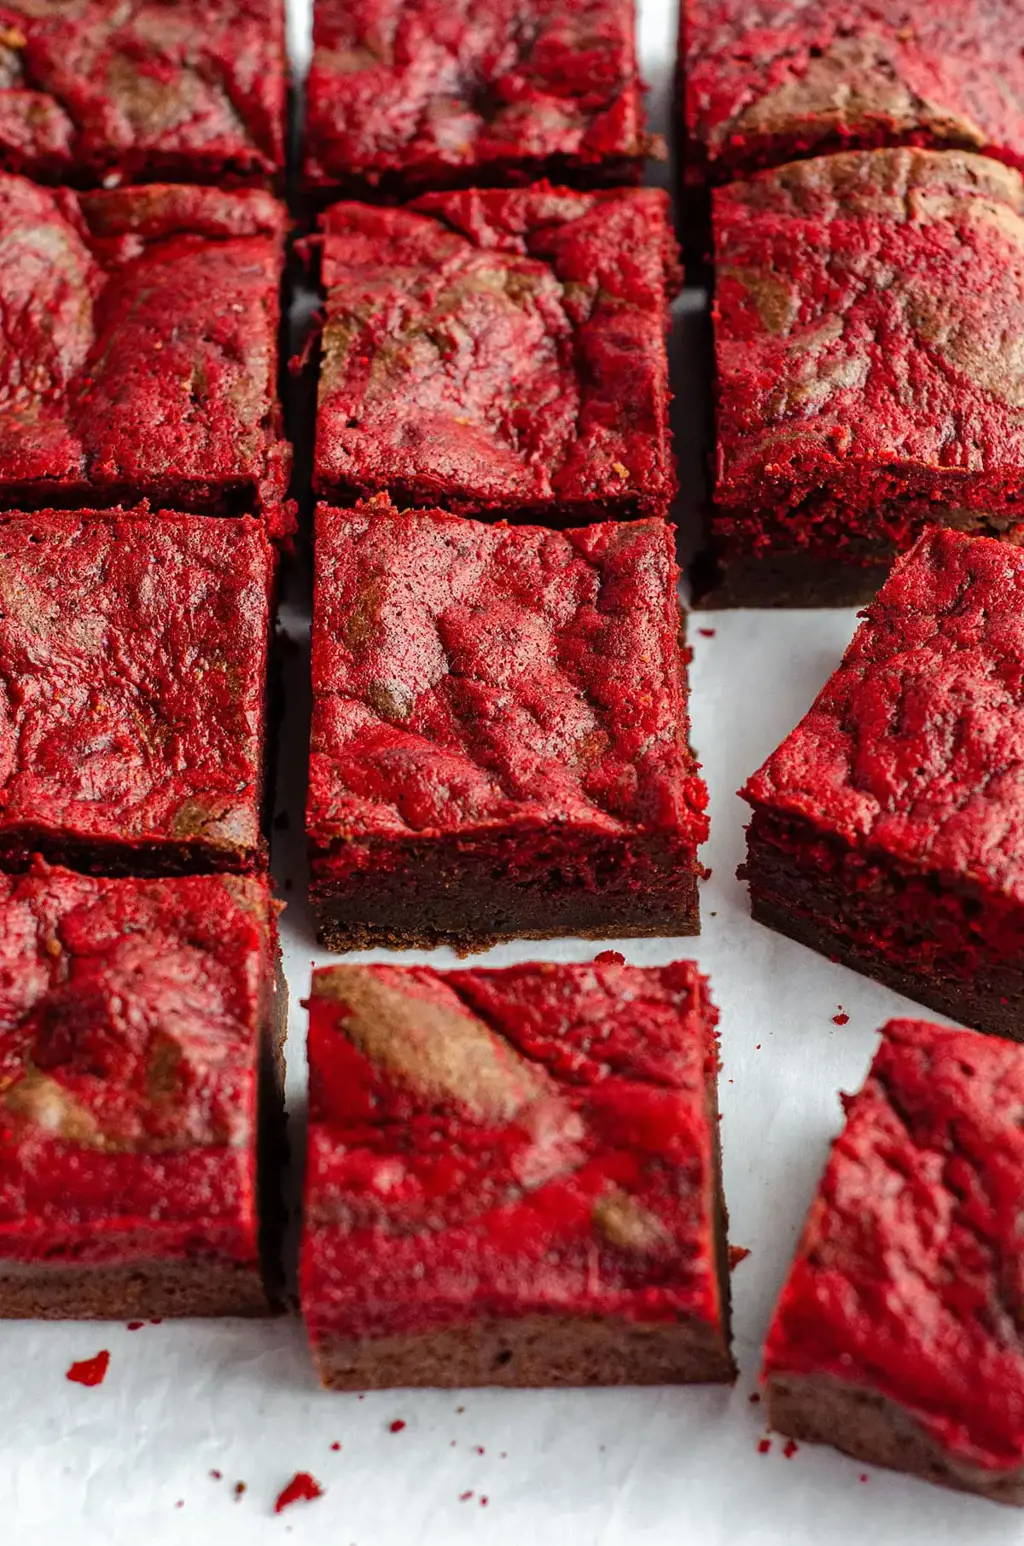
Red velvet cake mix is a versatile ingredient that can be used to create a variety of delicious treats. One popular option is to make red velvet brownies. These rich and indulgent brownies have a fudgy texture and a vibrant red color that is sure to impress. Here is a simple recipe to make red velvet brownies using red velvet cake mix.
To make red velvet brownies, you will need the following ingredients:
- 1 box of red velvet cake mix
- 1/2 cup (1 stick) of unsalted butter, melted
- 2 large eggs
- 1 teaspoon of vanilla extract
- 1/4 cup of milk
- 1 cup of semi-sweet chocolate chips
Once you have gathered all the ingredients, you can begin making your red velvet brownies using the following steps:
- Preheat your oven to 350°F (175°C) and line a 9x9-inch baking pan with parchment paper or grease it with cooking spray.
- In a large mixing bowl, combine the red velvet cake mix, melted butter, eggs, vanilla extract, and milk. Stir until all the ingredients are well combined and the batter is smooth.
- Fold in the chocolate chips, making sure they are evenly distributed throughout the batter.
- Pour the batter into the prepared baking pan and spread it out evenly with a spatula.
- Bake the brownies in the preheated oven for approximately 25-30 minutes, or until a toothpick inserted into the center comes out with a few moist crumbs.
- Remove the pan from the oven and let the brownies cool completely before cutting them into squares.
Red velvet brownies can be enjoyed on their own, but if you want to take them to the next level, you can also add a cream cheese frosting or dust them with powdered sugar. These brownies are perfect for any occasion, whether it's a birthday party, a family gathering, or just a sweet treat for yourself.
In conclusion, if you are looking for a delicious and easy way to use red velvet cake mix, try making red velvet brownies. This recipe is a simple and foolproof way to enjoy the rich and velvety flavors of red velvet in a fudgy and decadent brownie form. Give it a try and indulge in this delightful treat!
14 Must-Do Activities in Pigeon Forge in February
You may want to see also
![]()
Red Velvet Waffles - cook on a waffle iron
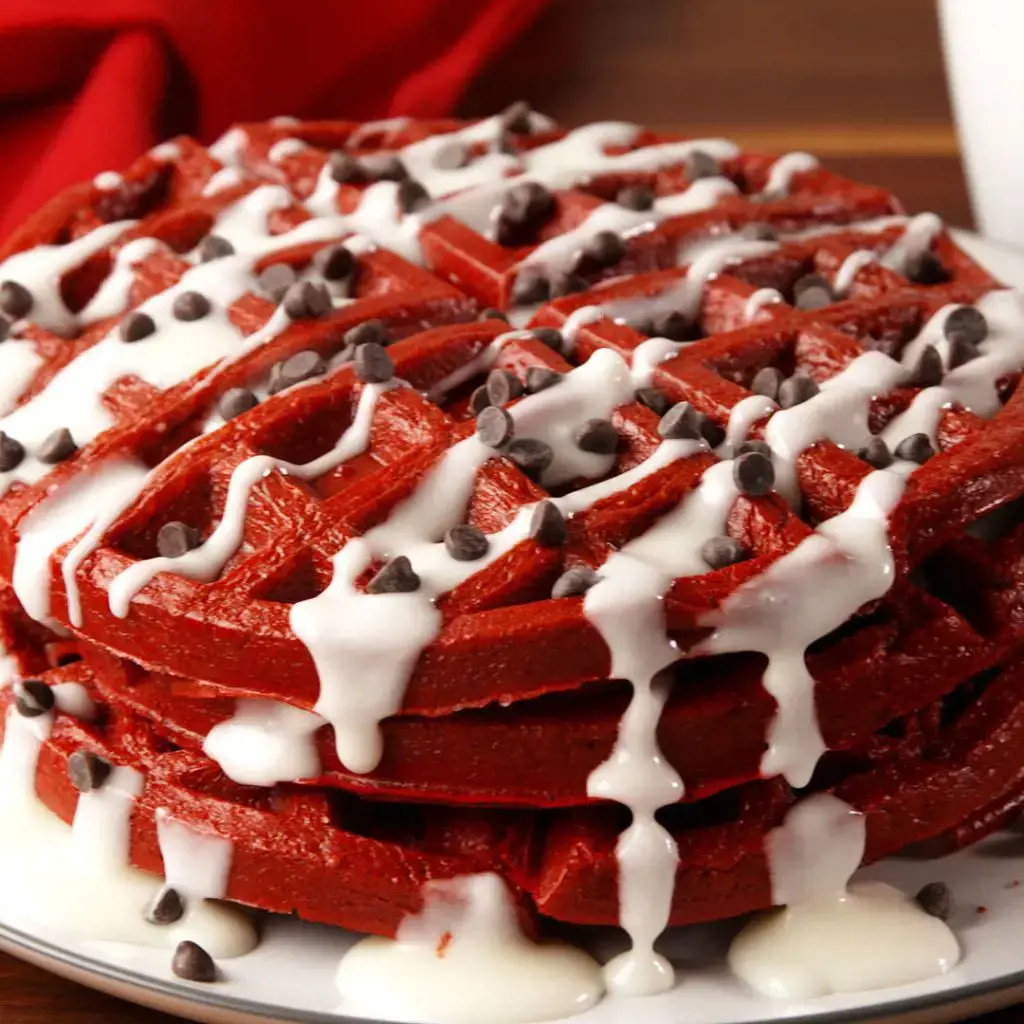
Red velvet cake is a popular treat loved by many. Its rich red color and decadent flavor make it a favorite for special occasions and celebrations. But did you know that you can also use red velvet cake mix to make delicious and unique waffles? That's right, red velvet waffles are a fun twist on the classic breakfast dish that will impress your family and friends. In this article, we will walk you through the process of making red velvet waffles using red velvet cake mix.
To start off, gather the following ingredients:
- 1 box of red velvet cake mix
- 1 cup all-purpose flour
- 1 teaspoon baking powder
- 1/4 teaspoon salt
- 2 eggs
- 1/2 cup vegetable oil
- 1 3/4 cups milk
- 1 teaspoon vanilla extract
- Optional toppings: powdered sugar, cream cheese icing, or fresh fruit
Now, let's get cooking!
Step 1: Preheat your waffle iron according to the manufacturer's instructions.
Step 2: In a large mixing bowl, combine the red velvet cake mix, all-purpose flour, baking powder, and salt. Whisk together until well combined.
Step 3: In a separate bowl, whisk together the eggs, vegetable oil, milk, and vanilla extract.
Step 4: Pour the wet ingredients into the dry ingredients and stir until just combined. Be careful not to overmix, as this can lead to tough waffles.
Step 5: Once the waffle iron is heated, lightly coat it with non-stick cooking spray or brush with melted butter. Spoon the batter onto the waffle iron, using about 1/4 to 1/2 cup of batter per waffle. Close the waffle iron and cook according to the manufacturer's instructions, usually about 3-5 minutes, or until the waffles are golden brown and crisp.
Step 6: Carefully remove the waffles from the iron and transfer them to a plate. Repeat with the remaining batter until all the waffles are cooked.
Step 7: Serve your red velvet waffles warm, and top them with powdered sugar, cream cheese icing, or fresh fruit. The choice is yours!
Red velvet waffles are a delicious and eye-catching breakfast or brunch option that will wow your guests. The combination of the red velvet flavor and the crisp texture of the waffle is a match made in heaven. These waffles are perfect for special occasions like birthdays, holidays, or just when you're in the mood for a decadent treat.
So the next time you have a box of red velvet cake mix on hand, try making these delicious red velvet waffles. They're sure to be a hit with everyone who tries them. Enjoy!
12 Free Things to Do in Santa Monica
You may want to see also
![]()
Red Velvet Doughnuts - fry in your kitchen
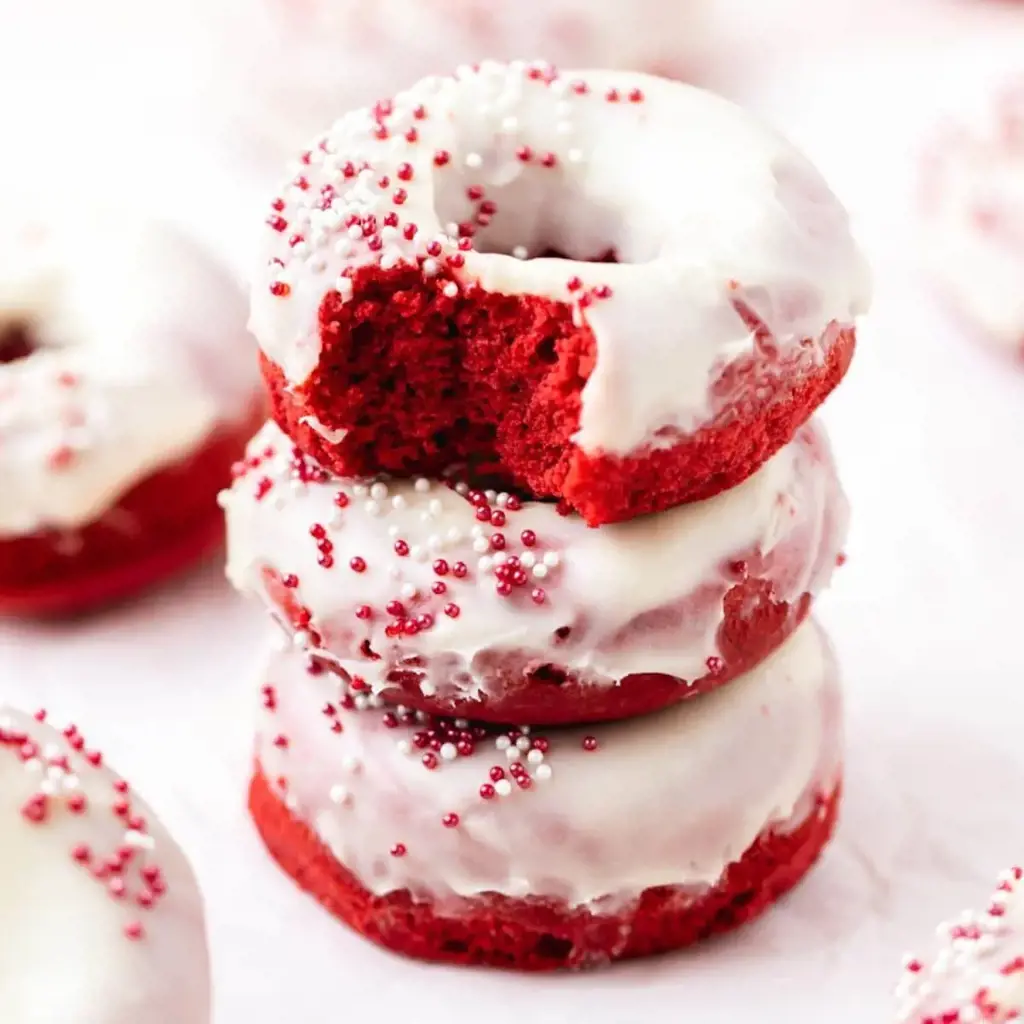
Red velvet cake has become a popular dessert choice for its rich flavor and beautiful red color. But did you know that you can transform a simple red velvet cake mix into delicious red velvet doughnuts? These sweet treats are perfect for breakfast, brunch, or as a snack any time of the day. In this article, we will guide you through the simple steps of making red velvet doughnuts from scratch.
To get started, gather the following ingredients:
- 1 box of red velvet cake mix
- 1 cup of buttermilk
- 2 eggs
- 2 tablespoons of melted butter
For the glaze:
- 2 cups of powdered sugar
- 1/4 cup of milk
- 1 teaspoon of vanilla extract
Additional ingredients for decoration (optional):
- Sprinkles
- Edible glitter
- Cream cheese frosting
Now, let's dive into the process of making the red velvet doughnuts:
- Preheat your frying oil: Fill a deep pan or dutch oven with about 2 inches of frying oil. Heat the oil to 350°F (175°C) over medium heat. It's important to maintain this temperature throughout the frying process to achieve perfectly cooked doughnuts.
- Mix the dough: In a large mixing bowl, combine the red velvet cake mix, buttermilk, eggs, and melted butter. Stir until all the ingredients are well incorporated and form a smooth batter.
- Pipe the doughnuts: Fill a piping bag or a plastic food storage bag with the doughnut batter. Cut a small hole in one corner of the bag to create a makeshift piping tip. Squeeze the bag to pipe the batter into the hot oil, forming doughnut shapes. Be careful not to overcrowd the pan as this can interfere with even frying.
- Fry the doughnuts: Gently place the doughnuts into the hot oil using a slotted spoon or tongs. Fry for about 2-3 minutes on each side until they turn golden brown. Remember to flip them halfway through for even frying. Remove the doughnuts from the oil and place them on a paper towel-lined plate to drain excess oil.
- Prepare the glaze: While the doughnuts cool slightly, make the glaze by whisking together powdered sugar, milk, and vanilla extract until smooth. Adjust the consistency by adding more powdered sugar for a thicker glaze or more milk for a thinner glaze.
- Glaze and decorate: Dip each doughnut into the glaze, making sure to coat both sides. Place the glazed doughnuts on a wire rack set over a baking sheet to catch any drips. If desired, sprinkle some colorful sprinkles or edible glitter over the glaze for additional decoration. Let the glaze set for a few minutes before serving.
- Optional cream cheese frosting topping: For an extra layer of decadence, you can also pipe some cream cheese frosting on top of the glazed doughnuts. To make the frosting, beat together softened cream cheese and powdered sugar until smooth. Transfer the frosting into a piping bag and drizzle it over the doughnuts.
Now you have a batch of freshly fried red velvet doughnuts ready to be devoured. These fluffy treats are perfect on their own or paired with a cup of coffee or milk. Enjoy the heavenly combination of the rich red velvet flavor and the sweet glaze. Share them with family and friends or indulge in a delightful treat just for yourself. Happy frying!
12 Exciting Things to Do in Sammamish for a Fun-Filled Day
You may want to see also
![]()
Red Velvet French Toast - cook on a stovetop
If you have a box of red velvet cake mix sitting in your pantry and you're looking for creative ways to use it, why not try making Red Velvet French Toast? This sweet and decadent breakfast treat combines the rich flavors of red velvet cake with the classic taste of French toast. It's easy to make on a stovetop and guaranteed to impress your family and friends.
Here's how to make Red Velvet French Toast:
Ingredients:
- 1 box of red velvet cake mix
- 4 large eggs
- 1 cup of milk
- 1 teaspoon of vanilla extract
- Butter for cooking
- Whipped cream, powdered sugar, or syrup for serving (optional)
Instructions:
- In a large bowl, whisk together the red velvet cake mix, eggs, milk, and vanilla extract until well combined. The batter should have a smooth and thick consistency.
- Heat a large non-stick skillet or griddle over medium-low heat. Add a pat of butter and swirl it around the pan to coat the surface.
- Dip a slice of bread into the red velvet batter, making sure to coat both sides evenly. Allow any excess batter to drip off.
- Place the bread onto the preheated skillet and cook for 2-3 minutes on each side, until golden brown. Repeat with the remaining slices of bread, adding more butter to the pan as needed.
- Serve the Red Velvet French Toast warm with a dollop of whipped cream, a dusting of powdered sugar, or a drizzle of your favorite syrup. You can also garnish with fresh berries or chocolate shavings for an extra touch of indulgence.
Tips:
- Experiment with different bread types to find your favorite. Brioche, challah, or even cinnamon swirl bread work well for this recipe.
- If you want to make your Red Velvet French Toast extra indulgent, add chocolate chips or white chocolate chunks to the batter before dipping the bread.
- Leftovers can be stored in an airtight container in the refrigerator for up to 2 days. Reheat in a toaster or toaster oven for a quick and easy breakfast.
Red Velvet French Toast is a unique and delicious twist on a classic breakfast favorite. The rich and velvety flavor of the red velvet cake mix adds a touch of luxury to your morning meal. Whether you're making this for a special occasion or just a lazy weekend brunch, it's sure to be a hit with everyone at the table. So grab that box of red velvet cake mix and get cooking!
13 Fun Things to Do in Moab with Kids
You may want to see also
![]()
Red Velvet Mug Cake - make in your microwave

If you're looking for a quick and easy dessert that will satisfy your sweet tooth, look no further than a Red Velvet Mug Cake. With just a few ingredients and a microwave, you can have a delicious treat in minutes.
To make a Red Velvet Mug Cake, you'll need a box of red velvet cake mix, some milk, vegetable oil, and an egg. Simply combine the cake mix, milk, vegetable oil, and egg in a microwave-safe mug and mix until well combined. Then, microwave the mug on high for about 1-2 minutes, or until the cake has risen and is cooked through.
Once the cake is cooked, you can customize it with your favorite toppings. Some popular options include cream cheese frosting, whipped cream, or even a scoop of vanilla ice cream. You can also sprinkle some powdered sugar or cocoa powder on top for an extra touch of sweetness.
The beauty of a mug cake is that it's a single serving dessert, so you don't have to worry about making a whole cake and having leftovers. Plus, it's quick to make and doesn't require any fancy equipment or baking skills. It's perfect for those times when you're craving something sweet but don't want to spend a lot of time in the kitchen.
Red Velvet Mug Cakes are great for special occasions or holidays, or just as a fun treat to enjoy on a cozy night in. They also make a great gift idea, as you can package the dry ingredients in a jar and include instructions for how to make the mug cake. It's a thoughtful and delicious gift that anyone will appreciate.
So the next time you have a box of red velvet cake mix sitting in your pantry, don't just make a regular cake. Try making a Red Velvet Mug Cake instead. It's a simple and delicious dessert that will satisfy your cravings and impress your friends and family.
12 Fun Things to Do in Groveland, CA
You may want to see also
Frequently asked questions
Yes, you can use red velvet cake mix to make a variety of desserts. Some popular options include red velvet cupcakes, red velvet cake pops, red velvet brownies, and red velvet cookies.
Yes, you can customize the flavor of your red velvet cake mix by adding additional ingredients or extracts. Some common additions include adding chocolate chips, coconut, or cream cheese frosting.
Yes, you can substitute red velvet cake mix for regular cake mix in most recipes. Just keep in mind that the end result will have the distinct flavor and color of red velvet cake. Adjustments may be needed in terms of other ingredients and cooking times.
Yes, you can make a gluten-free version of red velvet cake by using a gluten-free red velvet cake mix or by using a gluten-free cake mix and adding red food coloring. Additionally, you may need to adjust other ingredients or use gluten-free substitutes, such as gluten-free flour or xanthan gum, depending on the recipe.


3 Comments
Francesca Gamble
Elsie Santos
Arjun Yadav
Author