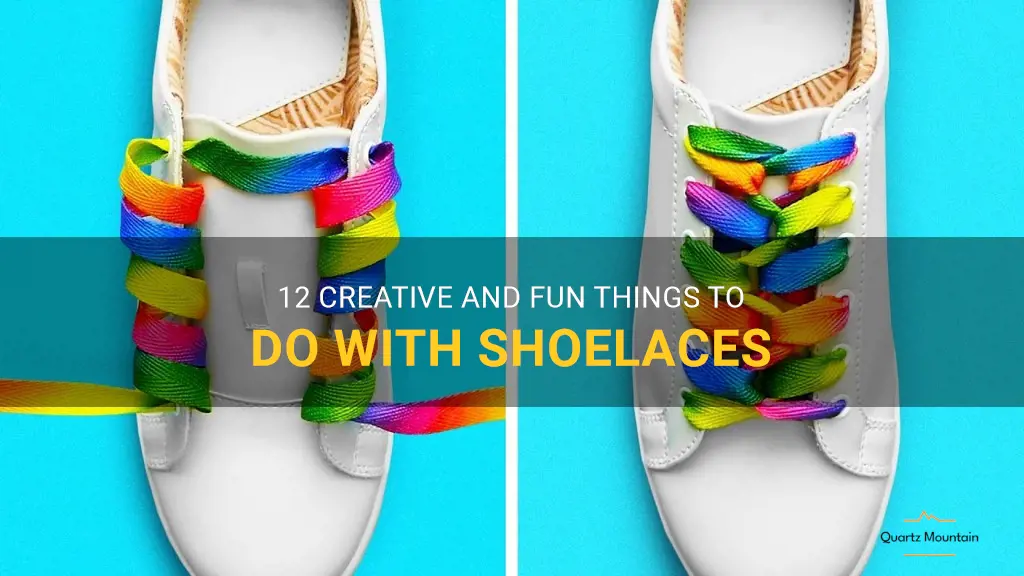
Shoelaces may seem like a simple and mundane item, but they can actually be a source of endless creativity and entertainment. From adding a pop of color to your shoes to creating intricate braided bracelets, there are so many fun and unique things you can do with shoelaces. Whether you're looking for a new DIY project or simply want to explore different ways to use everyday items, this article will guide you through 12 creative and fun things you can do with shoelaces. Get ready to unleash your imagination and transform those ordinary laces into something extraordinary!
| Activity | Description |
|---|---|
| Tie shoelaces | Learn different methods of tying shoelaces |
| Lace up shoes | Practice lacing up different types of shoes |
| Make a bracelet | Create a stylish bracelet using shoelaces |
| Decorate shoes | Use shoelaces to add colorful accents to your shoes |
| Repair shoelaces | Fix frayed or broken shoelaces |
| Teach someone to tie shoelaces | Help a child or adult learn how to tie their shoelaces |
| Experiment with different lacing techniques | Try out various lacing patterns to customize your shoes |
| Play "Tug of War" with shoelaces | Use shoelaces instead of a rope for a fun game |
| Organize shoelaces | Sort and store your collection of shoelaces |
| Create a shoelace maze | Make a challenging maze using shoelaces for a fun game |
What You'll Learn
- Create unique and colorful braided bracelets
- Replace old zipper pulls with shoelace loops
- Use shoelaces to create decorative keychains
- Transform an ordinary hair tie into a trendy scrunchie
- Add colorful laces to your favorite sneakers for a personalized touch
- Create a fun and stylish headband using shoelaces
- Turn your boring phone case into a statement piece with shoelace designs
- Make a DIY camera strap with colorful shoelaces
- Decorate a plain tote bag with shoelace designs for a one-of-a-kind accessory
- Use shoelaces to create unique bookmarks for your favorite books
- Turn a basic lampshade into a stylish piece using shoelace wraps or weaves
- Decorate your bike handles with colorful shoelaces for a fun and functional upgrade
![]()
Create unique and colorful braided bracelets
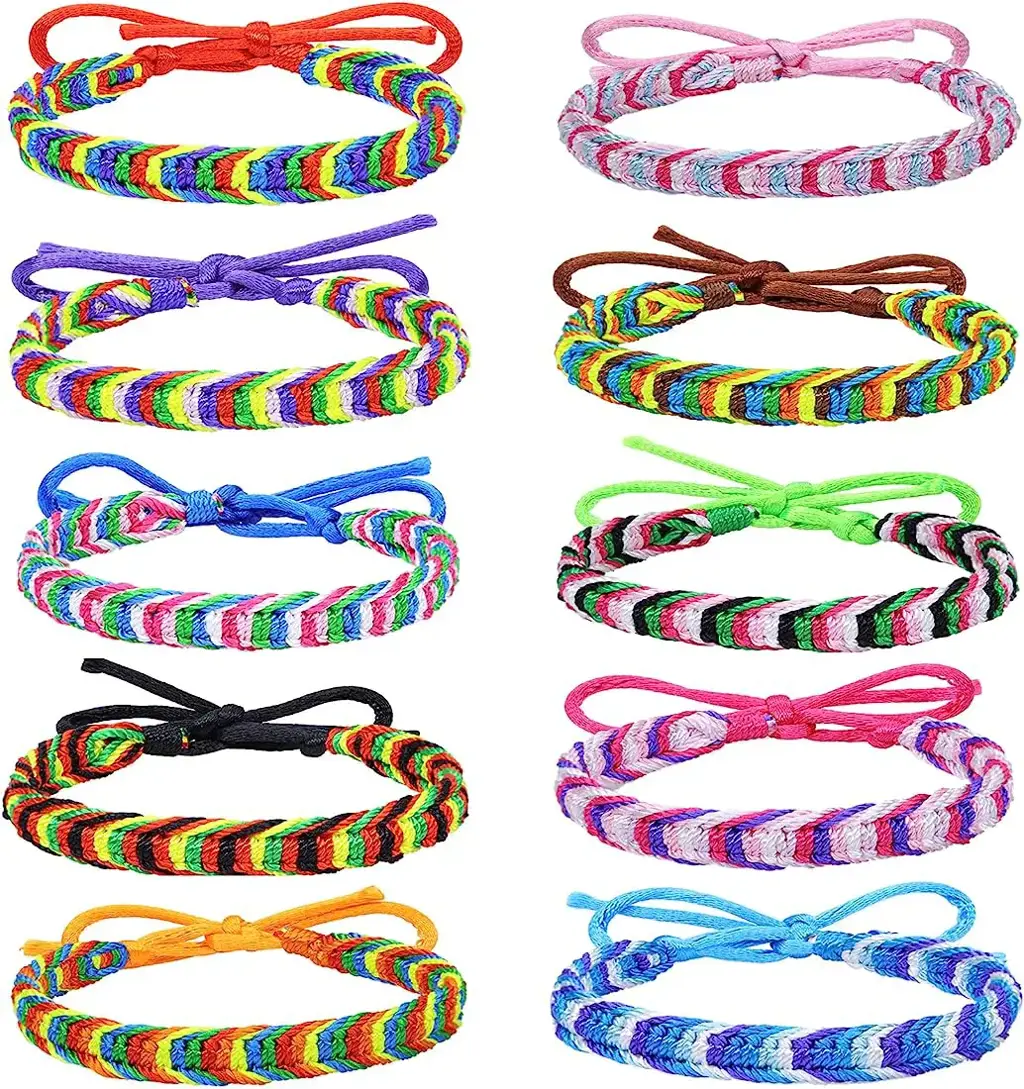
One fun and creative way to use shoelaces is to create unique and colorful braided bracelets. This is a simple and cost-effective DIY project that allows you to customize your own accessories. Whether you want to make a statement with bright and bold colors or create a more subtle and elegant design, braiding shoelaces can provide endless possibilities.
Here are the steps to create a braided bracelet using shoelaces:
- Gather your materials: You will need shoelaces in various colors, scissors, and a clasp or button for closure. Choose shoelaces that are long enough to wrap around your wrist a few times.
- Cut the shoelaces: Start by cutting the shoelaces to your desired length. It's better to have them slightly longer rather than too short, as you can always adjust them later.
- Choose your colors: Select the shoelaces you want to use for your bracelet. You can mix and match different colors to create an eye-catching design. Consider using complementary or contrasting colors for an interesting effect.
- Secure the shoelaces: Tie a knot at one end of the shoelaces, leaving a small loop. This loop will be used to attach the clasp or button later on.
- Start braiding: Take three shoelaces and hold them together with one hand. Start braiding the shoelaces by crossing the left one over the middle one, then the right one over the new middle one. Continue this pattern until you reach the desired length.
- Add more shoelaces: If you want to add more colors to your bracelet, simply insert another shoelace into the braid. For example, if you started with three shoelaces, you can add a fourth one by placing it in between the left and middle shoelaces.
- Continue braiding: Keep braiding until you have reached the desired length for your bracelet. Make sure to keep the tension consistent throughout the process to create an even braid.
- Secure the end: Once you've reached the desired length, tie a knot at the end of the braid to secure it. Trim any excess shoelace if necessary.
- Attach the clasp or button: Take the loop you created at the beginning of the bracelet and slide the clasp or button through it. Tie a secure knot to hold the closure in place.
- Adjust the fit: Put the bracelet around your wrist and adjust the length if needed. You can also add additional clasps or buttons to create a wrap-around bracelet.
Creating braided bracelets with shoelaces is a fun and easy craft that allows you to express your personal style. Experiment with different colors and patterns to create one-of-a-kind accessories that are sure to catch attention. Whether you make them for yourself or as gifts for others, these shoelace bracelets are a fun and fashionable way to repurpose materials and add a unique touch to your jewelry collection.
11 Fun Things to Do in Red Bluff, California
You may want to see also
![]()
Replace old zipper pulls with shoelace loops
When it comes to shoelaces, most people only think about tying their shoes. However, shoelaces can actually be quite versatile and can be used for a variety of purposes. One such use is replacing old zipper pulls with shoelace loops. This can be a simple and effective way to update your clothing or accessories.
Replacing old zipper pulls with shoelace loops is a great way to add a touch of personalization to your items. Whether it's a jacket, a backpack, or a purse, replacing the zipper pulls with shoelace loops can give it a unique and stylish look. Plus, it's an easy DIY project that anyone can do.
To replace old zipper pulls with shoelace loops, you'll need a few basic supplies. First, you'll need a pair of shoelaces in your desired color and length. It's a good idea to choose shoelaces that are thicker and more durable, as they will need to withstand the constant pulling and tugging that comes with using a zipper.
Next, you'll need a pair of scissors to trim the shoelaces to the desired length. Make sure to measure the length of the old zipper pulls before cutting the shoelaces, as you'll want the loops to be roughly the same size. Additionally, you may need a small needle and thread to secure the ends of the shoelaces and prevent fraying.
To replace the old zipper pulls, start by removing the old pulls from the zipper. This can usually be done by gently sliding them off the zipper's metal tab. Next, thread one end of the shoelace through the hole in the zipper's metal tab. Make sure to leave a loop on the other side of the tab, as this will be where you'll pull to open the zipper.
Once the shoelace is threaded through the zipper's metal tab, tie a knot at the end to secure it in place. You can use a few small stitches with a needle and thread to reinforce the knot and prevent it from coming undone. Repeat this process on the other side of the zipper, making sure to measure the length of the shoelace loop to match the first one.
Once both shoelace loops are in place, give them a gentle tug to ensure that they're securely attached to the zipper. If they feel loose or slide off easily, you may need to tighten the knots or use additional reinforcement.
Replacing old zipper pulls with shoelace loops is a fun and creative way to update your clothing and accessories. So, the next time you have a zipper that needs a little sprucing up, reach for your favorite pair of shoelaces and give it a try. You'll be amazed at how such a simple change can make a big difference in the overall look and feel of your items.
13 Reasons Why Mick Made My To-Do List - A Fall Out Boy Tale
You may want to see also
![]()
Use shoelaces to create decorative keychains

Have you ever wondered what to do with all those extra shoelaces you have lying around? Instead of throwing them away, why not get creative and find a fun way to use them? One great idea is to use shoelaces to create decorative keychains. Not only will this give your old shoelaces a new purpose, but it will also add a unique touch to your keys.
To create a decorative keychain with shoelaces, you will need a few supplies. First, gather your old and unused shoelaces. You can use different colors and patterns to add variety to your keychains. Next, you will need a keychain ring, which can be easily found at a craft store or online. Lastly, you will need a pair of scissors to trim the shoelaces to the desired length.
To start creating your decorative keychain, choose a shoelace and measure the desired length. You can decide how long or short you want your keychain to be based on personal preference. Once you have determined the length, cut the shoelace accordingly. Repeat this step for as many keychains as you want to make.
Next, take one end of the shoelace and fold it in half. This will create a loop at one end of the lace. Pass the loop through the keychain ring and pull the loose ends of the lace through the loop. Pull tight to secure the lace to the keychain ring. You can repeat this step with additional shoelaces to create a layered or braided effect.
Now comes the fun part – adding embellishments and personalizing your keychain. You can get creative and add beads, charms, or even small trinkets to the shoelaces. Simply thread them onto the lace before attaching it to the keychain ring. This will give your keychain a unique and personalized touch. You can choose to add different beads or charms to each keychain, or create a matching set using the same embellishments.
Once you have added all the desired embellishments, take a moment to ensure everything is secure and tightly fastened. Give the keychain a gentle tug to make sure nothing comes loose. Trim any excess lace or thread that may be sticking out.
Now your decorative keychain is ready to be attached to your keys! Simply slip the keychain ring onto your keyring and enjoy your new personalized accessory. You can make several keychains using different shoelaces and embellishments to switch up your style whenever you want.
Using shoelaces to create decorative keychains is a fun and easy way to repurpose old laces and give your keys a unique touch. With just a few supplies and a little creativity, you can transform a simple shoelace into a stylish accessory. So, why let your old shoelaces go to waste when you can use them to create something beautiful? Give it a try and see what you can come up with!
12 Fun Activities to Experience in Swallow Falls State Park
You may want to see also
![]()
Transform an ordinary hair tie into a trendy scrunchie
Looking for a way to upgrade your hair accessories without breaking the bank? Why not transform an ordinary hair tie into a trendy scrunchie using just a shoelace? With a few simple steps, you can create a stylish and unique hair accessory that will give your outfit an instant upgrade. Here is a step-by-step guide on how to turn a shoelace into a trendy scrunchie.
Step 1: Gather your materials
To make a shoelace scrunchie, you will need a shoelace of your choice, a hair tie, scissors, and a hot glue gun or fabric glue.
Step 2: Measure and cut the shoelace
Take the shoelace and wrap it around your wrist, making sure it has a little bit of slack. This will serve as a measurement for the circumference of your scrunchie. Once you are satisfied with the length, cut the shoelace.
Step 3: Attach the hair tie
Take the hair tie and stretch it out. Then, place one end of the shoelace through the hair tie, creating a loop. Hold the shoelace tightly against the hair tie and wrap it around the hair tie several times until you reach the other end.
Step 4: Secure the shoelace
To secure the shoelace in place, you can use a hot glue gun or fabric glue. Apply a small amount of glue to the end of the shoelace and press it against the hair tie. Hold it in place until the glue dries. Repeat this process on the other end of the shoelace.
Step 5: Finishing touches
Once the glue has dried, your shoelace scrunchie is almost complete. You can leave it as it is for a more minimalist look, or you can add some embellishments for a touch of flair. You could attach a small fabric flower, a bow, or even some beads to make it truly unique. Get creative and have fun with it!
And there you have it – a trendy scrunchie made from a simple shoelace! These DIY scrunchies are not only fashionable, but they are also a great way to repurpose old shoelaces that would otherwise go to waste. Now you can rock a stylish hairstyle while also being eco-friendly.
So next time you're looking to add a little something extra to your hair, don't hesitate to give this shoelace scrunchie tutorial a try. With just a few materials and a little bit of creativity, you can turn an everyday item into a trendy fashion statement.
12 Amazing Things to Do in Caracas, Venezuela
You may want to see also
![]()
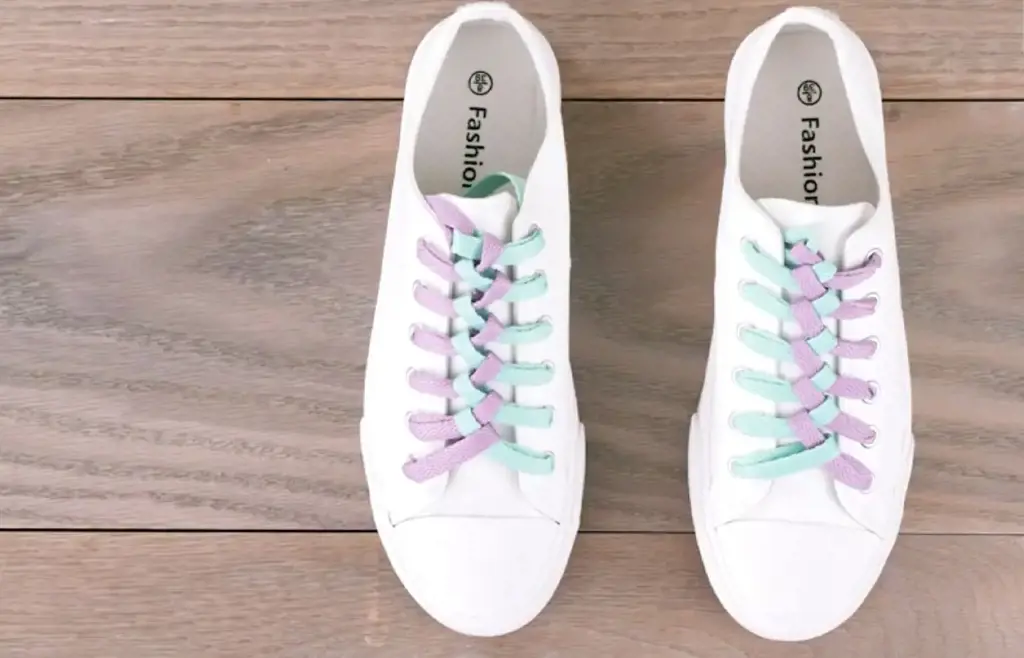
Add colorful laces to your favorite sneakers for a personalized touch
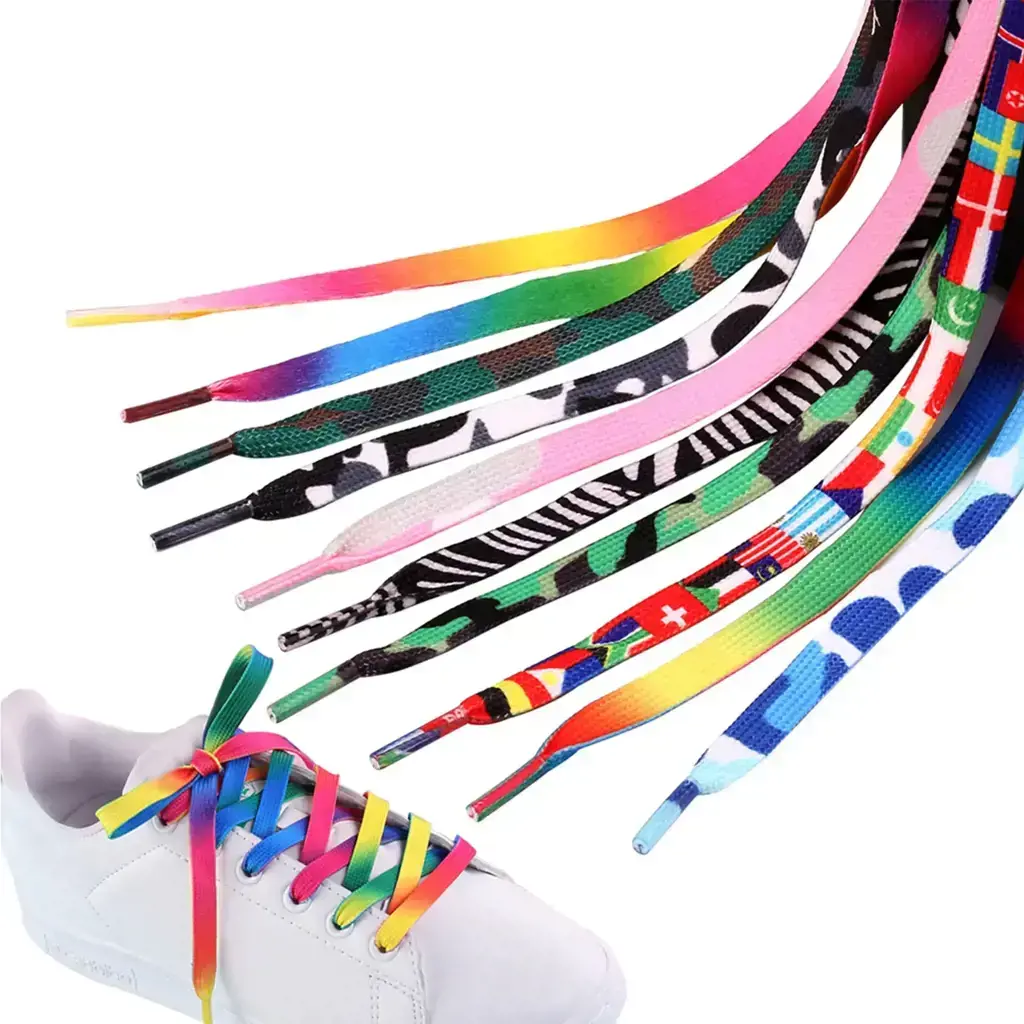
There are countless things you can do with shoelaces to add a bit of personal flair to your favorite sneakers. One fun and easy way to achieve this is by adding colorful laces to your shoes. Whether you want to match them to your outfit, show off your favorite colors, or just add a pop of vibrancy, colorful laces are a great way to make a statement. Here are some ideas on how to do it:
- Match them to your style: If you have a specific aesthetic or style, you can use colorful laces to enhance it. For example, if you have a vintage-inspired look, try replacing the laces on your sneakers with a pair of bright, retro-inspired laces. This small change can completely transform the overall vibe of your outfit.
- Experiment with different color combinations: Don't be afraid to mix and match different colors to create unique combinations. You can either choose complementary colors that go well together, or opt for contrasting colors to create an eye-catching effect. Have fun playing around with different shades until you find the perfect combination for your sneakers.
- Use them as an accent: If you don't want to completely replace your laces, you can use colorful laces as an accent. For example, you can tie a brightly colored lace around the ankle or the top row of eyelets to create a focal point. This is a great way to draw attention to your shoes and add a touch of uniqueness without going overboard.
- Try different lacing styles: Another way to make a statement with your laces is by experimenting with different lacing styles. There are many different ways to lace your shoes, such as the criss-cross, ladder, or checkerboard style. By using colorful laces and trying out different lacing patterns, you can create a truly personalized look.
- Coordinate with your outfit: If you want to create a cohesive look, try matching the color of your laces to another element in your outfit. Whether it's the color of your shirt, a bag, or even your nails, coordinating your laces with another item can help tie your whole look together.
In conclusion, adding colorful laces to your sneakers is a simple yet effective way to personalize your footwear. Whether you choose to match them to your style, experiment with different color combinations, use them as accents, try different lacing styles, or coordinate them with your outfit, colorful laces can add a fun and vibrant touch to your favorite sneakers. So go ahead, get creative and make a statement with your shoes!
12 Fun Things to Do in Danvers Massachusetts
You may want to see also
![]()
Create a fun and stylish headband using shoelaces
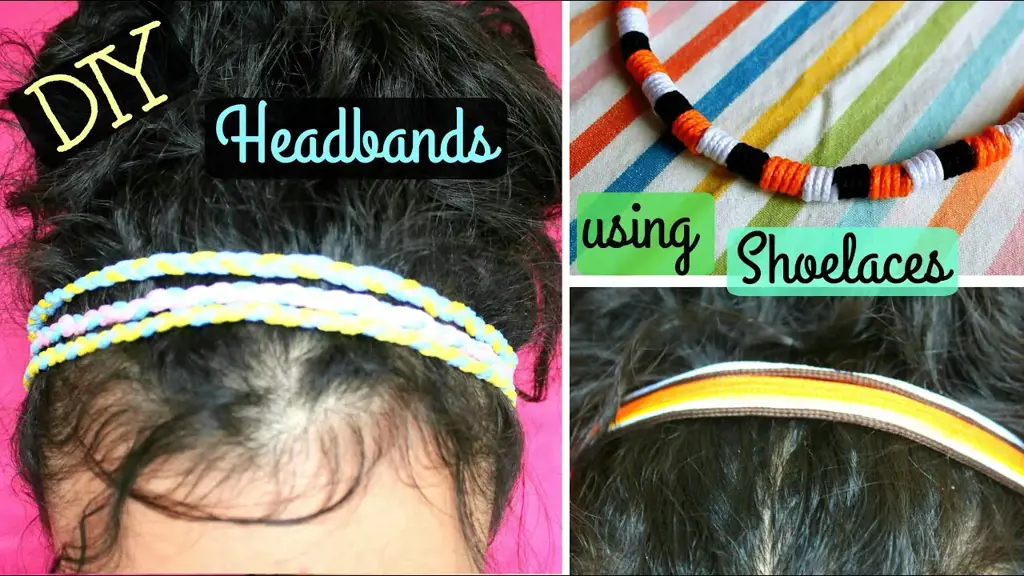
Shoelaces are not just for keeping your sneakers in place – they can also be a fun and stylish accessory to wear in your hair. With a few simple steps, you can create a headband using shoelaces that will add a unique touch to any outfit. Follow these easy instructions to make your own shoelace headband.
Materials needed:
- Shoelaces of your choice
- Scissors
- Glue or needle and thread (optional)
- Elastic band (optional)
Step 1: Choose your shoelaces
Select a pair of shoelaces that complement your hair color and outfit. You can go for a simple and classic white or black, or opt for a bold and colorful pattern to make a statement. Make sure the length of the shoelaces is long enough to wrap around your head comfortably.
Step 2: Measure and cut the shoelaces
Take the shoelaces and measure them against your head, making sure they are long enough to reach from one side to the other. Add an extra inch on each end for tying or securing the headband.
Step 3: Secure the ends
To prevent the ends of the shoelaces from fraying, you can use a small amount of glue or stitch them together using a needle and thread. If you prefer a more flexible headband, you can also attach an elastic band to the ends instead.
Step 4: Tie the headband
Take the shoelaces and wrap them around your head, ensuring that they are snug but not too tight. Tie the ends together in a double knot or bow, making sure the headband feels secure.
Step 5: Style and wear
Once your headband is secured, you can position it on your head wherever you like – over your forehead, at the crown of your head, or slightly pushed back. Experiment with different hairstyles and looks to find the best way to showcase your new shoelace headband.
Not only does this DIY shoelace headband add a unique and fashion-forward touch to your outfit, but it is also a great way to reuse and repurpose old shoelaces. So next time you find yourself with an extra pair of shoelaces lying around, put them to good use and create a fun and stylish headband that is sure to turn heads.
13 Fun Things to Do in Bettendorf, Iowa
You may want to see also
![]()
Turn your boring phone case into a statement piece with shoelace designs
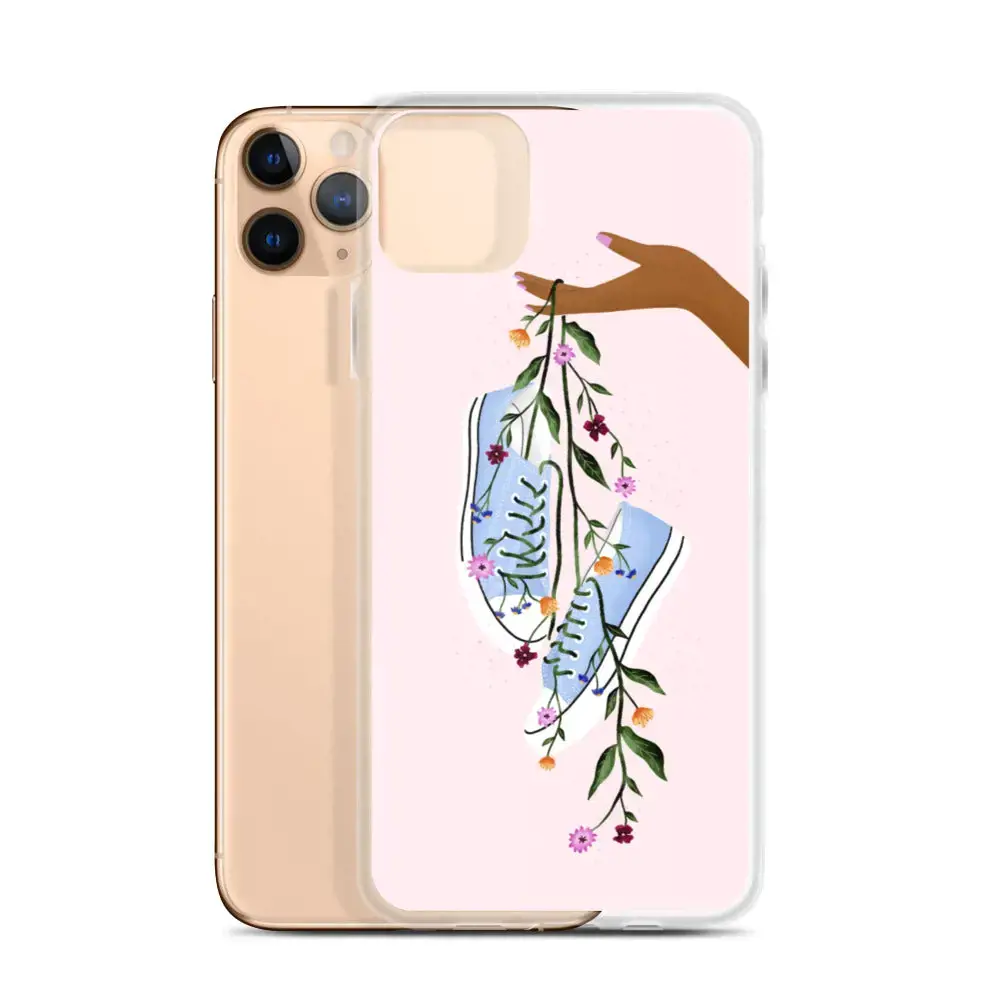
Are you tired of your plain, boring phone case? Do you want to add some personality and style to your device? Look no further than your shoelaces! With a little creativity and some simple techniques, you can turn your ordinary phone case into a statement piece that reflects your unique style.
Here are some fun and easy ways to use shoelaces to transform your phone case:
Wrap it up:
One of the simplest ways to incorporate shoelaces into your phone case design is by wrapping them around your case. Start by choosing a shoelace color or pattern that you love. Then, starting at one end of your phone case, wrap the lace tightly around the case, securing it with a few drops of glue at the beginning and end. Continue wrapping until the entire case is covered, and then secure the final end with more glue. This technique is great for adding texture and dimension to your phone case.
Lace it up:
For a more intricate design, consider lacing your shoelace through the holes or loops on your phone case. This technique works best if your case has holes or a textured surface. Start by threading one end of the shoelace through the first hole, leaving a small loop. Thread the other end of the shoelace through the loop and pull it tight. Repeat this process for each hole or loop on your phone case until you have created a laced pattern that you love. You can experiment with different lacing techniques, such as crisscrossing the lace or creating zigzag patterns, to create a unique look.
Create a pattern:
If you have multiple shoelaces in different colors, you can create a pattern on your phone case. Start by choosing a base color and wrap it around your phone case using the "wrap it up" technique mentioned earlier. Then, choose a contrasting color and wrap it around the case in a different pattern, such as stripes, chevrons, or polka dots. You can also mix and match different colors for a more vibrant and playful look. Secure each shoelace with glue as you go to ensure they stay in place.
Add accessories:
To take your shoelace phone case design to the next level, consider adding some accessories. You can attach small charms, beads, or even buttons to the shoelaces using thin wires or strong glue. This will give your phone case a personalized touch and make it stand out even more. Be creative and experiment with different accessories to find the perfect combination for your style.
Remember, the possibilities are endless when it comes to using shoelaces to transform your phone case. Use your imagination, experiment with different colors and patterns, and have fun creating a unique statement piece that reflects your personality. With a little time and effort, you can turn your plain phone case into a fashion-forward accessory that will make heads turn wherever you go. So, gather your shoelaces and start designing!
13 Fun and Exciting Things to Do in Wilmington, VT
You may want to see also
![]()
Make a DIY camera strap with colorful shoelaces
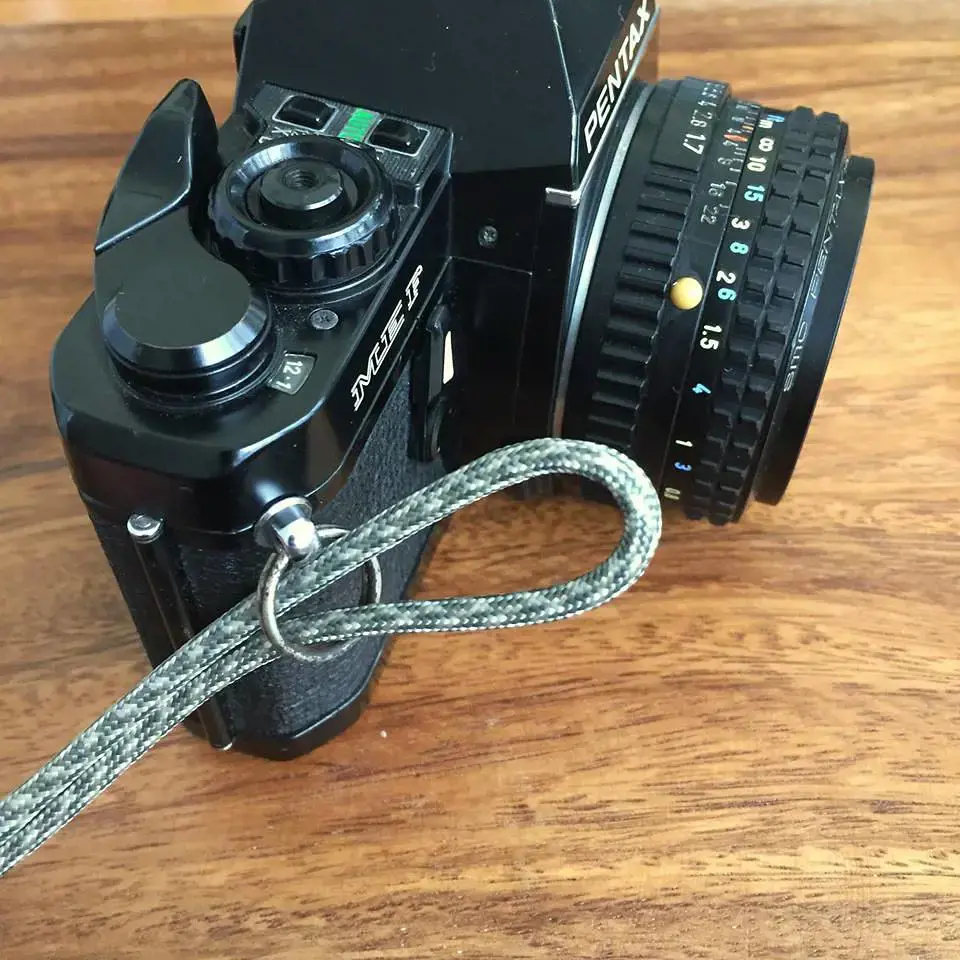
Are you tired of using the same old camera strap that came with your camera? Why not add some personality and style to your photography gear by making a DIY camera strap using colorful shoelaces! This simple and creative project will not only make your camera stand out, but it will also showcase your unique personality and creativity.
To get started, you will need the following materials:
- Colorful shoelaces of your choice
- Scissors
- Strong adhesive or a sewing kit (if you prefer sewing)
- A camera with removable straps
Once you have gathered all the materials, follow these simple steps:
- Measure and cut the shoelaces: Measure the length of the original camera strap and cut the shoelaces to the same length. You can use one color for a more uniform look or mix and match different colored shoelaces for a vibrant and eclectic style.
- Remove the original camera strap: Detach the original camera strap from your camera. This is usually done by unhooking it from the camera's strap lugs or D-rings.
- Attach the shoelaces: Take one end of the shoelace and securely attach it to one strap lug or D-ring using either strong adhesive or by sewing it on. Repeat this step for the other end of the shoelace, ensuring that it is securely attached to the other strap lug or D-ring.
- Repeat for additional shoelaces: If you have chosen to mix and match different colored shoelaces, repeat steps 1 to 3 for each shoelace. Make sure to attach them evenly on both sides of the camera to ensure balance and stability.
- Test the strap: Once you have attached all the shoelaces, test the strap by hanging your camera around your neck or shoulder. Make sure the shoelaces are securely attached and that the strap feels comfortable and stable.
And there you have it - a unique and eye-catching DIY camera strap made from colorful shoelaces! Take your camera out and show off your creative style while capturing amazing photographs. This project is not only fun and easy but also a great way to repurpose old or unused shoelaces.
Remember, creativity knows no bounds, so feel free to experiment with different patterns, textures, and colors of shoelaces. You can even add decorative elements such as beads or charms to make your camera strap even more personalized. Get creative and have fun with this DIY project!
12 Fun Nighttime Activities in Lake Tahoe
You may want to see also
![]()
Decorate a plain tote bag with shoelace designs for a one-of-a-kind accessory
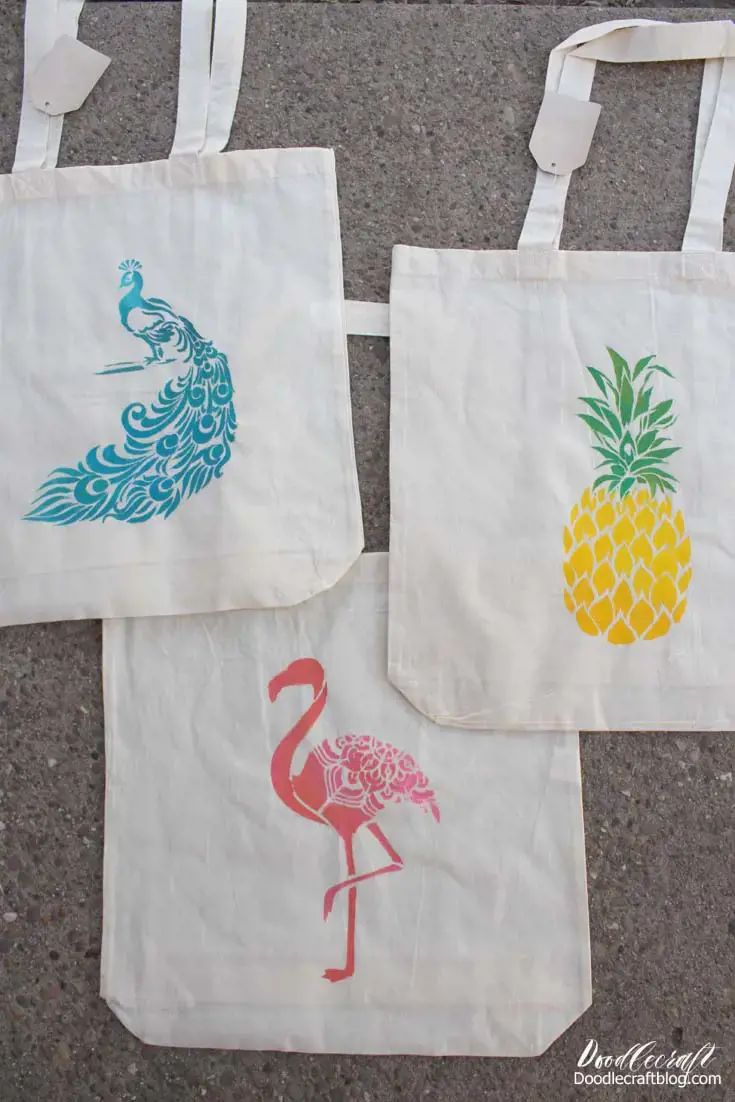
Looking for a fun and creative way to give your plain tote bag a stylish makeover? Why not try decorating it with shoelaces? Not only is it a unique way to customize your bag, but it also gives you the opportunity to showcase your personality and creativity. In this article, we will guide you through the process of adding shoelace designs to your tote bag, creating a one-of-a-kind accessory that is sure to turn heads.
Here's what you'll need:
- A plain tote bag
- Various shoelaces in different colors and patterns
- Craft glue or fabric glue
- Scissors
- Optional: embellishments such as beads, buttons, or ribbons
Now, let's get started:
Step 1: Choose your color palette
Before you begin, decide on a color scheme for your bag. You can opt for a monochromatic look using different shades of the same color, or mix and match a variety of colors for a vibrant and lively design. Consider the outfit or occasion you'll be using the bag for, and let your creativity guide you.
Step 2: Plan your design
Take a moment to plan out the design on your bag. You can go for a simple pattern like stripes or chevrons, or get more intricate with shapes and symbols. Sketch out your design on a piece of paper to get a better idea of how the shoelaces will fit together.
Step 3: Attach the shoelaces
Start by attaching your first shoelace to the bag using craft glue or fabric glue. Begin at the bottom of the bag, and follow your planned design, ensuring that the shoelace is securely glued down. Continue layering and overlapping the shoelaces until your design is complete. You can trim the shoelaces with scissors if needed.
Step 4: Embellish (optional)
If you want to add some extra flair to your design, you can attach beads, buttons, or ribbons to the shoelaces. Use the craft glue or fabric glue to secure these embellishments in place. Be creative and have fun with it!
Step 5: Let it dry
After completing your design, allow the bag to dry completely. Keep in mind that the drying time will vary depending on the glue used, so be patient and follow the instructions provided. Once your bag is dry, it's ready to be shown off to the world!
Decorating a plain tote bag with shoelace designs is a fun and affordable way to add a personal touch to your accessories. Whether you're going for a boho-chic style or a bold and colorful look, the possibilities are endless. So grab your favorite shoelaces and get creative – you'll be amazed at the result!
12 Exciting Adventures to Try in Hebron Ohio
You may want to see also
![]()
Use shoelaces to create unique bookmarks for your favorite books
Shoelaces are versatile and can be used for more than just tying your shoes. One creative way to use shoelaces is to create unique bookmarks for your favorite books. Not only are these bookmarks functional, but they also add a touch of personalization to your reading experience. Here are a few ideas for using shoelaces to create one-of-a-kind bookmarks.
- Braided Bookmark: Start by selecting three shoelaces in different colors. Cut the shoelaces to a length slightly longer than the height of your book pages. Gather the shoelaces together and tie a knot at one end. Then, proceed to braid the shoelaces together. Once you reach the end, tie another knot to secure the braid. Slip the braided bookmark between pages to mark your place in the book and showcase your creative flair.
- Tassel Bookmark: Cut a shoelace to your desired bookmark length. Fold the shoelace in half, so both ends meet, and tie a knot at the folded end, creating a loop. Slide the loop through the hole in the top of a small decorative bead or charm. Next, slide the loose ends of the shoelace through the loop and pull tight to secure the bead or charm in place. This will create a tassel-like bookmark. Insert the shoelace into your book to mark your page, and let the tassel hang out for a stylish touch.
- Painted Bookmark: Choose a plain white shoelace and some fabric paint. Lay the shoelace flat on a protected surface, such as a plastic sheet or wax paper. Use the fabric paint to create unique designs, patterns, or even write inspiring quotes on the shoelace. Let the paint dry completely before using your artistic bookmark in your favorite book. Not only will this bookmark keep your place in your book, but it will also be a personal work of art.
- Beaded Bookmark: Gather your favorite beads and a shoelace. Cut the shoelace to the desired bookmark length. Slide beads onto the shoelace, arranging them in any pattern you like. You can use a single type of bead or mix different sizes and colors for a more eclectic look. Once you've added all your beads, tie a knot at each end of the shoelace to secure the beads in place. Slip your beaded bookmark into your book, and let the beads dangle outside for added charm.
- Ribbon and Shoelace Bookmark: Cut a piece of ribbon and a shoelace to the same desired bookmark length. Place the ribbon and the shoelace together, with the shoelace positioned slightly towards one end of the ribbon. Fold the end of the ribbon over the shoelace and secure it with a small stitch or a few drops of fabric glue. This will create a loop at one end of the bookmark. Thread the shoelace through the loop, leaving a small portion of the shoelace sticking out. Tie a knot at the end of the shoelace to prevent it from slipping out. Place the ribbon and shoelace page marker in your book, and use the shoelace to easily find your spot.
These are just a few creative ideas to get you started with using shoelaces to create unique bookmarks. The possibilities are endless, so don't be afraid to experiment and let your imagination run wild. With these DIY bookmarks, your reading experience will be even more enjoyable and stylish.
12 Fun-filled Adventures around Truro NS
You may want to see also
![]()
Turn a basic lampshade into a stylish piece using shoelace wraps or weaves

Shoelaces are not just for tying your shoes anymore. With a little creativity, you can turn them into a fun and stylish accessory for your home decor. One simple yet effective way to use shoelaces is by transforming a basic lampshade into a stunning piece using shoelace wraps or weaves. This DIY project is easy to do and can completely change the look of a room.
To start, gather your supplies. You will need a lampshade, shoelaces in various colors and lengths, a hot glue gun, and scissors. Choose shoelaces that are long enough to wrap around your lampshade and complement the color scheme of your room. Don't be afraid to mix and match different colors and patterns for a unique and vibrant look.
Begin by preparing your lampshade. Remove any dust or debris from the surface and make sure it is clean and dry. This will ensure that the shoelaces adhere properly to the lampshade. If desired, you can also remove the existing fabric from the lampshade to create a blank canvas for your shoelace design.
Next, decide on the design you want to create. There are several options for using shoelaces on a lampshade. One option is to wrap the shoelaces around the lampshade in a spiral pattern. Start at the top or bottom of the lampshade and secure the end of the shoelace with a small dot of hot glue. Wrap the shoelace around the lampshade, periodically adding small dots of hot glue to keep it in place. Continue wrapping until you reach the desired height or cover the entire lampshade.
Another option is to create a weave pattern using the shoelaces. Start by securing one end of a shoelace to the inside of the lampshade with hot glue. Bring the shoelace across the front of the lampshade and loop it around to the back. Continue weaving the shoelace in and out of the lampshade's frame, crossing over and under the previous shoelace as you go. Secure the other end of the shoelace with hot glue once you reach the desired height or complete the weave pattern.
You can also combine these techniques by alternating between wrapping and weaving the shoelaces. This will add depth and texture to your lampshade design. Experiment with different patterns and placements to create a one-of-a-kind look.
Once you have finished applying the shoelaces to your lampshade, trim any excess length and secure the ends with hot glue. This will ensure that the shoelaces stay in place and do not unravel over time. Allow the hot glue to dry completely before attaching the lampshade back to the lamp.
Now step back and admire your transformed lampshade! The addition of shoelaces adds a playful and unique touch to your home decor. You can use this technique on multiple lampshades throughout your home to create a cohesive and stylish look. Don't be afraid to experiment with different colors and patterns to match your personal style.
In conclusion, using shoelaces to transform a basic lampshade into a stylish piece is a creative and fun DIY project. By wrapping or weaving the shoelaces around the lampshade, you can add depth and texture to your home decor. Whether you choose to use a single color or mix and match different colors and patterns, this simple technique can completely change the look of a room. So why not give it a try and see how shoelaces can elevate your home decor?
14 Fun and Interesting Things to Do in Pasadena, TX
You may want to see also
![]()
Decorate your bike handles with colorful shoelaces for a fun and functional upgrade
Are you tired of the plain and boring bike handles? Want to give your bike a fresh new look? Why not decorate them with colorful shoelaces? This simple and inexpensive DIY project is not only fun but also functional. Here's a step-by-step guide on how to decorate your bike handles with shoelaces.
Step 1: Gather your materials
To get started, you'll need the following materials:
- Shoelaces in various colors and patterns: Choose laces that are long enough to wrap around your bike handles.
- Scissors: You'll need these to cut the shoelaces to the desired length.
Step 2: Remove old handle grips (if applicable)
If your bike already has handle grips, you'll need to remove them before you can decorate with shoelaces. Use a screwdriver or Allen wrench to loosen and remove any screws or bolts holding the handle grips in place. Once removed, clean the handlebars to ensure a smooth surface for the shoelaces.
Step 3: Start wrapping the shoelaces
Take one end of a shoelace and secure it tightly around the base of the handlebar. Make sure it's snug and won't slide off. Once secured, start wrapping the shoelace around the handlebar, overlapping each wrap slightly. Continue wrapping until you reach the end of the handlebar.
Step 4: Secure the shoelace
When you reach the end of the handlebar, secure the shoelace by tying a knot or using a small zip tie. Trim any excess lace with scissors to neaten the finish. Repeat the wrapping process with the remaining handles, using different shoelaces to create a unique and vibrant look.
Step 5: Test the grips
Once you've wrapped both bike handles with shoelaces, give them a test run. Grip the handles and make sure they feel comfortable and secure. If needed, adjust the shoelaces or add more wraps to ensure a good grip.
Step 6: Finishing touches (optional)
If you want to add an extra touch of style to your bike handles, consider adding decorative beads or charms to the ends of the shoelaces. Thread them onto the shoelaces before securing them to the handlebars. This will give your bike handles a personalized and eye-catching look.
By following these simple steps, you can easily upgrade your bike handles with colorful shoelaces. Not only will this DIY project give your bike a fresh new look, but it will also provide you with a comfortable grip during your rides. So go ahead and get creative with your shoelaces and transform your bike into a fun and unique ride. Happy decorating!
11 Romantic Things to Do in Kennebunkport
You may want to see also
Frequently asked questions
To tie your shoelaces properly, start by crossing the laces over each other and pulling them tight. Then, make a loop with one lace and cross the other lace over it, pulling it through the loop. Finally, pull both loops tight to secure the knot.
To prevent your shoelaces from coming undone, make sure you tie them with a double knot. After tying your shoelaces, make an extra loop with each lace and tie them together in a knot. This will provide extra security and reduce the chances of your laces coming undone during activities.
There are plenty of creative ways to lace your shoes. Some popular options include the ladder lacing technique, where the laces crisscross like a ladder, or the checkerboard lacing technique, where the laces create a checkerboard pattern on the shoe. You can also experiment with different colors of laces or alternate lacing patterns for a unique look.
If your shoelaces are dirty, you can clean them by soaking them in warm soapy water for a few minutes. Then, scrub them gently with a brush or sponge to remove any dirt or stains. Rinse them thoroughly, squeeze out any excess water, and hang them to dry. Alternatively, you can also put them in a pillowcase and wash them in the washing machine on a gentle cycle.


2 Comments
Thalia Koch
Leona Harvey