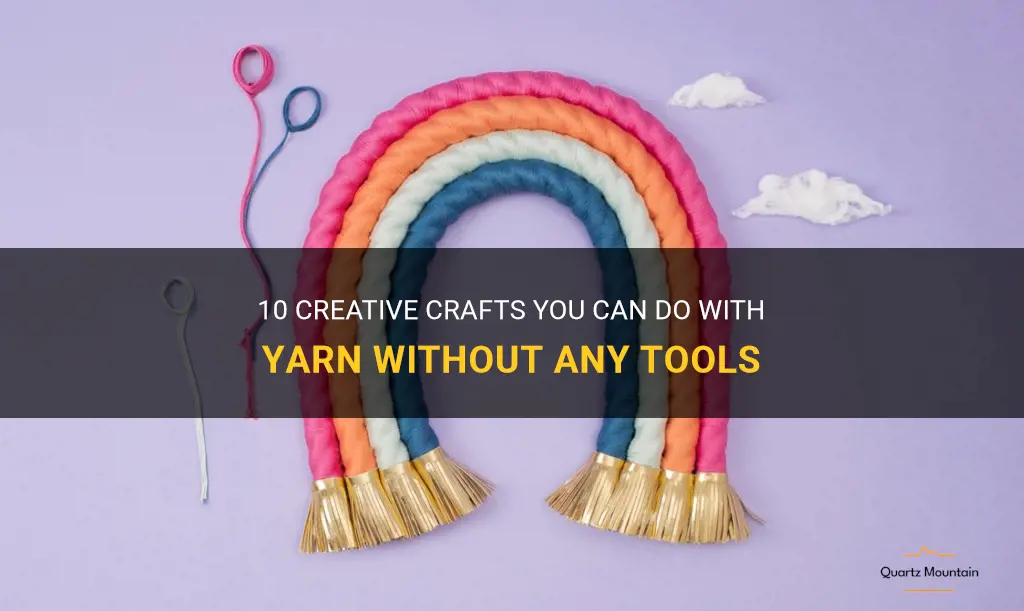
Are you looking for a fun and creative way to pass the time? Look no further! We have put together a list of 10 creative crafts that you can do with yarn without the need for any tools. Whether you are a seasoned crafter or a beginner, these projects are sure to keep you entertained and create beautiful results. So put down your crochet hooks and knitting needles, and let's get started on some yarn-tastic creations!
| Activity | |
|---|---|
| 1 | Knitting |
| 2 | Crocheting |
| 3 | Weaving |
| 4 | Macramé |
| 5 | Finger knitting |
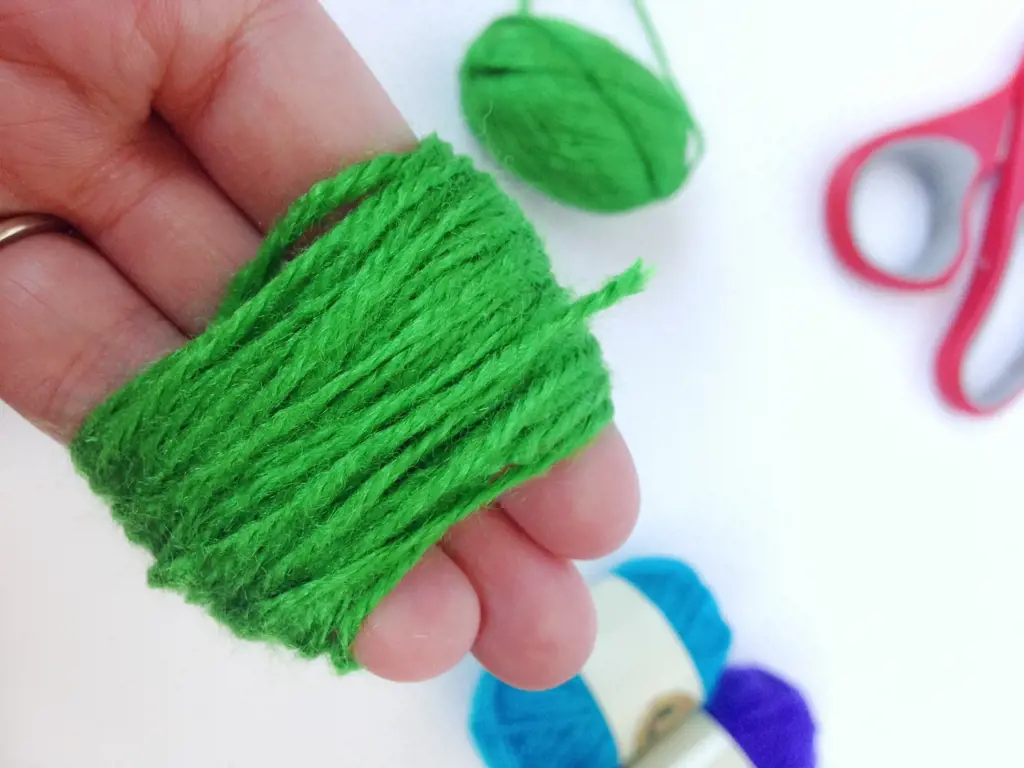
| 6 | Yarn-wrapping |
| 7 | Pom-pom making |
| 8 | Tassel making |
| 9 | Yarn braiding |
| 10 | Yarn painting |
What You'll Learn
- Crafting at Home: Use yarn to make pom-poms or tassels to add a touch of creativity to your home decor
- Yarn Painting: Create a unique piece of artwork by dipping yarn into paint and creating textured patterns on a canvas or paper
- Yarn Weaving: Make a small weaving loom using cardboard and weave different colored yarns to create beautiful patterns
- Yarn Dolls: Create adorable yarn dolls using just yarn, scissors, and glue
- Yarn Wrapped Letters: Decorate wooden or cardboard letters with colorful yarn by wrapping it around them
- Yarn Wreaths: Make your own wreaths by wrapping yarn around foam or cardboard circles and adding decorative elements
- Yarn Friendship Bracelets: Braid or knot different colored yarns together to make cute and personalized friendship bracelets
- Yarn Pouches: Use simple crochet techniques to create small pouches or bags to hold your essential items
- Yarn Wrapped Vases or Bottles: Give a new look to plain vases or bottles by wrapping yarn around them and securing with glue
- Yarn Bookmarks: Make fun and colorful bookmarks using yarn and adding beads or charms for extra flair
![]()
Crafting at Home: Use yarn to make pom-poms or tassels to add a touch of creativity to your home decor
If you're looking for a fun and creative way to jazz up your home decor, look no further than yarn. With just a few simple techniques, you can transform this versatile material into beautiful pom-poms or tassels that will add a touch of handmade charm to any space. The best part? You don't need any fancy tools or equipment to get started.
Pom-poms are a classic crafting element that can be used in a variety of ways. From adding a whimsical touch to a plain pillow or blanket, to creating a colorful garland to hang on the wall, there are endless possibilities for using pom-poms to spruce up your home. To make pom-poms without any tools, all you need is yarn and your hands.
To get started, cut a piece of yarn about 8-10 inches long and set it aside. Next, wrap the yarn around your hand or fingers. The more times you wrap it, the fuller your pom-pom will be, so feel free to experiment with different amounts of yarn. Once you're happy with the thickness of your pom-pom, carefully slide it off your hand or fingers and pinch it together in the middle. Use the piece of yarn you set aside earlier to tie a tight knot around the middle of the pom-pom, securing all the strands in place.
After you've tied the knot, you can trim the excess yarn to even out the edges of the pom-pom and give it a neat appearance. However, if you prefer a more organic and fluffy look, you can leave the strands long and uneven. Repeat these steps to make as many pom-poms as you like, and then use them to decorate your home according to your unique style and taste.
Tassels are another versatile decoration that can add a touch of elegance to your home decor. Whether you want to adorn your curtains, keychains, or even create a stylish boho wall hanging, tassels are a simple and effective way to achieve a chic and trendy look. Just like pom-poms, you can make tassels with just yarn and your hands.
To make a tassel, start by cutting a piece of yarn about 8-10 inches long and setting it aside. Then, wrap the yarn around your hand or fingers (the same way you did for the pom-poms) until you've reached your desired thickness. Slide the yarn off your hand or fingers and pinch one end together. Use the piece of yarn you set aside earlier to tie a tight knot around the top of the tassel, about half an inch from the end.
Once you've tied the knot, you can trim the bottom edge of the tassel to create a straight line. If you prefer a more bohemian look, you can leave the strands long and uneven. Finally, attach a loop of yarn to the top of the tassel by folding the piece of yarn you set aside in half and sliding it through the top knot. Tie a knot at the ends of the loop to secure it in place, and your tassel is ready to be displayed.
These simple techniques open up a world of possibilities for using yarn to add a creative touch to your home decor. Whether you choose to make pom-poms or tassels, the process is easy and the results are sure to impress. So, gather some yarn and let your creativity flow - the possibilities are endless!
10 Awesome Activities in Taunton for the Perfect Day Out
You may want to see also
![]()
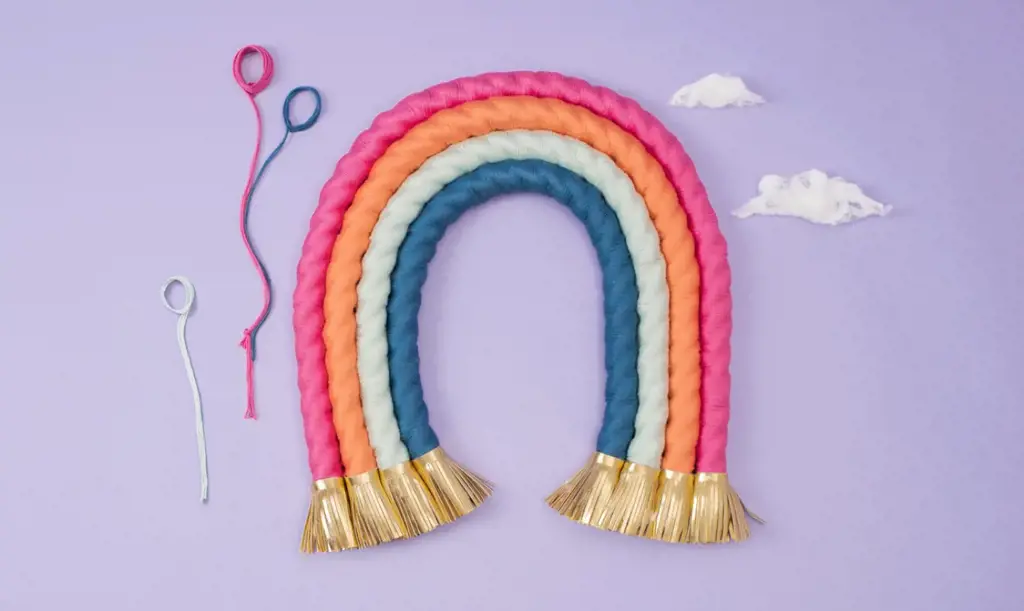
Yarn Painting: Create a unique piece of artwork by dipping yarn into paint and creating textured patterns on a canvas or paper
Yarn Painting: Unleash Your Creativity Without Tools
Yarn is a versatile material that can be used for many crafts and projects. One exciting and unique way to use yarn is through yarn painting. This technique allows you to create one-of-a-kind artwork without the need for any tools or fancy equipment. All you need is some yarn, paint, and a canvas or paper to get started with this fun and creative activity.
Here's a step-by-step guide on how to create your own yarn painting:
Gather your materials:
- Yarn in various colors and textures
- Acrylic paint in your desired colors
- A canvas or heavy-duty paper
- Newspaper or a drop cloth to protect your work surface
- A container for the paint, such as a plate or palette
- Optional: brushes for mixing paint colors or applying additional details
Prepare your work area:
Lay down newspaper or a drop cloth to protect your table or floor. Yarn painting can get messy, so it's always a good idea to create a barrier between your work and the surface.
Choose your yarn:
Select a few different colors and textures of yarn to experiment with. You can use thick yarn for bold and textured patterns, or thin yarn for more delicate and intricate designs.
Dip the yarn into the paint:
Pour a small amount of acrylic paint onto a plate or palette. Take one end of the yarn and dip it into the paint, making sure to coat the entire length of the yarn with paint. You can choose to dip the entire length of the yarn or only a portion, depending on the desired effect.
Apply the yarn to the canvas or paper:
Take the paint-coated yarn and press it onto the canvas or paper in any pattern or design you like. You can twist or loop the yarn to create interesting textures and shapes. Experiment with different lengths and thicknesses of yarn to create a variety of effects.
Repeat and layer:
Continue dipping the yarn into different colors of paint and applying it to the canvas or paper. Overlap the yarn or layer it in different directions to create depth and dimension in your artwork. You can also mix and blend colors on the yarn itself to create unique shades and gradients.
Add details (optional):
If desired, you can use a brush or your fingers to add additional details or highlights to your yarn painting. This could include adding small dots, lines, or shapes to enhance the overall design.
Let it dry:
Once you're satisfied with your yarn painting, set it aside to dry completely. It may take a few hours or overnight, depending on the thickness of the paint and the humidity in your workspace.
Display your finished artwork:
Once the paint is dry, you can display your yarn painting in a frame, hang it on a wall, or even use it as a unique and textured background for other crafts and projects.
Yarn painting is a fantastic way to explore your creativity and create beautiful artwork without the need for any tools. With just some yarn, paint, and a canvas or paper, you can unleash your imagination and create unique textured masterpieces. So grab your yarn and let your creativity run wild with this fun and easy craft!
12 Things to Do in Sapa
You may want to see also
![]()
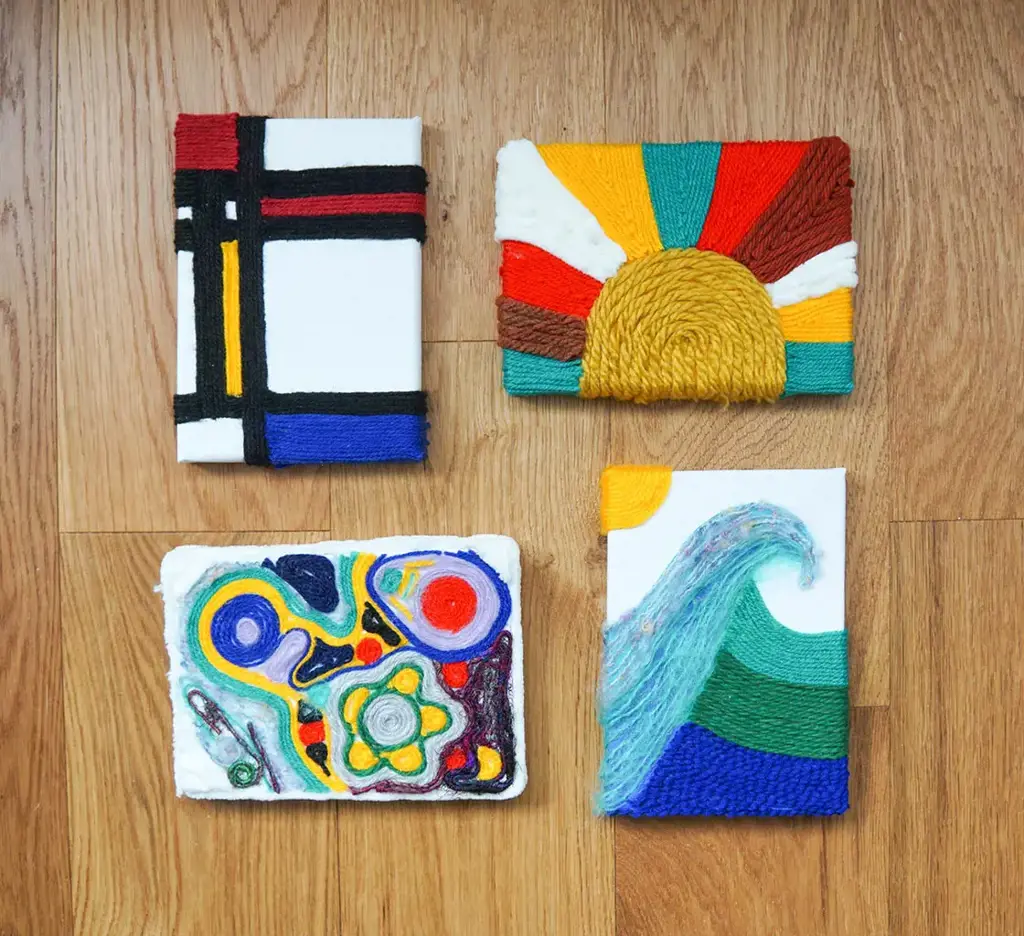
Yarn Weaving: Make a small weaving loom using cardboard and weave different colored yarns to create beautiful patterns
If you have some yarn on hand and no tools to use, don't worry! There are still plenty of fun things you can do with yarn without any tools. One of these activities is yarn weaving. In this article, we will show you how to make a small weaving loom using cardboard and how to weave different colored yarns to create beautiful patterns.
Materials you will need:
- Cardboard
- Scissors
- Ruler
- Pencil
- Yarn in different colors
Step 1: Start by cutting a piece of cardboard into a rectangle shape. The size of the rectangle will determine the size of your weaving, so choose the size that you prefer. Use a ruler and a pencil to measure and mark the dimensions of your rectangle on the cardboard.
Step 2: Once you have marked the dimensions, use scissors to carefully cut along the lines and remove the excess cardboard. You should be left with a clean rectangle shape.
Step 3: Now, use the ruler to measure and mark equidistant lines along the shorter sides of the rectangle. These lines will be used to create the notches for your yarn to go through. Make sure to leave a small space between each line.
Step 4: Carefully cut along the marked lines to create notches on each side of the cardboard. These notches will hold the yarn in place when you start weaving.
Step 5: Next, choose the colors of yarn you want to use for your weaving. Cut several pieces of each color, around 1 yard long. These pieces will be the weft yarns that you will weave through the loom.
Step 6: Take one of the pieces of yarn and tie a knot on one of the notches at the top of the loom. This will be your starting point.
Step 7: Begin to weave your yarn through the notches, under and over the vertical strands of yarn. Continue this pattern, alternating colors as you go along. You can experiment with different patterns and techniques to create different textures and designs.
Step 8: Once you have reached the desired length of your weaving, tie another knot on one of the notches at the bottom of the loom to secure the yarn in place.
Step 9: To finish off your weaving, carefully slide the woven piece off the loom. You can use scissors to trim any excess yarn if needed.
Step 10: Now, you can display your beautiful woven piece by hanging it on a wall or using it as a decorative element in your home. You can also make more weavings using different colors and patterns to create a collection.
Yarn weaving is a great way to get creative with yarn without any tools. With just some cardboard and your imagination, you can create beautiful and unique pieces. So grab your yarn and start weaving today!
11 Fun and Exciting Things to Do on Vashon Island
You may want to see also
![]()
Yarn Dolls: Create adorable yarn dolls using just yarn, scissors, and glue
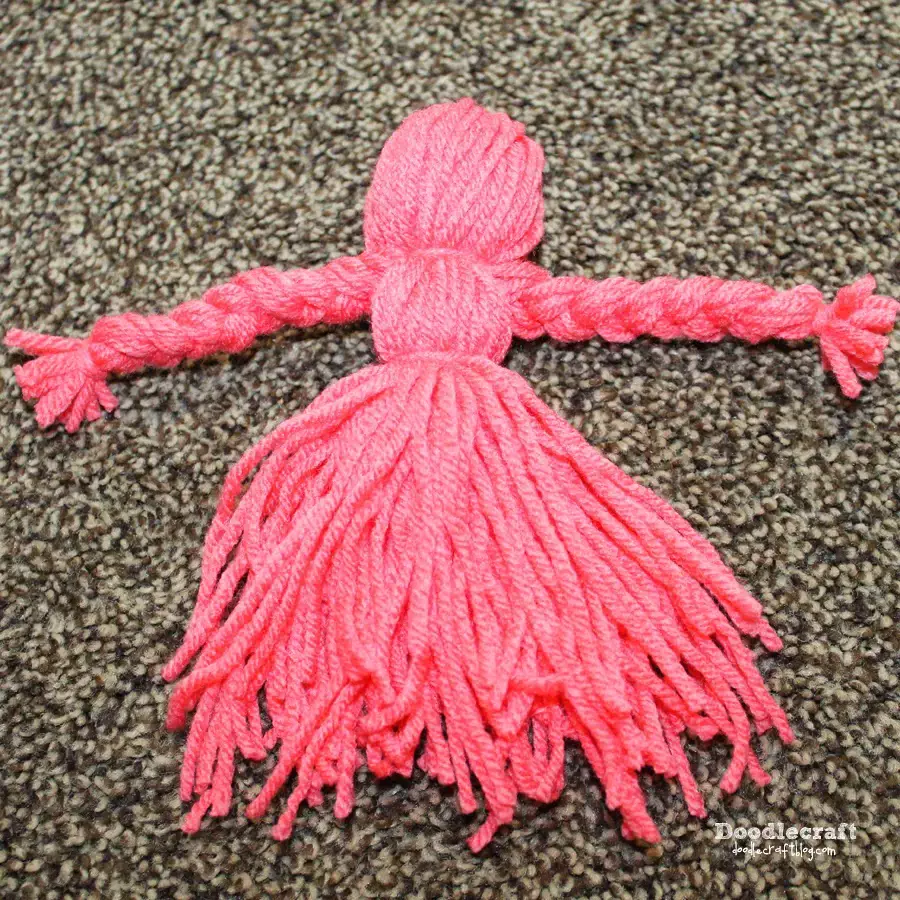
Yarn is a versatile and fun material that can be used to create a wide variety of crafts. One of the most popular things to do with yarn is to create adorable yarn dolls. These dolls are a great project for both kids and adults alike, as they are easy to make and require minimal materials.
To create a yarn doll, you will need yarn (in various colors if desired), scissors, and glue. You can use any type of yarn for this craft, but it is recommended to use a lightweight yarn that is easy to work with.
To begin making your yarn doll, cut a piece of yarn that is approximately 12 inches long. This will be used to create the head of the doll. Take one end of the yarn and fold it over a few times to create a small loop. Tie a knot at the top of the loop to secure it in place. This will be the top of the doll's head.
Next, cut another piece of yarn that is approximately 24 inches long. This will be used to create the body of the doll. Take one end of the yarn and fold it over a few times to create a small loop, just like you did for the head. Slide this loop through the loop on the head and pull it tight. This will create the neck of the doll.
To create the arms of the doll, cut two more pieces of yarn that are approximately 6 inches long each. Fold each piece of yarn in half and slide the folded end through the body loop just below the neck. Pull the ends of the yarn through the folded loop to secure the arms in place.
To create the legs of the doll, cut two more pieces of yarn that are approximately 8 inches long each. Fold each piece of yarn in half and slide the folded end through the body loop just below the arms. Pull the ends of the yarn through the folded loop to secure the legs in place.
To finish off your yarn doll, you can add a face and any other desired details. Use glue to attach googly eyes, yarn for hair, and any other embellishments you like. Be creative and make your doll as unique as you want!
Creating yarn dolls is a simple and enjoyable craft that can be done with just yarn, scissors, and glue. These dolls make great gifts or decorations, and are sure to bring a smile to anyone's face. So grab your yarn and get crafting!
13 Romantic Things to Do in Ocean City, MD
You may want to see also
![]()
Yarn Wrapped Letters: Decorate wooden or cardboard letters with colorful yarn by wrapping it around them
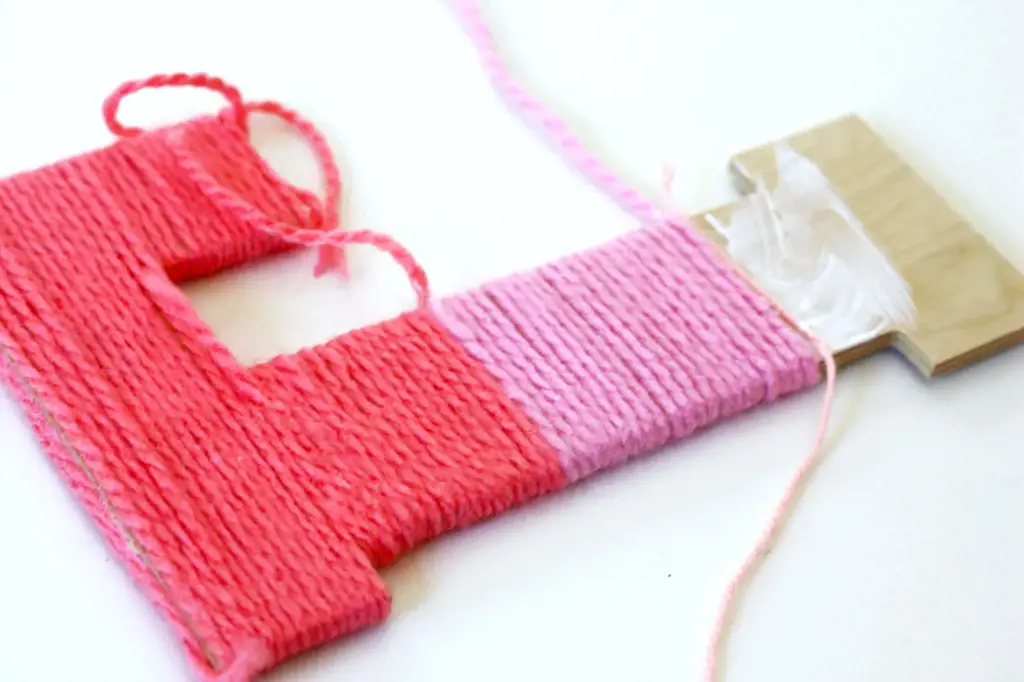
If you have some spare yarn lying around and are looking for a fun and creative project, why not try making yarn wrapped letters? This simple and easy-to-do craft allows you to personalize your space and add a pop of color to any room. All you need is some yarn, wooden or cardboard letters, and a bit of creativity!
To get started, gather your materials. You can find wooden or cardboard letters at most craft stores, or you can cut them out yourself using stencils or a template. Choose yarn colors that match your desired color scheme or go for a rainbow effect with a variety of shades. You will also need a pair of scissors and some glue or double-sided tape to secure the yarn.
Once you have your materials ready, begin by securing one end of the yarn to the back of the letter using glue or double-sided tape. You can start anywhere on the letter; just make sure the yarn is secure before moving on. Once the end is secure, start wrapping the yarn around the letter, making sure to cover the entire surface. Continue wrapping the yarn, making sure to overlap the previous layers slightly to create a tight and secure wrap. You can wrap the yarn in different directions, creating patterns or designs as you go along.
If you want to add some texture to your yarn wrapped letters, you can experiment with different yarn thicknesses or try using multiple colors. You can also mix and match different types of yarn, such as soft and fluffy yarn with braided or metallic yarn, to add some visual interest.
Once you have wrapped the entire letter with yarn, cut the yarn and secure the end to the back of the letter with glue or double-sided tape. Make sure the end is securely fastened to prevent it from unraveling. If you have any loose ends or areas that don't look quite right, you can go back and secure them with a small dab of glue or tape.
Yarn wrapped letters can be used in various ways to add a personal touch to your living space. They can be displayed on a wall or shelf, used as bookends, or even turned into ornaments for special occasions. You can also personalize them with additional decorations such as flowers, ribbons, or small trinkets to make them even more unique and eye-catching.
This craft is not only fun and easy but also a great way to use up any leftover yarn you may have. It can be a relaxing and meditative activity, allowing you to unwind and unleash your creativity. So grab some yarn and give this craft a try – you'll be surprised at how a simple material like yarn can transform plain wooden or cardboard letters into beautiful and colorful works of art.
13 Romantic Things to Do in Brooklyn for Couples
You may want to see also
![]()
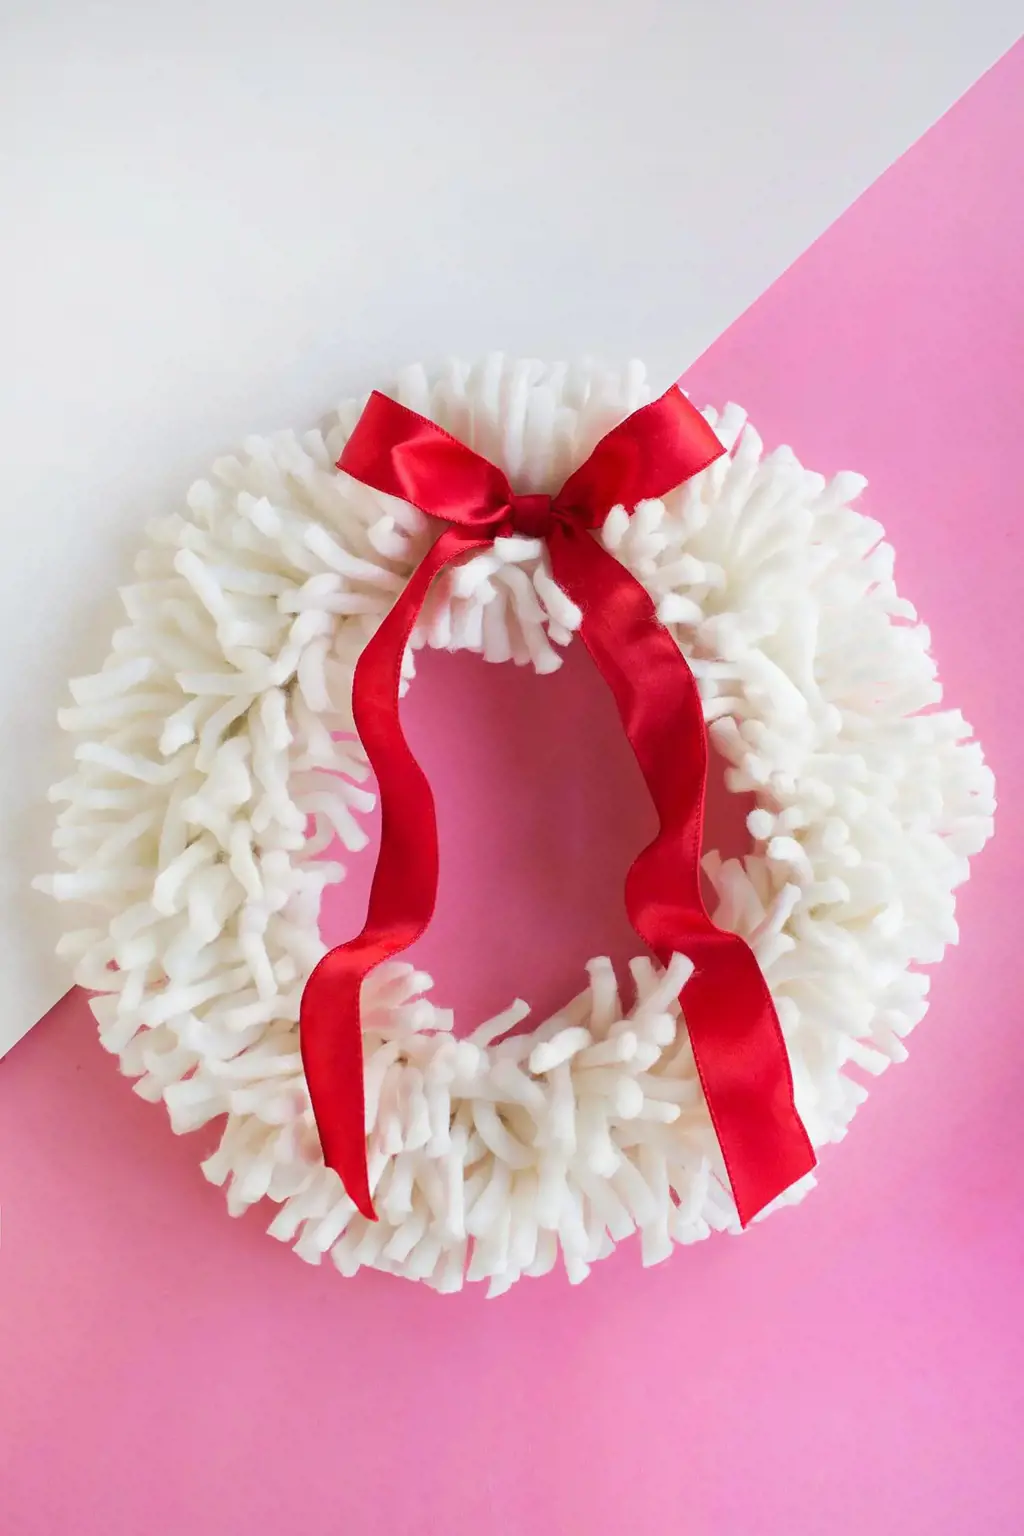
Yarn Wreaths: Make your own wreaths by wrapping yarn around foam or cardboard circles and adding decorative elements
Yarn Wreaths: Make Beautiful Decorations without Tools
If you're looking for a fun and creative way to use up your extra yarn, consider making your own yarn wreaths. These beautiful decorative pieces can be made without the need for any tools. All you need is some yarn, foam or cardboard circles, and your imagination!
To get started, gather your materials. You'll need yarn in your chosen colors, foam or cardboard circles (which can be found at your local craft store or easily cut from old boxes), and any additional decorative elements you'd like to add, such as flowers, bows, or ornaments.
Begin by wrapping your first color of yarn around the foam or cardboard circle. You can secure the end of the yarn with a knot or a small amount of tape. Then, simply start wrapping the yarn around the circle, making sure to cover the entire surface. You can wrap the yarn tightly for a more polished look or leave it looser for a more textured effect.
Once you're satisfied with the coverage of your first color, you can either cut the yarn and tie it off, or you can continue wrapping and switch to a different color. Mixing multiple colors can create a stunning layered effect for your wreath. You can experiment with different color combinations to find a look that you love.
After you've finished wrapping the yarn, it's time to add any additional decorative elements. This is where you can let your creativity shine. You can attach flowers made from felt or fabric, bows made from ribbon, or even small ornaments for a festive touch. The possibilities are endless!
To attach these decorations, you can simply use hot glue or a small amount of tape. Make sure to arrange them in a way that is visually pleasing to you. You can create a symmetrical design or go for a more whimsical look with a random arrangement of elements.
Once you're happy with your design, your yarn wreath is ready to be displayed. These wreaths look lovely on front doors, walls, or even as table centerpieces. You can also hang them from a ribbon or hook for added versatility.
Yarn wreaths are not only a fun project to make, but they also make wonderful gifts for friends and family. You can customize them to match any decor or theme, making them a truly personal and heartfelt present.
So, the next time you find yourself with some spare yarn and a creative itch, consider making your own yarn wreaths. With just a few materials and some imagination, you can create beautiful and unique decorations that will add a touch of warmth and charm to any space. Happy crafting!
13 Fun Things to Do in Altoona, PA
You may want to see also
![]()
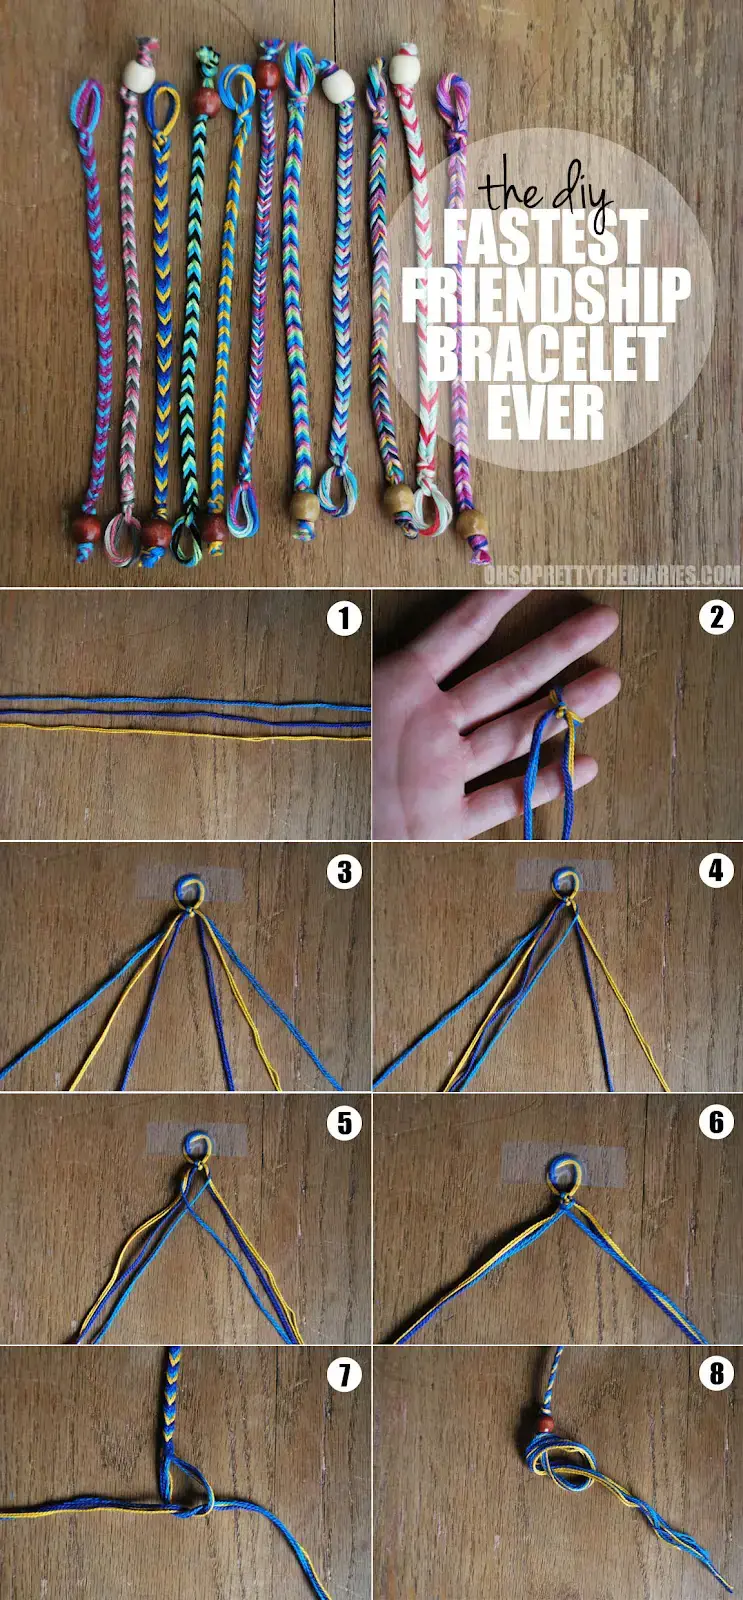
Yarn Friendship Bracelets: Braid or knot different colored yarns together to make cute and personalized friendship bracelets
Yarn Friendship Bracelets: A Fun DIY Project Without Tools
Friendship bracelets are a classic symbol of friendship and have been popular among kids and teenagers for generations. Making friendship bracelets with yarn is a simple and creative way to express your friendship and have fun at the same time. The best part is, you don't need any tools to make these beautiful bracelets. Here's how you can create your own yarn friendship bracelets without using any tools.
Materials you will need:
- Different colored yarns
- Scissors
Step 1: Choose Your Yarns
To start making your yarn friendship bracelets, you need to select different colored yarns. Choose colors that you and your friends love. You can go for a monochromatic theme or mix and match different shades.
Step 2: Cut the Yarns
Cut the yarns into equal lengths. The ideal length depends on your preference, but a good starting point is around 20 inches per strand. You can adjust the length depending on how long you want your bracelets to be.
Step 3: Create a Loop
Take all the strands of yarn and fold them in half. This will create a loop at one end. Make sure the ends of the yarns are aligned.
Step 4: Start Braiding
Hold the looped end of the yarn with one hand and separate the strands into three equal sections. Begin braiding the strands together, crossing the left strand over the middle strand, then the right strand over the new middle strand. Continue braiding until you reach the desired length.
Step 5: Add More Colors
If you want to incorporate more colors into your bracelet, you can add new strands as you braid. To do this, simply take a new strand of yarn in your desired color, fold it in half, and place it next to one of the existing strands. Continue braiding as usual and the new color will blend with the others.
Step 6: Finishing Touches
Once you've reached the desired length for your friendship bracelet, tie a knot at the end to secure the braids. Trim any excess yarn, leaving a small tail. You can also add beads or charms to personalize your bracelets even further.
Step 7: Share and Enjoy
After completing your yarn friendship bracelets, it's time to share them with your friends. Give the bracelets as gifts or wear them together as a symbol of your friendship. They make great keepsakes that you and your friends can cherish.
Making yarn friendship bracelets without tools is a fun and creative activity that allows you to express your friendship in a unique way. With just a few simple steps, you can create beautiful bracelets that you and your friends will love. So grab some yarn, gather your friends, and start braiding to create your own personalized friendship bracelets today.
14 Fun Things to Do Near Fort Leonard Wood
You may want to see also
![]()
Yarn Pouches: Use simple crochet techniques to create small pouches or bags to hold your essential items
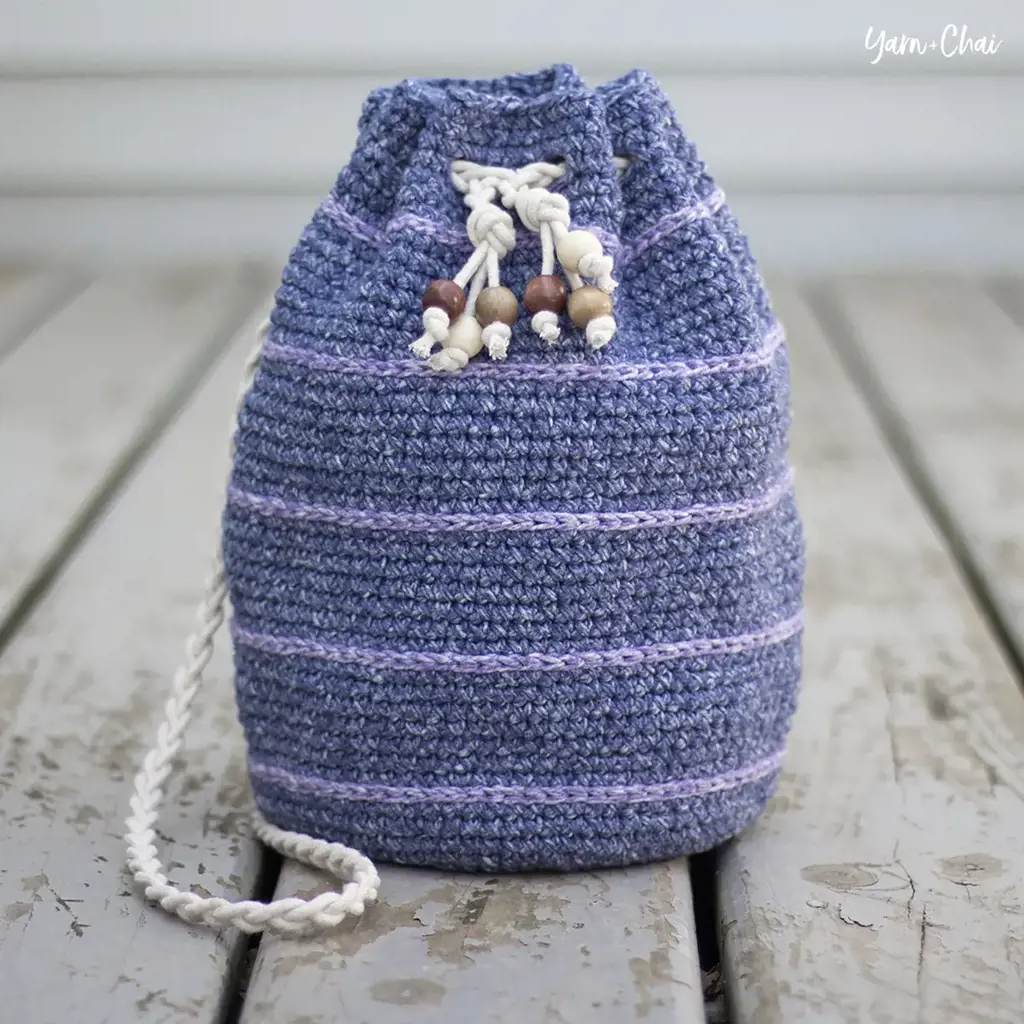
Crochet is a fun and relaxing hobby that allows you to create beautiful and useful items with just a hook and some yarn. If you're looking for something to do with yarn but don't have any tools, consider making yarn pouches. These small bags are perfect for holding your essential items like keys, lip balm, or small change. Plus, they make great gifts!
To make a simple yarn pouch, you'll need some yarn and a crochet hook. Choose a yarn that is soft but durable, and select a hook size that matches the recommended size on the yarn label. This will ensure that your stitches are the right size and that your pouch turns out the way you want it to.
To start, make a slip knot on your crochet hook and chain a foundation row of stitches. The length of your foundation row will determine the width of your pouch, so chain as many stitches as you like. If you want a pouch that is about 4 inches wide, for example, you could chain around 20 stitches.
Once you have your foundation row, turn your work and start crocheting single crochet stitches into each stitch across the row. To do this, insert your hook into the first stitch, yarn over, and pull up a loop. Yarn over again and pull through both loops on your hook. Repeat this process for each stitch across the row.
Continue crocheting rows of single crochet stitches until your pouch is the desired length. If you want a pouch that is about 6 inches long, for example, you could crochet around 12 rows.
To finish your pouch, fasten off your yarn by cutting it, leaving a 6-inch tail. Pull this tail through the last loop on your hook and tighten it to secure the end of your work. Use a yarn needle to weave in any loose ends and trim any excess yarn.
Once your pouch is complete, you can add any additional embellishments or decorations you like. Consider attaching a button or zipper to keep your items secure, or add a tassel or pom-pom for a fun touch.
Yarn pouches are a versatile and practical item that you can make without any additional tools. They are great for keeping your essential items organized in a cute and stylish way. Plus, they make excellent gifts for friends and family. So grab some yarn and a crochet hook, and start making your own yarn pouches today!
14 Fun Things to Do in Buckeye, AZ
You may want to see also
![]()
Yarn Wrapped Vases or Bottles: Give a new look to plain vases or bottles by wrapping yarn around them and securing with glue
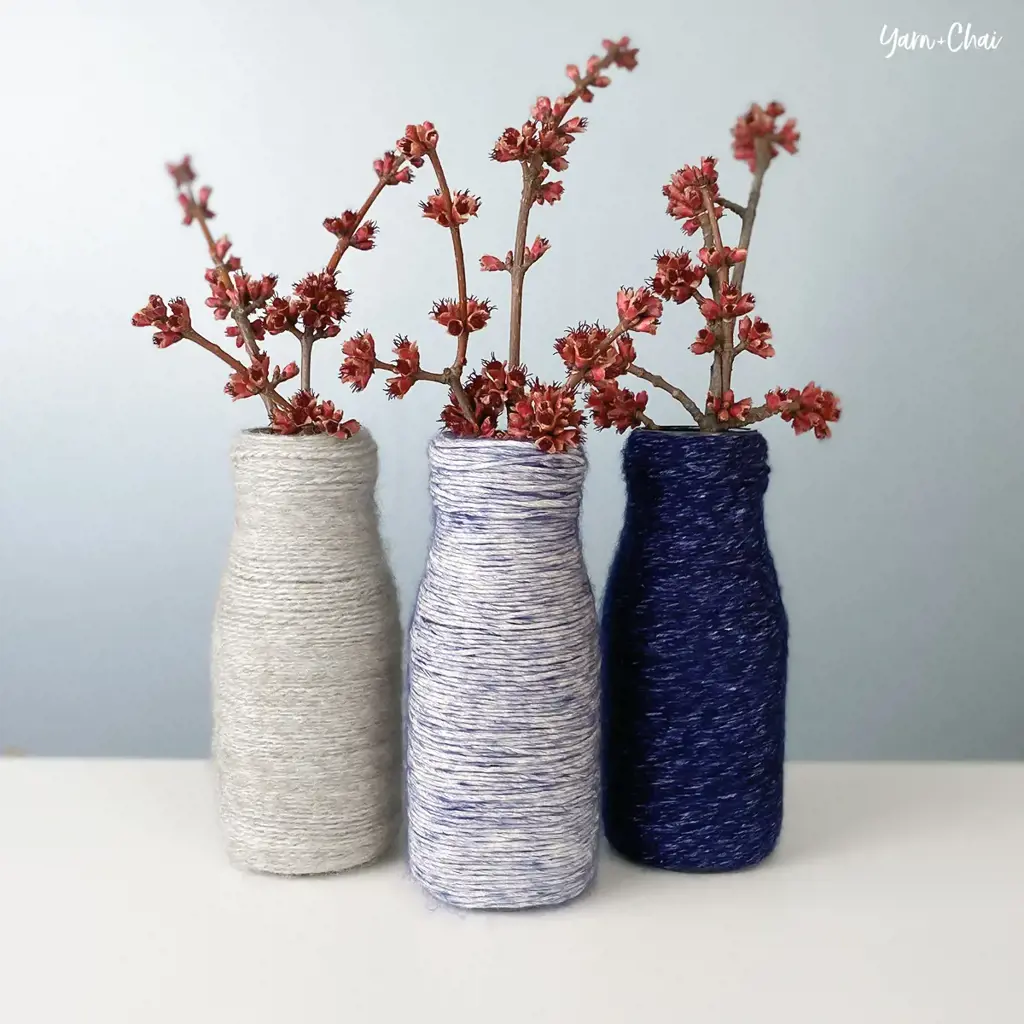
If you have some extra yarn lying around and are looking for a fun and creative way to use it, why not try yarn-wrapping some vases or bottles? This simple and easy DIY project can transform plain and ordinary objects into beautiful decorative pieces for your home. Plus, you don't need any fancy tools or equipment to get started!
Here's a step-by-step guide on how to yarn-wrap vases or bottles:
Gather your materials:
- Yarn of your choice in any color or thickness
- Plain vases or bottles
- Craft glue or a glue gun
- Scissors
Prepare your vases or bottles:
Make sure the surface of your vases or bottles is clean and free from any dirt or dust. Remove any labels or stickers if necessary.
Start wrapping:
Start by applying a small dab of glue to the bottom of your vase or bottle, near the edge. Press one end of the yarn onto the glue to secure it. Hold it in place for a few seconds until the glue sets.
Wrap the yarn:
Begin wrapping the yarn around the vase or bottle, working your way up. You can wrap it tightly or loosely, depending on the look you want. Continue wrapping the yarn until you reach the desired height or have covered the entire surface. Remember to leave a small space at the top and bottom, so the vase or bottle can still be used.
Secure the end:
Once you reach the top, cut the yarn, leaving a tail of about 2-3 inches. Apply a small amount of glue to the end of the yarn and press it onto the vase or bottle to secure it. Hold it in place for a few seconds to ensure it sticks.
Optional: Add decorative touches:
If desired, you can add extra embellishments to your yarn-wrapped vases or bottles. Attach beads, buttons, or ribbons using glue for a unique and personalized look.
Let it dry:
After completing the wrapping and any additional decorations, let the glue dry completely. This may take a few hours, depending on the type of glue you used.
Once the glue is dry, your yarn-wrapped vases or bottles are ready to be displayed! Place them on a shelf, table, or windowsill to add a pop of color and texture to your home decor. You can create multiple vases or bottles in different colors and sizes to create a cohesive look or mix and match for a more eclectic style.
Yarn-wrapping is a versatile and budget-friendly craft that allows you to customize your home decor. You can experiment with different yarn colors, textures, or even patterns to suit your personal style. So grab some yarn and start transforming your ordinary vases or bottles into eye-catching pieces that will surely impress your friends and family.
Exploring the Charm of Moore County, NC: Top Things to Do
You may want to see also
![]()
Yarn Bookmarks: Make fun and colorful bookmarks using yarn and adding beads or charms for extra flair
Yarn Bookmarks: Make Fun and Colorful Bookmarks Using Yarn
If you're looking for a creative and easy way to use your yarn stash without tools, why not try making yarn bookmarks? Not only are they fun to make, but they also make great gifts for book lovers. Plus, you can personalize them by adding beads or charms for extra flair. Here are a few simple steps to get you started:
- Choose Your Yarn: Begin by selecting a yarn color or combination of colors that you love. You can use any type of yarn that you have on hand, whether it's acrylic, cotton, or even novelty yarn.
- Measure and Cut: Measure out a length of yarn that is about twice the length of your desired bookmark. This will allow you to fold it in half and create a loop at the top. If you want a longer bookmark, you can make it longer.
- Create a Loop: Take the yarn and fold it in half, matching the ends together. This will create a loop at the top of your bookmark. Make sure the loop is large enough to fit around the corner of a book page.
- Tie a Knot: With the loop at the top, take the loose ends of the yarn and thread them through the loop. Pull the ends tight to create a knot. This will secure the loop in place.
- Add Beads or Charms: To add some extra flair to your bookmark, you can thread beads or charms onto the loose ends of the yarn before tying the knot. This will create a decorative tassel at the bottom of the bookmark. Be creative with your choices of beads or charms to match your personal style or the recipient's taste.
- Trim the Ends: Once you have tied the knot and added any desired beads or charms, you can trim the loose ends of the yarn to your desired length. You can leave them long for a boho look or trim them short for a more polished appearance.
- Explore Different Techniques: Once you have mastered the basic yarn bookmark, you can experiment with different techniques to create various patterns and designs. For example, you can try finger knitting or making pom-poms and attaching them to the bookmark.
Yarn bookmarks are a versatile and inexpensive way to get creative with your yarn stash. They make lovely gifts for friends and family, or you can simply enjoy using them in your own books. So grab your yarn, get creative, and start making some charming yarn bookmarks today!
10 Free Ways to Explore Aurora, CO
You may want to see also
Frequently asked questions
There are plenty of things you can make with yarn without using any tools! You can create pom-poms by simply wrapping yarn around your fingers and tying it in the middle. You can also make friendship bracelets by braiding multiple strands of yarn together. Additionally, you can create decorative tassels by cutting strands of yarn and tying them together at one end.
Making a yarn necklace without tools is simple! Start by cutting a long piece of yarn, long enough to fit around your neck. Fold the yarn in half and tie a knot at the folded end, creating a loop. Take the loose ends of the yarn and thread beads onto them. Once you've added enough beads, tie a knot at the end to secure them. Adjust the length of the necklace by sliding the beads up or down the yarn.
Absolutely! Creating a yarn garland without tools is easy and fun. Start by cutting several strands of yarn in your desired length. Then, fold each piece of yarn in half and tie a knot at the folded end, creating loops. Repeat this step with all the strands of yarn. Next, take a long piece of yarn and tie the loops onto it, spacing them out evenly. Once you've attached all the loops, your yarn garland is ready to hang!