As the temperatures begin to cool and the leaves start to fall, you might be thinking about pulling out your trusty leaf blower to tackle the job of clearing your yard. But did you know that your leaf blower engine can do so much more than just blowing leaves? From powering go-karts to crafting unique yard sculptures, we've got 13 fun and unexpected ways to use your leaf blower engine that will blow your mind! So put down that rake and get ready to rev up your engine in ways you never thought possible.
| Thing to Do | Description |
|---|---|
| Check Air Filter | Make sure the air filter is clean and doesn't need to be replaced. |
| Change Spark Plug | Replace the spark plug if it's worn or dirty. |
| Inspect Fuel Filter | Check the fuel filter for clogs and replace if necessary. |
| Clean Carburetor | Remove and clean the carburetor to remove any built-up debris. |
| Sharpen Blades | Sharpen the blades on the leaf blower to improve its cutting performance. |
| Check Fuel Lines | Inspect the fuel lines for cracks or damage and replace if necessary. |
| Adjust Carburetor | Adjust the carburetor to maintain an optimal fuel-to-air ratio. |
| Change Engine Oil | Change the engine oil regularly to ensure proper lubrication. |
| Check Muffler | Make sure the muffler isn't clogged with debris that could affect engine performance. |
| Inspect Fuel Tank | Check the fuel tank for leaks or damage and replace if necessary. |
What You'll Learn
- Powering a go-kart
- Inflating bounce houses
- A homemade hovercraft
- Clearing gutters
- Drying wet pavement
- Pumping water out of a flooded area
- Painting with a spray gun
- Cleaning dust from garage floors
- Running a pressure washer
- Snow blowing with a custom-made attachment
- Dusting off outdoor furniture
- Creating a confetti cannon
- Powering a mini bike or mini chopper
![]()
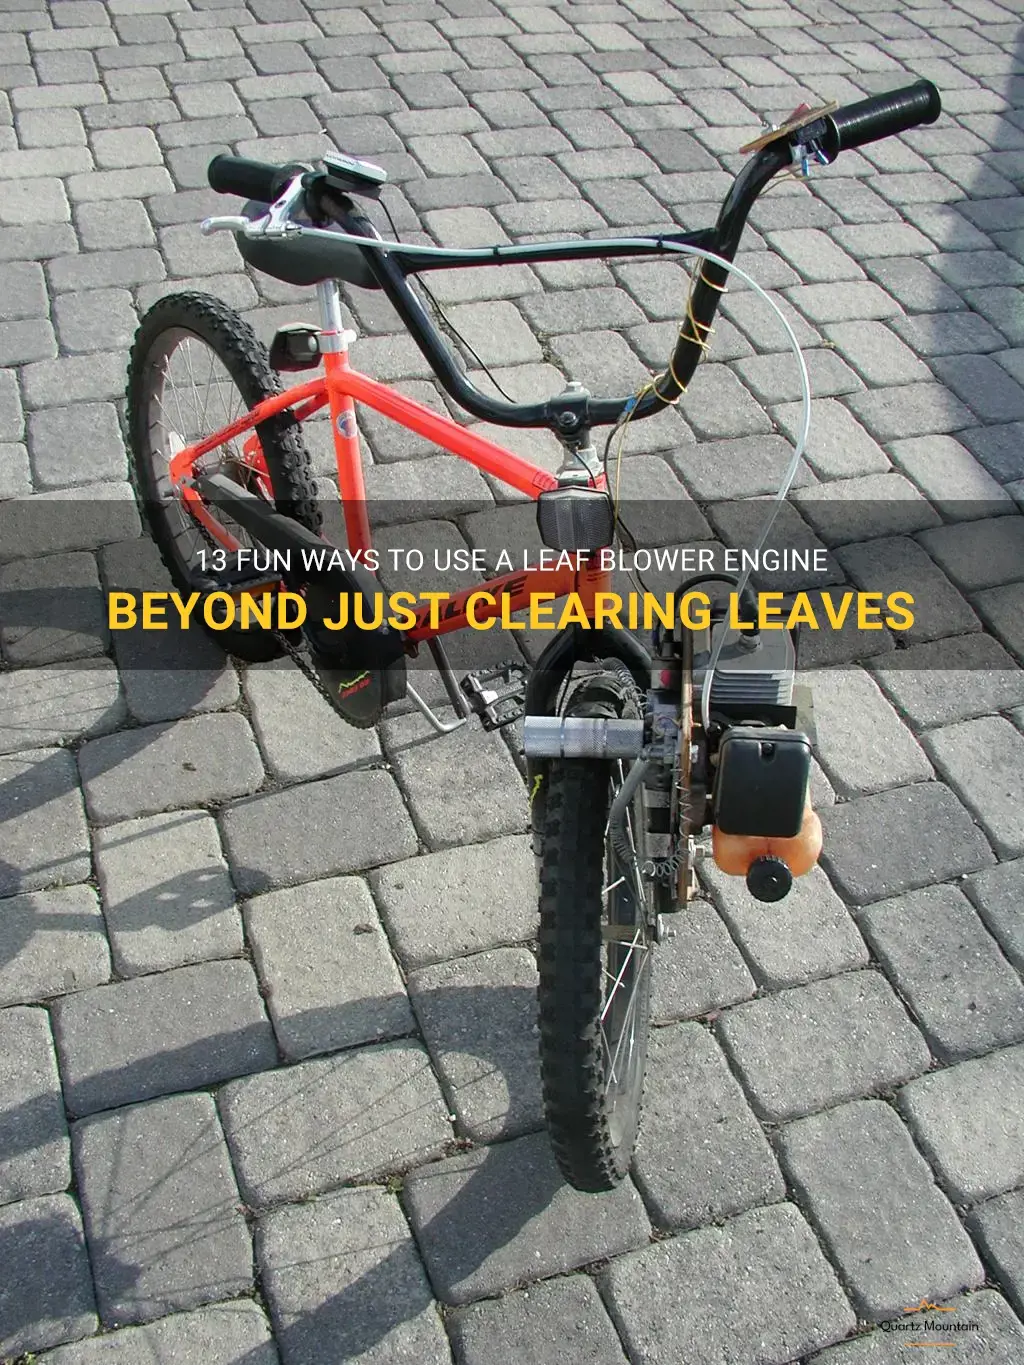
Powering a go-kart
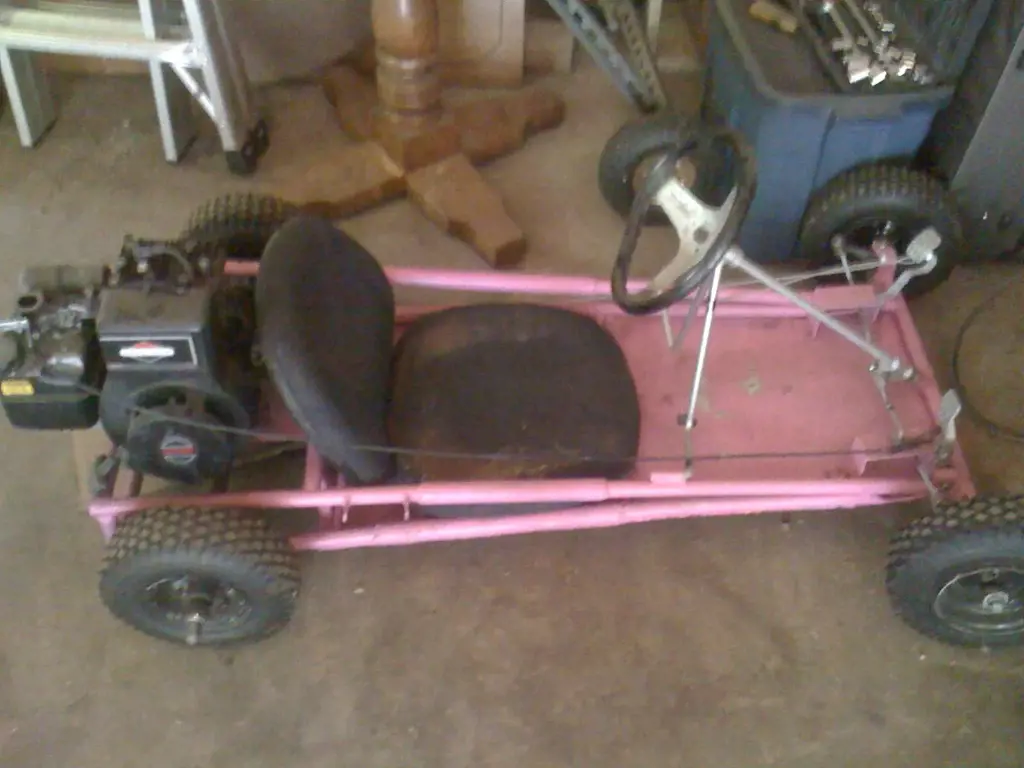
Are you looking for a fun and creative way to use your leaf blower engine? Why not try building a go-kart with it! Here are the steps you can follow to get yourself cruising the streets in no time.
Step 1: Collect Materials
You will need to gather a few materials and tools to build your go-kart. You will need a leaf blower engine, steel tubing for the frame, a go-kart steering wheel and pedal set, and tires for your go-kart. As for tools, you will need a welding machine, drill, saw, and a wrench set.
Step 2: Decide on the Design
The design of your go-kart is up to you, but it is important to make sure it is balanced and properly weighted. You can draw a sketch of your design before moving on to the next step.
Step 3: Build the Frame
Using the steel tubing, create the frame of your go-kart. Be sure to add support bars to the frame to make it more durable and strong. Once you have the frame built, use the welding machine to secure the joints in place.
Step 4: Install the Leaf Blower Engine
Using a drill, install the leaf blower engine into the frame of the go-kart. Make sure it is secure and in the right location to power the go-kart efficiently.
Step 5: Install the Steering Wheel and Pedals
Attach the go-kart steering wheel and pedal set to the frame of the go-kart. You want to make sure the driver's seat is in a comfortable position and that the pedals are adjustable to fit the feet of the driver.
Step 6: Install the Tires
Add the tires to your go-kart, making sure they are properly inflated and securely attached to the frame. This is an important step as it will determine how fast and smoothly your go-kart will operate.
Once you have completed all these steps, give your go-kart a test drive to see how it performs. Remember to use caution when operating your go-kart and always wear a helmet and protective gear. Building a go-kart using a leaf blower engine is a fun and rewarding project that will give you many hours of enjoyment!
12 Best Things to Do in Station Square: A Comprehensive Guide
You may want to see also
![]()
Inflating bounce houses
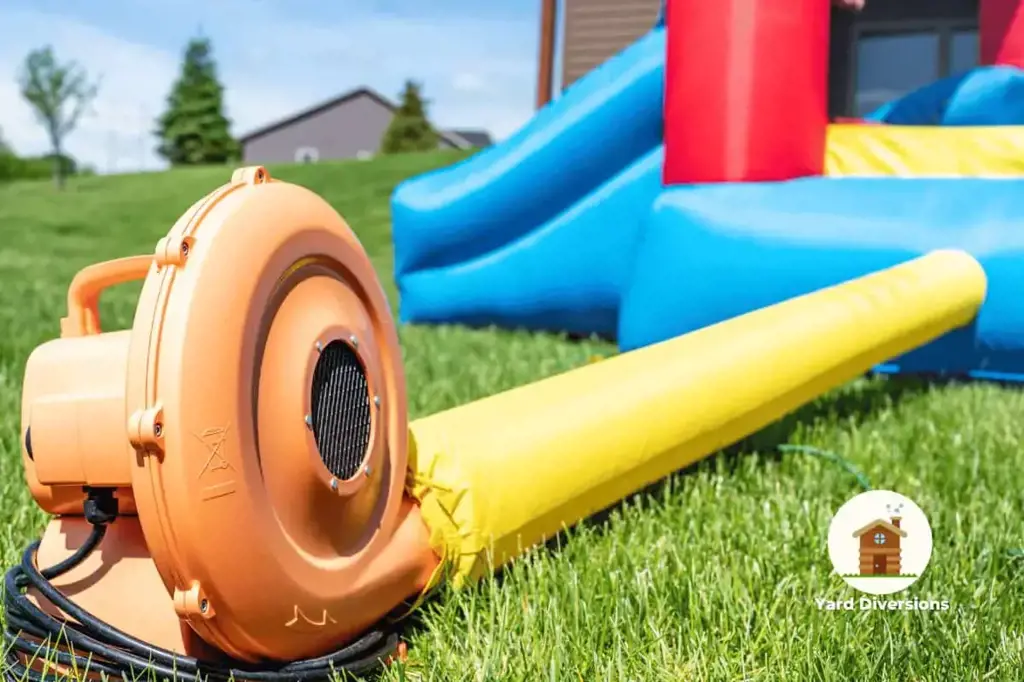
Are you tired of manually inflating your bounce house for parties and events? Look no further than your trusty leaf blower engine! With the right attachments and safety precautions, inflating a bounce house with a leaf blower can save you time and effort.
First, make sure you have a high-powered leaf blower with enough airflow to inflate the bounce house. Attachments specifically designed for inflating bounce houses can be purchased online or at a hardware store. These attachments often include a long, flexible tube and a nozzle that fits into the bounce house valve.
Before inflating, ensure your bounce house is clean and dry. Any moisture or debris can clog the blower and cause safety hazards. Also, make sure the bounce house is securely anchored to the ground to prevent it from blowing away during inflation.
Once you’ve attached the blower and nozzle, turn on the engine and begin inflating the bounce house. It’s important to regularly check the bounce house for proper inflation and adjust the blower as needed. Once the bounce house is fully inflated, turn off the engine and remove the nozzle from the valve. Double check that all anchors are secure before allowing children to enter the bounce house.
It’s important to never leave a running leaf blower unattended or allow children to operate it. Always read the manufacturer’s instructions and take proper safety precautions.
Overall, inflating a bounce house with a leaf blower engine can be a convenient and efficient option for your next event. With the right tools and safety measures, you can save time and energy while still providing a fun activity for children.
10 Awesome Things to Do with Kids in Grafton, MA
You may want to see also
![]()
A homemade hovercraft

If you’re looking for a fun and unique way to use your leaf blower engine, why not try making a homemade hovercraft? This project is sure to keep you busy and provide hours of enjoyment for the whole family.
First, you’ll need to gather some materials. You’ll need a piece of plywood for the base, a tarp or heavy-duty garbage bag for the skirt, a leaf blower engine with an impeller, some PVC pipe and fittings, and some screws and bolts. You can find most of these materials at your local hardware store.
Start by cutting the plywood into a 4-foot circle. Drill a hole in the center of the circle that is slightly larger than the impeller on your leaf blower. Next, cut the tarp or garbage bag into a circle that is about 2 feet larger in diameter than the plywood. Attach the tarp or bag to the edges of the plywood using screws or bolts. Make sure to leave one side open for the air from the leaf blower to escape.
Now it’s time to attach the PVC pipe and fittings to the underside of the plywood. Cut four pieces of PVC pipe to the desired length for the hovercraft’s skirt and attach them to the plywood using screws or bolts. Make sure they are evenly spaced and level. Next, attach a T-shaped PVC fitting to the center of the plywood, with the top of the T facing up. Attach a short piece of PVC pipe to this fitting, pointing straight up.
Now it’s time to attach the leaf blower engine. Secure the engine to the plywood using screws or bolts, with the impeller facing down through the hole in the center of the circle. Attach the end of the leaf blower’s air nozzle to the PVC pipe that is pointing straight up, using duct tape or a hose clamp.
Finally, it’s time to test your hovercraft. Turn on the leaf blower and watch as the air fills the skirt under the plywood, causing it to lift off the ground. With a little practice, you’ll be able to maneuver your homemade hovercraft around your yard, driveway, or even a nearby pond or lake.
This project is a great way to use your leaf blower engine in a fun and creative way. It’s also a great way to encourage creativity and learning in children, as they learn about the principles of physics and aerodynamics. So why not give it a try and see what kind of hovercraft you can create?
13 Exciting Activities to Try in Switzerland During April
You may want to see also
![]()
Clearing gutters
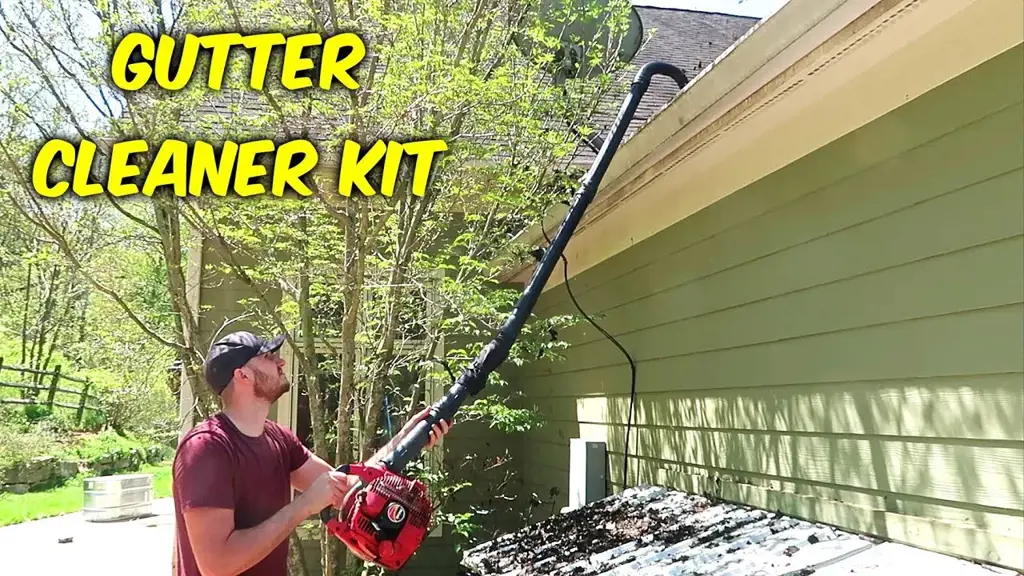
Safety First
Before you start using your leaf blower engine to clean your gutters, ensure you have all the necessary safety equipment, including gloves, goggles, and a sturdy ladder. Check all power lines, branches, and nearby hazards. Keep in mind that the engine blower produces loud noise, so wear ear protection.
Clean The Gutter Channels
Start by positioning the ladder near your home's gutters. Remove debris like leaves, twigs, and dirt using your hands or a small garden trowel. Next, use a large stick to loosen and remove any clumps of debris that you can’t get with your hands.
Prepping the Leaf Blower Engine
Once you remove debris from the gutters, you can fire up your leaf blower engine. Ensure you mix fuel according to the manufacturer's recommendations or your local gas station for best results. Before you start the engine, clear any debris around the engine and prepare to mount it onto the blower tube. Attach lightweight duct tubing to the blower tube carefully and gently from the ground. This way, you can easily reach the gutters without climbing onto the roof.
Clearing The Gutters
After you have your leaf blower engine running, start with the farthest point from the downspout and use your leaf blower to blow debris along the gutter towards the opening. Use a slower blowing setting to ensure you don't scatter debris elsewhere. Be sure to adjust the blower tube as you go along.
Clean up
Once you have cleared the gutters, ensure you clean up the debris on the ground and return the leaf blower engine to your storage area. Be sure not to dispose of debris into storm drains, waterways, flowerbeds, or other areas that could cause clogging hazards.
In summary, your leaf blower engine is a versatile tool that can help you with many household chores, including clearing your gutters. It saves time and energy, and it's an easy way to avoid having to climb onto your roof. Follow the tips outlined above, and you'll have clear gutters in no time.
12 Fun Things to Do on Pine Island
You may want to see also
![]()
Drying wet pavement
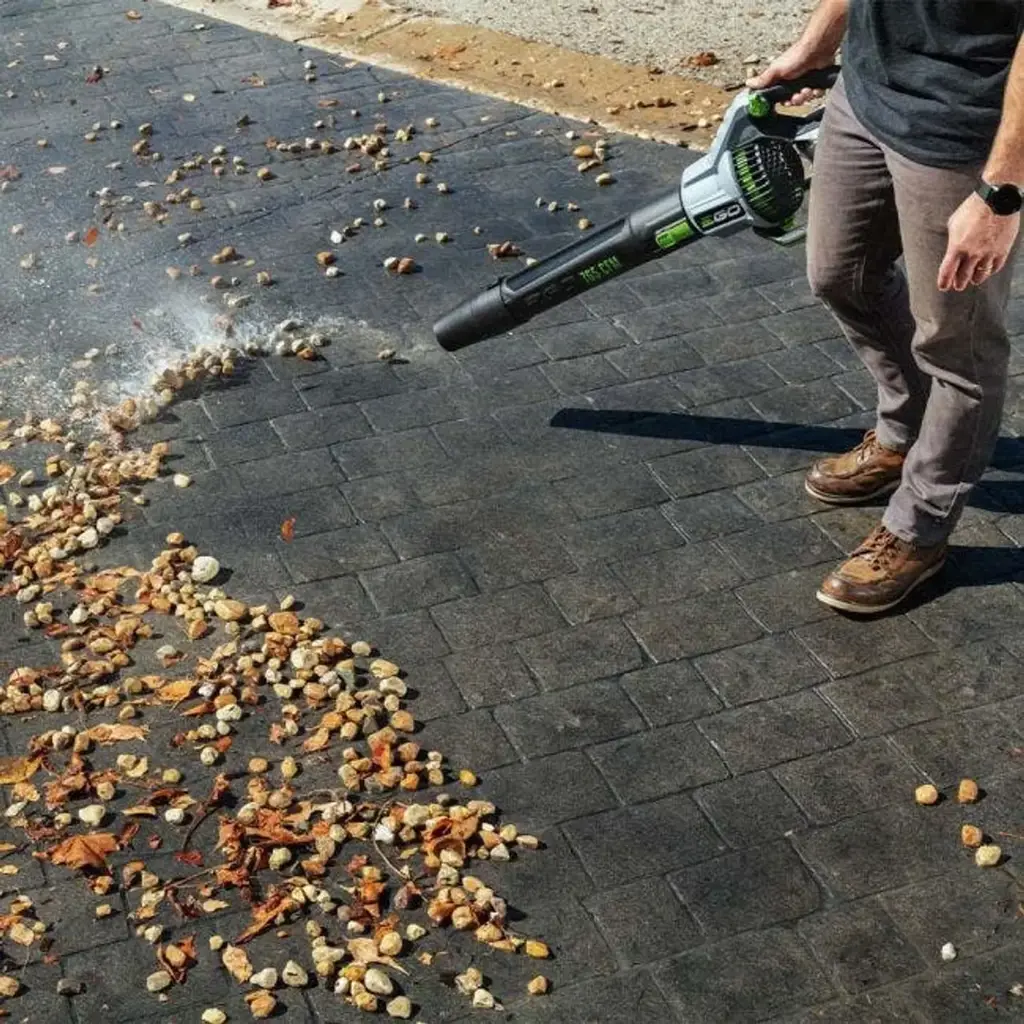
Leaf blowers have long been useful tools for clearing leaves, debris, and other debris from yards and gardens. However, you might not have thought of another practical use for your leaf blower engine – drying wet pavement.
- Ensure that the pavement is safe to drive or walk on: Before you start drying wet pavement, make sure it is safe to drive or walk on. Check for any puddles of water that may indicate a deeper issue with the pavement surface.
- Work in sections: Start by dividing the pavement into sections that are easy to manage. Begin at one end of the area and work your way towards the other end. Ensure that your blower is on the highest setting to achieve the best results.
- Use the nozzle carefully: To dry the pavement effectively, use the nozzle to direct the airflow downwards, as close to the surface as possible, to force the water off the surface. Use back and forth motions, or circular ones if you prefer, to ensure the entire section is dried of surface water.
- Work carefully around the edges: Pay close attention to the edges as water tends to accumulate there. Use the nozzle to direct the airflow towards the center of the pavement, where it can be blown away.
- Repeat as necessary: After you complete drying one section, move on to the next one and repeat the process. Focus on the areas where water is more likely to accumulate, such as low spots, slopes, curbs, and gutters.
- Keep safety in mind: It is essential to be careful when using a leaf blower engine. Always wear eye and ear protection. Check the leaf blower thoroughly before use to ensure there are no leaks or other problems.
In conclusion, using a leaf blower engine for drying wet pavement is a safe and efficient way to maintain surfaces, especially in areas that receive significant rainfall. With these steps, you can easily clear the water and minimize the chances of accidents. Always prioritize safety when using any tool, including your leaf blower engine.
13 Fun Activities for Daddy and Daughter Bonding Time
You may want to see also
![]()
Pumping water out of a flooded area
Having a leaf blower engine can come in handy during unexpected situations such as floods. Many people don't realize that this type of engine can be used to pump water out of a flooded area. In this article, we'll take a look at how to use a leaf blower engine for this purpose.
First and foremost, it's important to note that only certain types of leaf blower engines can be used for pumping out water. Specifically, you'll need a backpack leaf blower or a handheld blower with a 4-stroke engine. These engines are more powerful and durable, making them better suited for this job.
Once you've identified the right type of leaf blower engine, it's time to prepare the unit for use as a water pump. This involves removing the leaf blower's impeller and air filter to allow for better air flow. You should also remove the spark plug to prevent any potential accidents that could occur while the engine is running.
Next, you'll need to attach a hose to the leaf blower's intake port. This hose should be long enough to reach the flooded area that you need to pump water from. Ideally, the hose should also be made from a durable material such as PVC or rubber to prevent any leaks during operation.
Now that you're ready to pump water out of the flooded area, it's time to start up the leaf blower engine. You'll want to set it to full throttle to achieve maximum power output. As the engine begins to run, make sure to keep an eye on the water level in the flooded area to ensure that it's actually being pumped out.
Once you've pumped out all the water from the area, it's time to shut down the leaf blower engine and detach the hose. At this point, you can inspect the engine and clean any debris that may have accumulated during the pumping process. You should also reattach the impeller and air filter to prepare the engine for regular leaf blowing tasks.
In conclusion, a leaf blower engine can be a valuable tool for pumping water out of a flooded area. However, it's important to use the right type of engine, prepare it correctly, and follow proper safety measures to avoid any accidents. With these guidelines in mind, you can use your leaf blower engine to tackle unexpected flooding situations with ease.
13 Exciting Outdoor Activities in Northern Virginia.
You may want to see also
![]()
Painting with a spray gun
If you are a DIY enthusiast, you must have a leaf blower lying around in your house. Have you ever thought about using its engine for a different purpose, such as painting? With a few modifications, a leaf blower engine can power a spray gun to enable you to paint with ease and speed. Here are some tips on how to paint with a leaf blower engine using a spray gun.
The first step is to assemble the necessary supplies. You will need a spray gun, a leaf blower engine, and a mounting bracket that will attach the two together. You may also require some bolts, nuts, and washers to secure the engine to the bracket.
Next, mount the engine to the bracket according to the instructions given. Most engines come with pre-drilled holes that allow them to be attached to a mounting bracket. You will need to make sure that the bracket is sturdy and doesn't wobble when the engine is in motion.
Once the engine is fixed to the bracket, you can attach the spray gun. The spray gun should be able to fit snugly onto the engine's opening where the blower tube was affixed. Fix the spray gun to the engine according to the manufacturer's instructions.
After attaching the spray gun, connect the engine to a power source, such as a battery or wall outlet. Test the engine to ensure that it is functioning correctly. Once all the connections are made and the engine is running smoothly, you can begin to paint.
When you start painting, you should adjust the pressure of the spray gun until it is just right. The pressure should be high enough to propel the paint from the spray gun, but not so high that it causes the paint to splatter. You can adjust the pressure using the regulator on the spray gun.
As you paint, you should move the spray gun back and forth in a steady motion to cover the surface evenly. Keep the spray gun a consistent distance from the surface and move it at a constant speed as you work. If you move the spray gun too quickly or too slowly, it can affect the thickness and consistency of the paint that is applied.
Once you have completed painting, you can detach the spray gun from the engine, and you can store the engine away until your next painting project.
In conclusion, using a leaf blower engine to power a spray gun can be an effective way to paint larger surfaces quickly and efficiently. With a few simple modifications and proper technique, you can achieve a professional-looking finish that will make any DIY project look fantastic. Give it a try, and you'll see how easy it can be!
14 Exciting Things to Do in Green Valley, Arizona
You may want to see also
![]()
Cleaning dust from garage floors
When it comes to leaf blower engines, most people only think of using them for their intended purpose - blowing away leaves and debris from the lawn. However, these high-powered engines can be very versatile and useful in many different situations. One such use is cleaning dust from garage floors.
If you have a garage, you know how quickly dust can accumulate on the floor. Even if you sweep regularly, it can be difficult to clean all the dust and debris from every nook and cranny. This is where a leaf blower engine can come in handy. By using the powerful air flow from the blower, you can easily and quickly blow away all the dust, dirt, and debris from your garage floor.
Here are a few steps to follow when using your leaf blower engine to clean your garage floor:
Step 1: Clear the Area
Before you start blowing dust around your garage, it is important to move any items or objects that could get damaged or blown away. Make sure to clear the area around your garage so that you have plenty of space to work in.
Step 2: Put on Protective Gear
Cleaning with a leaf blower engine can be dusty work, so it is important to protect yourself. Wear safety glasses to protect your eyes from dust and debris, as well as a mask to prevent inhaling any dust. It is also a good idea to wear gloves to protect your hands.
Step 3: Start Blowing
Once you have cleared the area and put on your protective gear, it's time to start blowing. With the blower in hand, start at the back of your garage and work your way toward the front, blowing all the dust and debris toward the open door. Use a sweeping motion to ensure you cover the entire floor evenly.
Step 4: Sweep Up
After you've blown away all the dust and debris, you'll likely have a pile of dirt and dust left over. Use a broom and dustpan to sweep it up and dispose of it properly.
In conclusion, a leaf blower engine can be a great tool to help clean dust from garage floors. By following these simple steps, you can keep your garage clean and tidy without having to spend hours sweeping and cleaning. So the next time you need to clean your garage, consider using your leaf blower engine to make the job quick and easy.
10 Best Things to Do in Branson in February
You may want to see also
![]()
Running a pressure washer
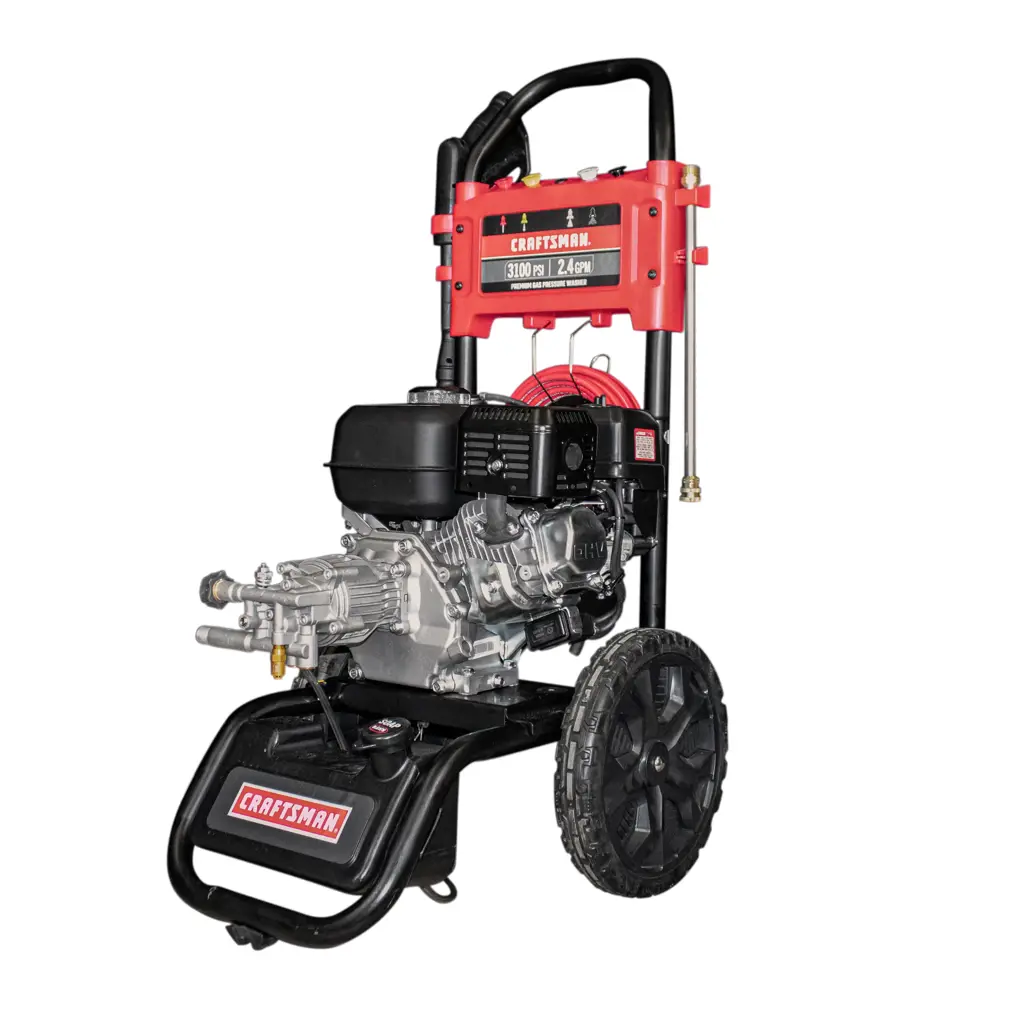
If you have a leaf blower engine sitting around, it might seem like a waste to just let it gather dust. However, repurposing it for another use can make it a valuable tool. One option is to turn it into a pressure washer, perfect for cleaning driveways, patios, and siding. Here's what you need to know to get started.
Supplies
In order to convert your leaf blower engine to a pressure washer, you'll need a few basic supplies. These include:
- A pressure washer pump
- An engine mounting bracket
- A water inlet valve
- A pressure hose
- A spray gun with nozzles
Conversion Process
The first step is to remove the engine from the leaf blower housing and mount it onto the engine bracket. Then, attach the pressure washer pump to the engine mounting bracket. Once that's done, connect the water inlet valve to the pump. Make sure the water source is connected to the inlet valve.
Next, connect the pressure hose to the pump's outlet valve, and then attach the spray gun to the other end of the hose. Finally, attach the desired nozzle to the spray gun.
Using Your Pressure Washer
Now that your leaf blower engine has been converted to a pressure washer, it's time to put it to use. You'll need to fill the pump with water before turning on the engine. Once the engine starts running, the pump will begin building up pressure. You can then use the spray gun and nozzle to direct the water where you need it, adjusting the pressure and flow as needed.
Safety Considerations
When working with any type of mechanical equipment, it's important to take safety into account. When using your pressure washer, make sure to wear appropriate safety gear, such as eye protection and gloves. Always make sure the water pressure and flow are appropriate for the surface you're cleaning, as too much pressure can cause damage. Finally, be careful when operating the spray gun, as the high pressure stream can cause injuries if not used properly.
Converting your leaf blower engine into a pressure washer is a great way to breathe new life into an old tool. With a few basic supplies and some know-how, you can have a valuable cleaning tool at your disposal. Remember to prioritize safety when using your pressure washer, and enjoy the results of a job well done.
13 Fun Activities to Explore in Hayes Valley
You may want to see also
![]()
Snow blowing with a custom-made attachment
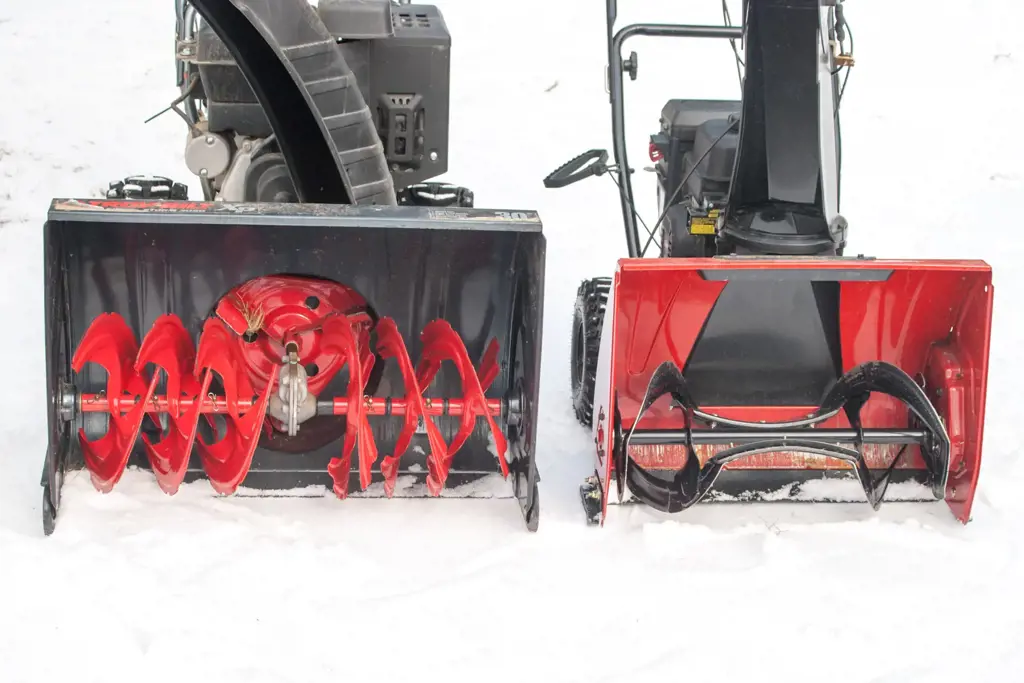
If you own a leaf blower engine and live in an area that receives snowfall, you may be wondering what other uses you can get out of your machine. While leaf blowers are great for clearing away yard debris, they can also be used for snow blowing with a custom-made attachment. In this article, we’ll explore how you can turn your leaf blower engine into a powerful snow blower.
First, you’ll need to determine if your leaf blower engine is strong enough for snow blowing. Most gas-powered leaf blowers range in engine size from 20cc to 80cc. If you have a larger engine, it may be powerful enough to clear snow easily. However, if you have a smaller engine, you may need to look into purchasing a higher-powered leaf blower or consider using it only for light snowfalls.
Assuming your engine is capable of snow blowing, the next step is to create a custom attachment for your leaf blower. This can be done using a PVC pipe, elbow joints, and a few other supplies readily available at your hardware store. The final result will be a nozzle attached to your leaf blower that can direct airflow towards the snow, effectively moving it out of the way.
Once you’ve built your snow-blowing attachment, it’s time to put it to the test! Before you start, make sure to dress appropriately, with warm clothes, gloves, and boots to protect you from the cold and snow. Make sure to also take care of your leaf blower engine with regular maintenance, including checking oil levels and cleaning the air filter.
Using your custom attachment, start directing the airflow towards the snow, starting from one end of your driveway or sidewalk and working your way towards the other end. Keep the nozzle close to the ground to ensure maximum effectiveness, but be careful not to suck up any rocks or other debris that may be hidden in the snow.
While snow blowing with a leaf blower engine may not be as powerful as a dedicated snow blower, it can still get the job done in a pinch. Plus, it’s a cost-effective option for those who already own a leaf blower. With a little creativity and DIY spirit, you can turn your leaf blower engine into a versatile tool for all seasons.
12 Awesome Free Things to Do in Traverse City
You may want to see also
![]()
Dusting off outdoor furniture
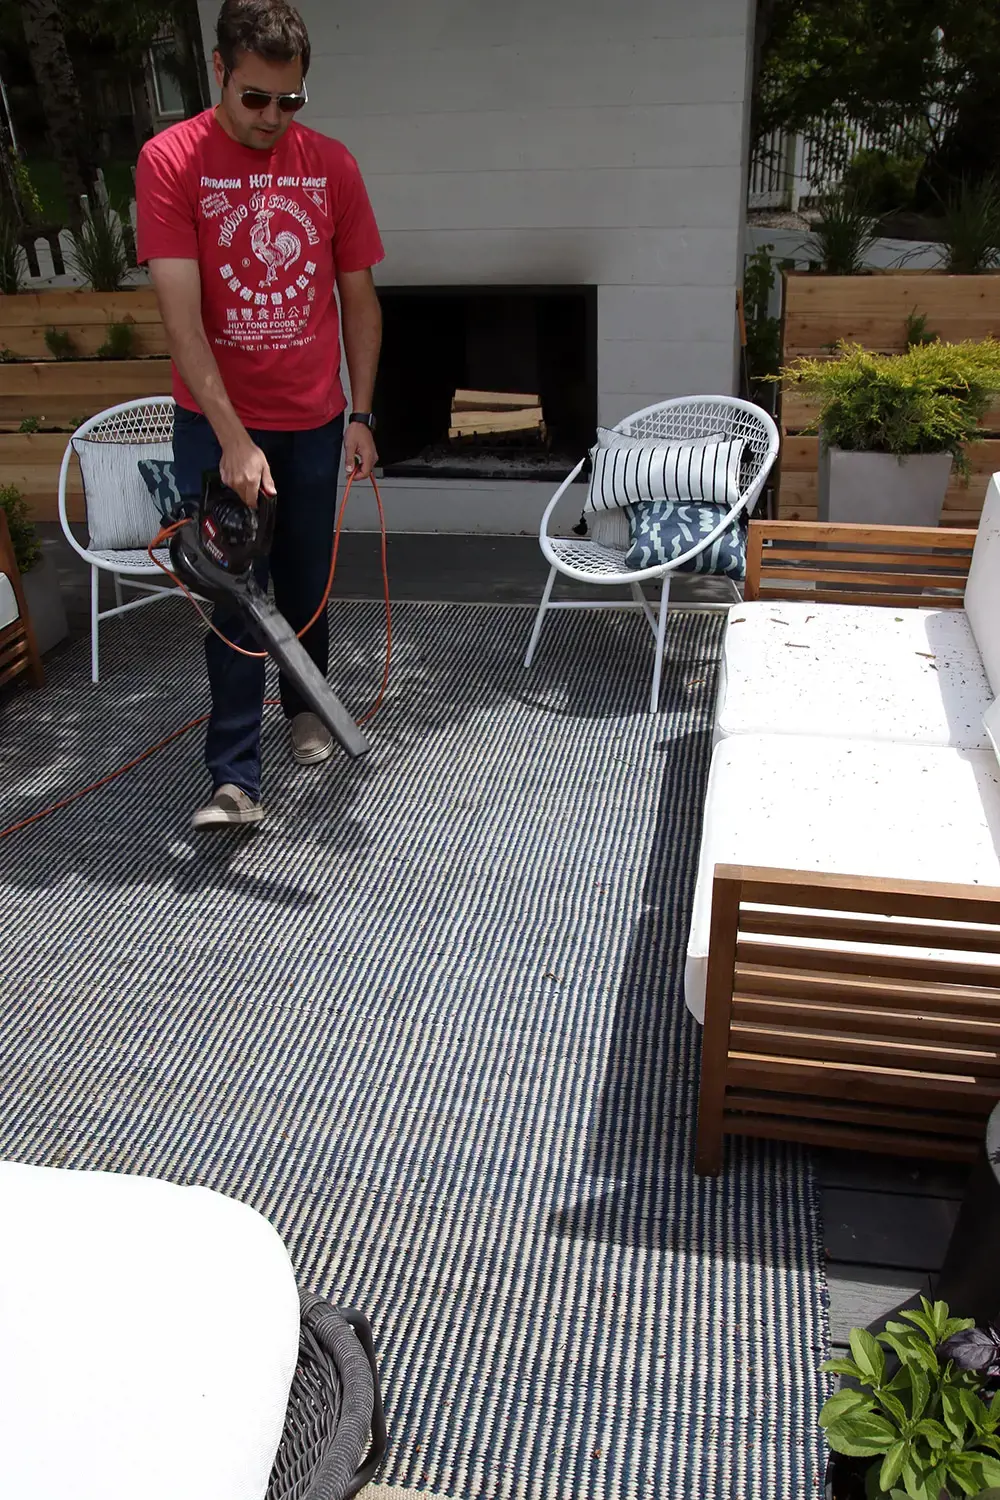
Having a leaf blower engine at your disposal can open up a world of possibilities for tasks both big and small around your home and garden. One handy use for a leaf blower engine is for dusting off your outdoor furniture. Over time, outdoor furniture can collect various forms of dirt, dust, debris, and other loose particles. If left unaddressed, this buildup can not only make your furniture look unsightly, but it can also render it unusable if it becomes too dirty or dusty.
Fortunately, using your leaf blower engine can make quick work of removing these unwanted particles and restoring your outdoor furniture to its former glory. Start by grabbing a clean cloth or rag and your leaf blower engine. Make sure that your engine is in good working order, with plenty of fuel and air-filter cleaned, so that it can perform its best.
Next, take your furniture to an open, flat, and preferably dry area, such as a driveway or patio, where you can easily access all sides of the item. If possible, remove any cushions, pillows, or other detachable parts and place them aside.
Using your cloth or rag, wipe down the entire surface of the furniture, being sure to remove any loose debris or dirt. Pay extra attention to those hard-to-reach areas or tight crevices where dirt can accumulate.
Once you've wiped down your furniture, it's time to fire up your leaf blower engine. Hold the nozzle of your engine about a foot away from your furniture and turn it on, directing the airflow over the entire surface of your furniture. Make sure to keep your engine nozzle moving in a fluid motion, never staying in one spot too long to avoid scratching or damaging the furniture.
As you use your leaf blower engine to clean your outdoor furniture, you'll notice that the dust and debris quickly flies off and drifts away. Continue to work your way around the item, being thorough and covering all sides. Once you're satisfied, turn off your leaf blower engine and give your furniture a quick once-over with the cloth or rag once more to remove any remaining dirt or debris.
Reattach any cushions and pillows, and your outdoor furniture should be looking clean and refreshed in no time. With your trusty leaf blower engine, it's easy to tackle this cleaning task and many others around your home and garden.
11 Fun Things to Do in Midway, Utah
You may want to see also
![]()
Creating a confetti cannon
If you have an old leaf blower engine lying around and are looking for a fun project, why not turn it into a confetti cannon? This DIY project is not only easy to make, but also extremely entertaining for parties or events. Here's what you need to know to get started.
Materials:
- Leaf blower engine (with a functioning pull cord)
- PVC pipe (8-9 inches long)
- PVC end cap (1 inch in diameter)
- PVC adapter (1 inch to 2 inches in diameter)
- Drill
- Two large hose clamps
- Electric tape
- Confetti (buy or make your own)
- Smoke canister (optional)
Instructions:
- Remove the leaf blower engine from the blower housing and place it on a flat workspace. Make sure the pull cord is functioning properly.
- Take your PVC pipe and drill a hole in the center of one end cap, big enough for the leaf blower engine exhaust to fit through. Insert the end cap onto one end of the PVC pipe.
- Next, attach the PVC adapter to the other end of the PVC pipe, using a large hose clamp to tighten it in place.
- Slide the PVC pipe onto the exhaust of the leaf blower engine and secure it with the second large hose clamp.
- Wrap electric tape around the hose clamps to cover any sharp edges and ensure the fit is secure.
- Fill the PVC pipe with confetti. Be sure to pack it tight so it shoots out with force.
- Now your confetti cannon is ready to fire. Hold onto the leaf blower engine by the handle and pull the cord to activate the engine. This will create enough air pressure to shoot the confetti out of the PVC pipe.
Additional Tips:
- For added effect, you can insert a smoke canister into the PVC pipe along with the confetti. This will create a cloud of colorful smoke as the confetti shoots out. However, be sure to follow instructions carefully for safe use of smoke canisters.
- You can customize your confetti cannon by using different colors and shapes of confetti.
- Always wear eye protection when working with power tools or explosives.
Overall, turning a leaf blower engine into a confetti cannon is a fun and affordable way to add some excitement to your next event or party. Give it a try and enjoy the show!
11 Fun Activities to Enjoy in Carroll County This Weekend
You may want to see also
![]()
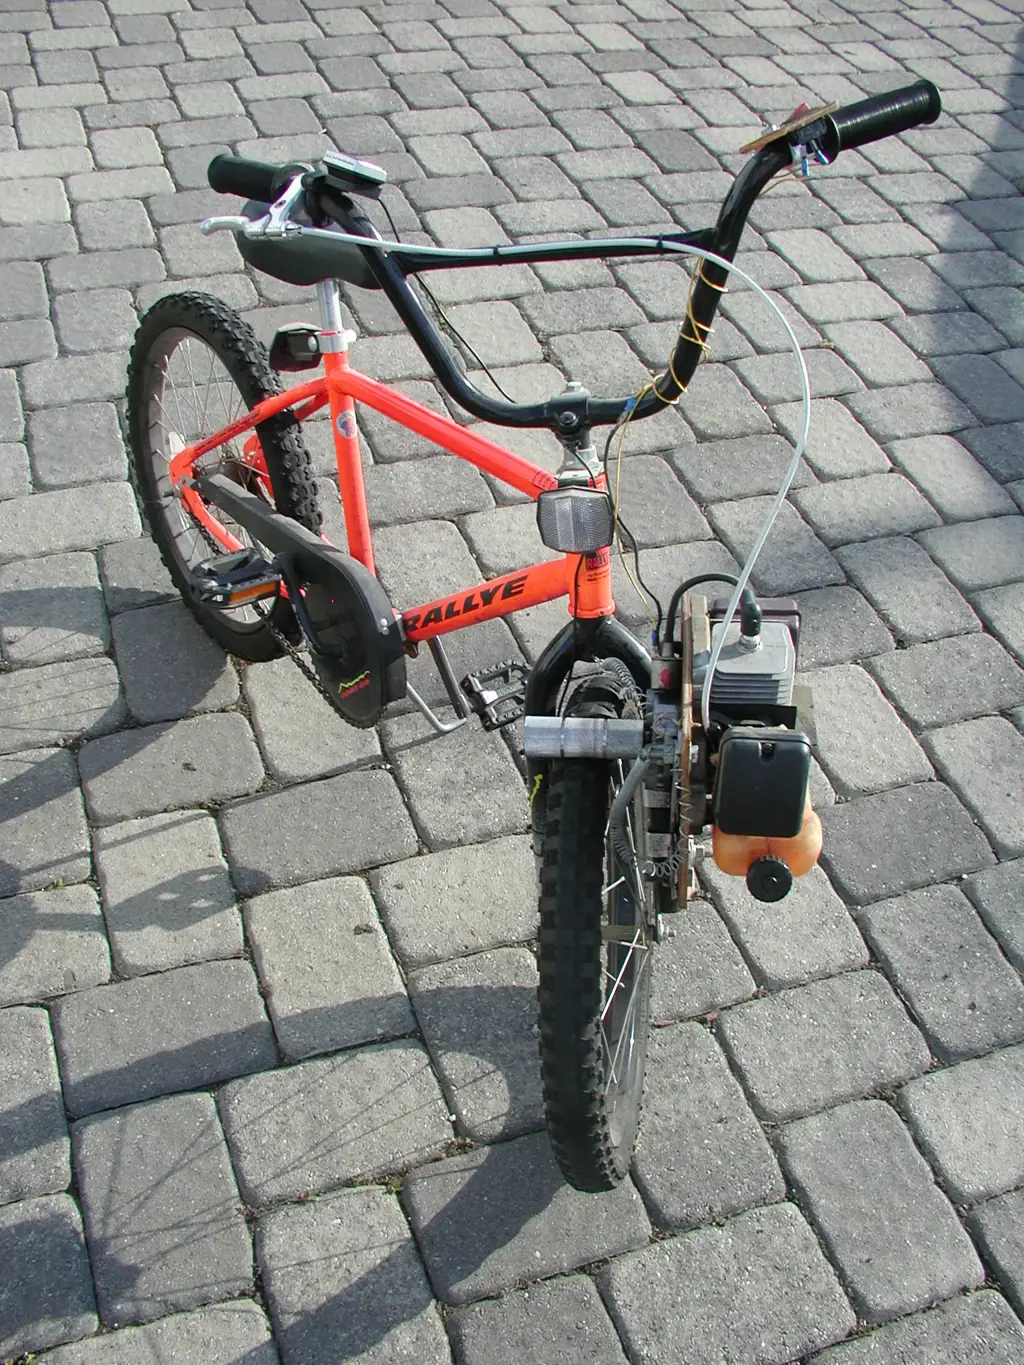
Powering a mini bike or mini chopper
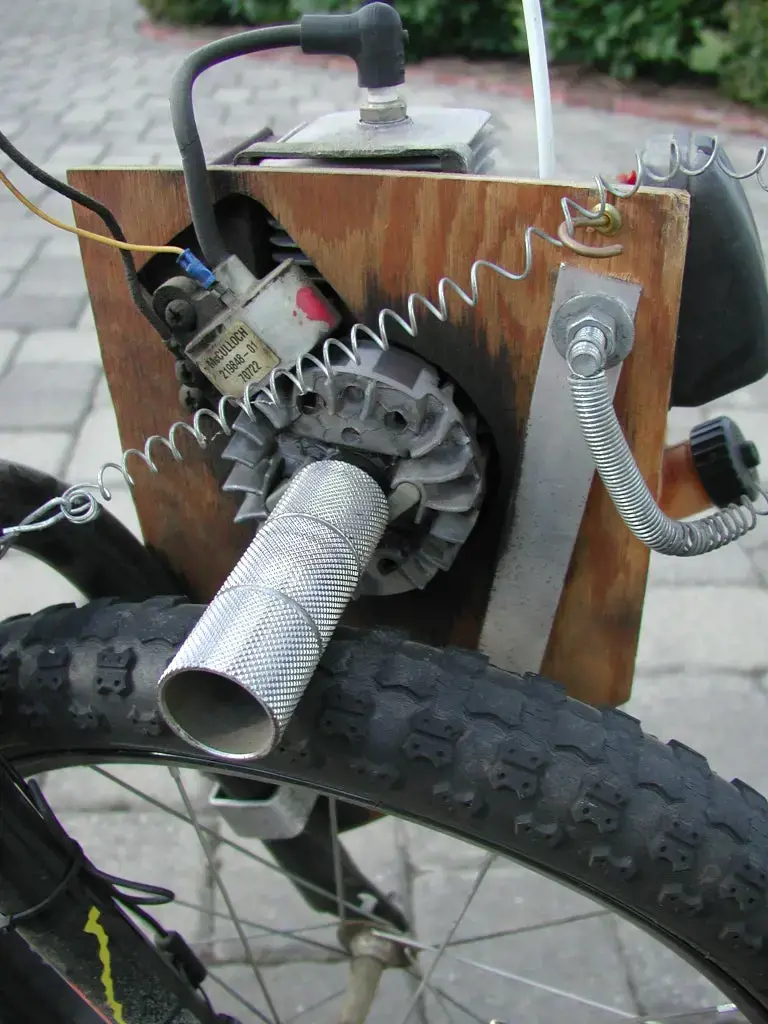
Are you wondering what to do with that old leaf blower engine that's been sitting in your garage? How about building a mini bike or mini chopper? By repurposing the engine, you can create a powerful ride that's perfect for kids or adults. In this article, we'll show you how to use a leaf blower engine to power your own mini bike or mini chopper.
First, you'll need to gather supplies. You'll need a leaf blower engine, a metal frame, a chain drive, rear axle, tires, gas tank, and throttle. You can find these items at any hardware store or online retailer. You'll also need basic hand tools like a wrench, screwdriver, and pliers.
Start by building the frame. Your frame should be sturdy and able to support the weight of the rider and the engine. You can use metal tubing, angle iron, or any other sturdy material that you have on hand. Use your welding skills to connect the pieces together and form the basic shape of your mini bike or mini chopper.
Next, attach the rear axle. Make sure it's sturdy enough to handle the weight of your engine, and that it's positioned correctly to support the chain drive. The chain drive should attach to the engine's output shaft and the rear axle. This will transfer power from the engine to the wheels.
Install tires that are appropriate for the terrain you'll be riding on. If you're planning to ride on rough terrain, you'll need sturdy, knobby tires that can handle the bumps and shocks. Street tires are fine for smooth pavement or asphalt. Install the gas tank in a convenient location, and run the fuel line up to the engine.
Attach the throttle to the handlebars. This will allow you to control the speed of your mini bike or mini chopper. Connect the throttle cable to the engine, so that you can control the acceleration.
Finally, add any finishing touches to your mini bike or mini chopper. Install a seat, add a paint job, and add any accessories that you want. Then, take your new ride for a spin!
With a little bit of creativity and ingenuity, you can turn an old leaf blower engine into a powerful mini bike or mini chopper. This project requires some welding and mechanical skills, so make sure you're comfortable with the process before you get started. With the right tools and supplies, you can create a ride that's both fun and functional.
12 Must-Do Activities in Skiathos Islands for Tourists
You may want to see also
Frequently asked questions
It is recommended to change the oil in your leaf blower engine after every 25 hours of use or at least once a year to ensure proper lubrication and engine performance.
Always check the manufacturer's instructions, but most leaf blower engines require a fuel that is a mixture of gasoline and oil (often a 50:1 ratio). Using the wrong type of fuel can damage the engine.
Excessive smoking can be a sign of an oil leak or other engine issue. It is best to turn off the engine and consult a professional for repairs. In general, routine maintenance and regular cleaning can help prevent excessive smoking and other engine problems.


5 Comments
Yousuf Kaufman
Zachary Lloyd
Duke Trotter
AuthorConnie Oliver
Leki Bora
Author